<?xml version="1.0" encoding="utf-8"?><feed xmlns="http://www.w3.org/2005/Atom" ><generator uri="https://jekyllrb.com/" version="3.10.0">Jekyll</generator><link href="https://ritviknag.com/feed.xml" rel="self" type="application/atom+xml" /><link href="https://ritviknag.com/" rel="alternate" type="text/html" /><updated>2026-04-17T02:23:36-04:00</updated><id>https://ritviknag.com/feed.xml</id><title type="html">Ritvik Nag</title><subtitle>Senior Software Engineer (automation, backend). M.S. (AI/ML). Runner pursuing a half marathon in all 50 states.</subtitle><author><name>Ritvik Nag</name><email>me@ritviknag.com</email></author><entry><title type="html">Half Marathons by State: My 50-State Running Journey</title><link href="https://ritviknag.com/blog/half-marathons-by-state/" rel="alternate" type="text/html" title="Half Marathons by State: My 50-State Running Journey" /><published>2026-04-16T23:10:28-04:00</published><updated>2026-04-16T23:10:28-04:00</updated><id>https://ritviknag.com/blog/half-marathons-by-state</id><content type="html" xml:base="https://ritviknag.com/blog/half-marathons-by-state/"><![CDATA[<p><strong>Progress:</strong> 13 / 51 states<br />
⭐ = Personal Record (PR)</p>

<p>I’m working toward running a half marathon in every U.S. state (13.1 × 50/51).</p>

<p>Before each race, I keep a simple tradition: carb-load the night before — usually pasta. When I can, I’ll share pre-race spots that are worth checking out.</p>

<p>This is a running log of races so far — times, courses, and a few notes along the way.</p>

<hr />

<h1 id="1-virginia">1. Virginia</h1>

<h2 id="reston-half-marathon-4212024">Reston Half Marathon (4/21/2024)</h2>

<table>
  <thead>
    <tr>
      <th>Race</th>
      <th>Location</th>
      <th>Time</th>
      <th>Pace</th>
      <th>Overall</th>
      <th>AG</th>
    </tr>
  </thead>
  <tbody>
    <tr>
      <td>1</td>
      <td>Reston, VA</td>
      <td><strong>1:36:41</strong> ⭐</td>
      <td>7:23/mi</td>
      <td>5</td>
      <td>1</td>
    </tr>
  </tbody>
</table>

<p>First in AG. I was expecting at least 3rd — a nice surprise.</p>

<p>In the words of a volunteer on the sidelines:</p>

<blockquote>
  <p>“Gravity is your friend!”</p>
</blockquote>

<hr />

<h2 id="richmond-half-marathon-11152025">Richmond Half Marathon (11/15/2025)</h2>

<table>
  <thead>
    <tr>
      <th>Race</th>
      <th>Location</th>
      <th>Time</th>
      <th>Pace</th>
      <th>Overall</th>
      <th>AG</th>
    </tr>
  </thead>
  <tbody>
    <tr>
      <td>11</td>
      <td>Richmond, VA</td>
      <td><strong>1:23:37</strong> ⭐</td>
      <td>6:23/mi</td>
      <td>124</td>
      <td>30</td>
    </tr>
  </tbody>
</table>

<p>Fast downhill finish. Strong close over the final stretch.</p>

<p>Great course, great crowd — solid weekend.</p>

<hr />

<h2 id="sentara-shamrock-half-marathon-3222026">Sentara Shamrock Half Marathon (3/22/2026)</h2>

<table>
  <thead>
    <tr>
      <th>Race</th>
      <th>Location</th>
      <th>Time</th>
      <th>Pace</th>
      <th>Overall</th>
      <th>AG</th>
    </tr>
  </thead>
  <tbody>
    <tr>
      <td>15</td>
      <td>Virginia Beach, VA</td>
      <td><strong>1:18:37</strong> ⭐</td>
      <td>6:00/mi</td>
      <td>15</td>
      <td>3</td>
    </tr>
  </tbody>
</table>

<blockquote>
  <p>The Sentara Shamrock Half Marathon is flat and fast, making it the perfect place for a PR.</p>
</blockquote>

<p>Flat and fast was accurate.</p>

<hr />

<h1 id="2-connecticut">2. Connecticut</h1>

<h2 id="62nd-annual-john--jessie-kelley-half-marathon-832024">62nd Annual John &amp; Jessie Kelley Half Marathon (8/3/2024)</h2>

<table>
  <thead>
    <tr>
      <th>Race</th>
      <th>Location</th>
      <th>Time</th>
      <th>Pace</th>
      <th>Overall</th>
      <th>AG</th>
    </tr>
  </thead>
  <tbody>
    <tr>
      <td>2</td>
      <td>New London, CT</td>
      <td><strong>1:31:53</strong> ⭐</td>
      <td>7:01/mi</td>
      <td>31</td>
      <td>4</td>
    </tr>
  </tbody>
</table>

<div class="review-card">
  <h4>Pre-Race: Consiglio's Restaurant</h4>
  <p>
    Classic Italian spot in New Haven — cozy atmosphere, solid pasta, and a great pre-race option.
  </p>
  <p>
    <a href="https://www.yelp.com/biz/consiglios-restaurant-new-haven-2?hrid=e-tC1gcwIPzPfuk7ZnQqig" rel="nofollow noopener">
      Read full review on Yelp
    </a>
  </p>
</div>

<p>Summer heat kept me from breaking 1:30.</p>

<p>Well-organized race despite tough conditions. Volunteers spraying water along the course made a huge difference — grabbing water and dumping it on my head was necessary in that heat.</p>

<hr />

<h1 id="3-west-virginia">3. West Virginia</h1>

<h2 id="new-river-gorge-wilds-trail-run-1052024">New River Gorge Wilds Trail Run (10/5/2024)</h2>

<table>
  <thead>
    <tr>
      <th>Race</th>
      <th>Location</th>
      <th>Time</th>
      <th>Pace</th>
      <th>Overall</th>
      <th>AG</th>
    </tr>
  </thead>
  <tbody>
    <tr>
      <td>3</td>
      <td>Oak Hill, WV</td>
      <td><strong>1:50:03</strong></td>
      <td>8:24/mi</td>
      <td>3</td>
      <td>?</td>
    </tr>
  </tbody>
</table>

<p>Top 3 at ACE Adventure Resort.</p>

<p>A true trail run — and I wore the wrong shoes.</p>

<p>Scenic course, and a ~5-hour drive from NoVA that was worth it.</p>

<p>First trail half marathon. Racing with a dead watch, no phone, no gear, and limited water was a good lesson in what to do better next time.</p>

<hr />

<h1 id="4-north-carolina">4. North Carolina</h1>

<h2 id="charlotte-half-marathon-11162024">Charlotte Half Marathon (11/16/2024)</h2>

<table>
  <thead>
    <tr>
      <th>Race</th>
      <th>Location</th>
      <th>Time</th>
      <th>Pace</th>
      <th>Overall</th>
      <th>AG</th>
    </tr>
  </thead>
  <tbody>
    <tr>
      <td>4</td>
      <td>Charlotte, NC</td>
      <td><strong>1:24:35</strong> ⭐</td>
      <td>6:28/mi</td>
      <td>38</td>
      <td>6</td>
    </tr>
  </tbody>
</table>

<p>First sub-1:25. Also the debut of the Nike Vaporfly 3.</p>

<hr />

<h1 id="5-arizona">5. Arizona</h1>

<h2 id="run-sedona-212025">Run Sedona (2/1/2025)</h2>

<table>
  <thead>
    <tr>
      <th>Race</th>
      <th>Location</th>
      <th>Time</th>
      <th>Pace</th>
      <th>Overall</th>
      <th>AG</th>
    </tr>
  </thead>
  <tbody>
    <tr>
      <td>5</td>
      <td>Sedona, AZ</td>
      <td><strong>1:31:02</strong></td>
      <td>6:57/mi</td>
      <td>16</td>
      <td>3</td>
    </tr>
  </tbody>
</table>

<p>Two hours of sleep, hills, and elevation — still happy with the result.</p>

<hr />

<h1 id="6-washington-dc">6. Washington, DC</h1>

<h2 id="dc-rock-n-roll-half-3152025">DC Rock ‘N Roll Half (3/15/2025)</h2>

<table>
  <thead>
    <tr>
      <th>Race</th>
      <th>Location</th>
      <th>Time</th>
      <th>Pace</th>
      <th>Overall</th>
      <th>AG</th>
    </tr>
  </thead>
  <tbody>
    <tr>
      <td>6</td>
      <td>Washington, DC</td>
      <td><strong>1:23:54</strong></td>
      <td>6:24/mi</td>
      <td>146</td>
      <td>22</td>
    </tr>
  </tbody>
</table>

<p>A good summary of this race:</p>

<blockquote>
  <p>Monster Hill 👹 @ mile 8<br />
completely destroyed me,<br />
had me thinking I’d just hold on for sub-1:30,<br />
and somehow still managed a slight PR.</p>
</blockquote>

<hr />

<h1 id="7-new-york">7. New York</h1>

<h2 id="nycruns-half--brooklyn-ice-cream-social-8232025">NYCRUNS Half — Brooklyn Ice Cream Social (8/23/2025)</h2>

<table>
  <thead>
    <tr>
      <th>Race</th>
      <th>Location</th>
      <th>Time</th>
      <th>Pace</th>
      <th>Overall</th>
      <th>AG</th>
    </tr>
  </thead>
  <tbody>
    <tr>
      <td>7</td>
      <td>Brooklyn, NY</td>
      <td><strong>1:24:53</strong></td>
      <td>6:29/mi</td>
      <td>9</td>
      <td>4</td>
    </tr>
  </tbody>
</table>

<p>Four laps around Prospect Park.</p>

<hr />

<h1 id="8-colorado">8. Colorado</h1>

<h2 id="boulderthon-9282025">Boulderthon (9/28/2025)</h2>

<table>
  <thead>
    <tr>
      <th>Race</th>
      <th>Location</th>
      <th>Time</th>
      <th>Pace</th>
      <th>Overall</th>
      <th>AG</th>
    </tr>
  </thead>
  <tbody>
    <tr>
      <td>8</td>
      <td>Boulder, CO</td>
      <td><strong>1:24:17</strong></td>
      <td>6:25/mi</td>
      <td>62</td>
      <td>10</td>
    </tr>
  </tbody>
</table>

<p>Happy to break 1:25 at altitude.</p>

<p>Hard race. ~5,300 ft — much higher than what I’m used to in NoVA.</p>

<p>Did a 10.5-mile shakeout on Davidson Mesa beforehand to acclimate. Still — they said “no hills”… not true.</p>

<hr />

<h1 id="9-new-hampshire">9. New Hampshire</h1>

<h2 id="smuttynose-rockfest-half-marathon-1052025">Smuttynose Rockfest Half Marathon (10/5/2025)</h2>

<table>
  <thead>
    <tr>
      <th>Race</th>
      <th>Location</th>
      <th>Time</th>
      <th>Pace</th>
      <th>Overall</th>
      <th>AG</th>
    </tr>
  </thead>
  <tbody>
    <tr>
      <td>9</td>
      <td>Hampton Beach, NH</td>
      <td><strong>1:20:25</strong> ⭐</td>
      <td>6:09/mi</td>
      <td>21</td>
      <td>6</td>
    </tr>
  </tbody>
</table>

<hr />

<h1 id="10-tennessee">10. Tennessee</h1>

<h2 id="nashville-half-marathon-10252025">Nashville Half Marathon (10/25/2025)</h2>

<table>
  <thead>
    <tr>
      <th>Race</th>
      <th>Location</th>
      <th>Time</th>
      <th>Pace</th>
      <th>Overall</th>
      <th>AG</th>
    </tr>
  </thead>
  <tbody>
    <tr>
      <td>10</td>
      <td>Nashville, TN</td>
      <td><strong>1:23:47</strong></td>
      <td>6:23/mi</td>
      <td>97</td>
      <td>11</td>
    </tr>
  </tbody>
</table>

<p>Started late (~7:20 AM) due to long bib pickup lines.</p>

<p>Hilly course — but the downhills helped. Strong energy downtown, and a unique finish inside a baseball stadium.</p>

<p>~10-hour trip from NoVA — worth it.</p>

<hr />

<h1 id="11-hawaii">11. Hawaii</h1>

<h2 id="maui-oceanfront-marathon-1182026">Maui Oceanfront Marathon (1/18/2026)</h2>

<table>
  <thead>
    <tr>
      <th>Race</th>
      <th>Location</th>
      <th>Time</th>
      <th>Pace</th>
      <th>Overall</th>
      <th>AG</th>
    </tr>
  </thead>
  <tbody>
    <tr>
      <td>11</td>
      <td>Wailuku, HI</td>
      <td><strong>1:23:24</strong></td>
      <td>6:22/mi</td>
      <td>4</td>
      <td>1</td>
    </tr>
  </tbody>
</table>

<p>First time in Hawaii — traveled with family.</p>

<hr />

<h1 id="12-california">12. California</h1>

<h2 id="bay-breeze-half-marathon-2142026">Bay Breeze Half Marathon (2/14/2026)</h2>

<table>
  <thead>
    <tr>
      <th>Race</th>
      <th>Location</th>
      <th>Time</th>
      <th>Pace</th>
      <th>Overall</th>
      <th>AG</th>
    </tr>
  </thead>
  <tbody>
    <tr>
      <td>12</td>
      <td>San Leandro, CA</td>
      <td><strong>1:21:15</strong></td>
      <td>6:12/mi</td>
      <td>3</td>
      <td>2</td>
    </tr>
  </tbody>
</table>

<p>Flat, but brutal — gravel, sand, bridges, wind, and bugs.</p>

<p>Cool temps (~47–50°F), but didn’t feel like it.</p>

<hr />

<h1 id="13-arkansas">13. Arkansas</h1>

<h2 id="little-rock-half-marathon-312026">Little Rock Half Marathon (3/1/2026)</h2>

<table>
  <thead>
    <tr>
      <th>Race</th>
      <th>Location</th>
      <th>Time</th>
      <th>Pace</th>
      <th>Overall</th>
      <th>AG</th>
    </tr>
  </thead>
  <tbody>
    <tr>
      <td>13</td>
      <td>Little Rock, AR</td>
      <td><strong>1:24:42</strong></td>
      <td>6:28/mi</td>
      <td>17</td>
      <td>2</td>
    </tr>
  </tbody>
</table>

<p>Hilly course, but a great race overall. Ran alongside another runner for much of it — strong finish and great crowd support.</p>]]></content><author><name>Ritvik Nag</name><email>me@ritviknag.com</email></author><category term="blog" /><category term="half-marathon" /><category term="running" /><category term="race-recaps" /><category term="50-states" /><summary type="html"><![CDATA[Progress: 13 / 51 states ⭐ = Personal Record (PR)]]></summary></entry><entry><title type="html">How I Automated Parking Permit Purchases at GMU with Python</title><link href="https://ritviknag.com/tech-tips/how-i-automated-parking-permit-purchases-at-gmu-with-python/" rel="alternate" type="text/html" title="How I Automated Parking Permit Purchases at GMU with Python" /><published>2025-09-04T23:04:34-04:00</published><updated>2025-09-04T23:04:34-04:00</updated><id>https://ritviknag.com/tech-tips/how-i-automated-parking-permit-purchases-at-gmu-with-python</id><content type="html" xml:base="https://ritviknag.com/tech-tips/how-i-automated-parking-permit-purchases-at-gmu-with-python/"><![CDATA[<p class="notice--warning">This article has been cross-posted on my <a href="https://medium.com/@ritviknag">Medium</a> and <a href="https://dev.to/ritvik-nag">Dev.to</a>.
<br /><br />
If you found this post useful, please consider <em>following me</em> on those platforms as I would be really grateful for the support. Thanks!</p>
<!-- {: .notice--info} -->

<hr />

<p>As a grad student at <strong>George Mason University (GMU)</strong>, I commute to Fairfax once a week for evening classes. Like many commuters, I need parking — but only for a few hours, usually <strong>4–7 PM</strong>.</p>

<p>Buying a semester-long permit didn’t make sense for my schedule (or wallet). Instead, the <strong>daily parking permits</strong> turned out to be cheaper and more flexible.</p>

<p>The problem? I always procrastinated. I’d remember to buy a permit at the last minute, sometimes right before class. It was stressful, repetitive, and just annoying.</p>

<p>So, being a CS student, I did what came naturally:</p>

<p>👉 <strong>I automated the entire process.</strong></p>

<h2 id="the-idea">The Idea</h2>

<p>Every week, I needed to:</p>

<ol>
  <li>Go to the GMU parking portal.</li>
  <li>Log in with my credentials.</li>
  <li>Navigate through a bunch of menus.</li>
  <li>Select the right permit.</li>
  <li>Enter payment details.</li>
</ol>

<p>It was the same steps every time. Why not let Python handle it?</p>

<h2 id="the-tool">The Tool</h2>

<p>I built a small open-source tool in Python that:</p>

<ul>
  <li>Automates login to the GMU parking portal up to the <strong>Duo Mobile 2FA step</strong> (which still requires approval on your phone).</li>
  <li>Selects the correct <strong>daily parking permit</strong>.</li>
  <li>Completes the checkout flow.</li>
  <li>Emails me a confirmation when done.</li>
</ul>

<p>That’s it — no more last-minute scrambling.</p>

<p>📽️ <strong>Demo Video:</strong> <a href="https://youtu.be/9X5lc2zZq-k">YouTube</a></p>

<p>💻 <strong>Source Code:</strong> <a href="https://github.com/rnag/GMU-Daily-Permit-Automation">GitHub – GMU Daily Permit Automation</a></p>

<h2 id="tech-breakdown">Tech Breakdown</h2>

<p>At its core, this project uses:</p>

<ul>
  <li><strong><a href="https://www.selenium.dev/">Selenium</a></strong> – to control a browser and interact with the GMU parking site.</li>
  <li><strong>Headless mode</strong> – so it runs quietly in the background.</li>
  <li><strong>Config + Environment variables</strong> – to keep credentials and payment info safe.</li>
  <li><strong>Task scheduling (optional)</strong> – you <em>could</em> use <code class="language-plaintext highlighter-rouge">cron</code> (Linux/Mac) or Task Scheduler (Windows) to kick off the script automatically. I usually just run it manually before class.</li>
  <li><strong>Duo Mobile 2FA</strong> – you’ll still need to approve the login from your phone. The script pauses at this step until Duo is confirmed.</li>
</ul>

<p>Here’s a simplified example of what the login step looks like in Python with Selenium:</p>

<div class="language-python highlighter-rouge"><div class="highlight"><pre class="highlight"><code><span class="kn">from</span> <span class="nn">selenium</span> <span class="kn">import</span> <span class="n">webdriver</span>
<span class="kn">from</span> <span class="nn">selenium.webdriver.common.by</span> <span class="kn">import</span> <span class="n">By</span>
<span class="kn">from</span> <span class="nn">selenium.webdriver.common.keys</span> <span class="kn">import</span> <span class="n">Keys</span>

<span class="c1"># Start the browser (headless mode can be enabled too)
</span><span class="n">driver</span> <span class="o">=</span> <span class="n">webdriver</span><span class="p">.</span><span class="n">Chrome</span><span class="p">()</span>

<span class="c1"># Go to GMU parking login page
</span><span class="n">driver</span><span class="p">.</span><span class="n">get</span><span class="p">(</span><span class="s">"https://gmu.t2hosted.com/Account/Portal"</span><span class="p">)</span>

<span class="c1"># Enter username
</span><span class="n">username_input</span> <span class="o">=</span> <span class="n">driver</span><span class="p">.</span><span class="n">find_element</span><span class="p">(</span><span class="n">By</span><span class="p">.</span><span class="n">ID</span><span class="p">,</span> <span class="s">"username"</span><span class="p">)</span>
<span class="n">username_input</span><span class="p">.</span><span class="n">send_keys</span><span class="p">(</span><span class="s">"myusername"</span><span class="p">)</span>

<span class="c1"># Enter password
</span><span class="n">password_input</span> <span class="o">=</span> <span class="n">driver</span><span class="p">.</span><span class="n">find_element</span><span class="p">(</span><span class="n">By</span><span class="p">.</span><span class="n">ID</span><span class="p">,</span> <span class="s">"password"</span><span class="p">)</span>
<span class="n">password_input</span><span class="p">.</span><span class="n">send_keys</span><span class="p">(</span><span class="s">"mypassword"</span><span class="p">)</span>
<span class="n">password_input</span><span class="p">.</span><span class="n">send_keys</span><span class="p">(</span><span class="n">Keys</span><span class="p">.</span><span class="n">RETURN</span><span class="p">)</span>

<span class="c1"># (From here, the script navigates menus and purchases the permit)
</span></code></pre></div></div>

<p>The real project handles edge cases, payment, and confirmation, but this snippet shows the basic automation flow.</p>

<h2 id="lessons-learned">Lessons Learned</h2>

<p>A few interesting takeaways while building this:</p>

<ul>
  <li>University systems often don’t have APIs, so <strong>web automation</strong> is sometimes the only option.</li>
  <li><strong>Security matters</strong> – never hardcode sensitive info; use config files or environment variables.</li>
  <li>Even small automations can save you from recurring stress (and are great coding practice).</li>
</ul>

<h2 id="try-it-yourself">Try It Yourself</h2>

<p>If you’re at GMU (or curious about automation), you can try it out:</p>

<p>👉 <a href="https://github.com/rnag/GMU-Daily-Permit-Automation">GitHub Project</a></p>

<p>The <code class="language-plaintext highlighter-rouge">README</code> has setup instructions. Just remember: <strong>use responsibly</strong> — the tool isn’t affiliated with GMU Parking Services, and you should only automate your own account.</p>

<h2 id="final-thoughts">Final Thoughts</h2>

<p>This project started as a way to save myself from procrastination, but it turned into a fun automation experiment. It’s one of those small quality-of-life improvements that adds up.</p>

<p>If you’re a fellow GMU commuter, hopefully this helps you too. And if you’re a developer, maybe it’ll inspire you to automate some of your own daily annoyances.</p>

<p>While Duo Mobile means this isn’t 100% hands-free, it still saves me from repeating the same web clicks every week.</p>]]></content><author><name>Ritvik Nag</name><email>me@ritviknag.com</email></author><category term="tech-tips" /><category term="python" /><category term="automation" /><category term="selenium" /><category term="productivity" /><category term="student-life" /><summary type="html"><![CDATA[A Python + Selenium tool to automate GMU daily parking permits. It’s open source, semi-automated with Duo Mobile 2FA, and saves me from last-minute stress.]]></summary></entry><entry><title type="html">Sleep Mode: Automating Wi-Fi &amp;amp; Bluetooth Off at Night on Apple Devices</title><link href="https://ritviknag.com/tech-tips/sleep-mode-automating-wi-fi-&-bluetooth-off-at-night-on-apple-devices/" rel="alternate" type="text/html" title="Sleep Mode: Automating Wi-Fi &amp;amp; Bluetooth Off at Night on Apple Devices" /><published>2025-05-22T00:26:24-04:00</published><updated>2025-05-22T00:26:24-04:00</updated><id>https://ritviknag.com/tech-tips/sleep-mode-automating-wi-fi-&amp;-bluetooth-off-at-night-on-apple-devices</id><content type="html" xml:base="https://ritviknag.com/tech-tips/sleep-mode-automating-wi-fi-&amp;-bluetooth-off-at-night-on-apple-devices/"><![CDATA[<p class="notice--warning">This article has been cross-posted on my <a href="https://medium.com/@ritviknag">Medium</a> and <a href="https://dev.to/ritvik-nag">Dev.to</a>.
<br /><br />
If you found this post useful, please consider <em>following me</em> on those platforms as I would be really grateful for the support. Thanks!</p>
<!-- {: .notice--info} -->

<hr />

<p>As a runner and fitness enthusiast, sleep is essential for my recovery — and yet, it’s something I’m constantly working to improve. I aim for 8 hours a night, but my Apple Watch reports an average closer to 6.5 hours over the past few months, with some nights dipping as low as 5. Being a light sleeper doesn’t help either. I’ve experimented with wax earplugs to block out noise and blackout curtains to keep light at bay.</p>

<p>One thing I’ve wanted to automate for a while now is disabling Wi-Fi and Bluetooth on the devices near my bed — including both my personal and work MacBooks, my iPhone, and ideally even my Apple Watch (which I wear to track sleep). These devices all stay in my bedroom overnight, so minimizing potential sleep disruptors has become a personal experiment.</p>

<p>You might ask: why go through the trouble of shutting off Wi-Fi and Bluetooth automatically? It’s a fair question. <a href="https://sleepreviewmag.com/sleep-health/parameters/quality/study-raises-concerns-wi-fi-device-radiation-sleep-quality/">This study</a> raises concerns that Wi-Fi radiation may impact sleep quality and increase the risk of insomnia. And this <a href="https://neurologicwellnessinstitute.com/can-wifi-affect-sleep-quality/">video explanation</a> discusses the potential relationship between wireless radiation and disrupted sleep. While scientific research on the topic is still largely inconclusive, I figured that if there’s even a slight chance of improving sleep quality by reducing exposure, it’s worth exploring.</p>

<p>So for the past several months, I’ve had an automation in place that turns off Wi-Fi and Bluetooth on my Apple devices around bedtime — and in this post, I’ll share how I set that up in case you’re looking to try something similar.</p>

<h2 id="creating-the-shortcuts">Creating the Shortcuts</h2>

<p>The first step involves opening the Shortcuts app on a Mac laptop or device. The easiest way is to hit <code class="language-plaintext highlighter-rouge">Cmd + Space</code> and search for <code class="language-plaintext highlighter-rouge">Shortcuts</code>.</p>

<p>The icon should look like this:</p>

<p><img src="https://help.apple.com/assets/6712D663A5C9C17B38070C34/6712D668A5C9C17B38070C3A/en_US/d230a25cb974f8908871af04caad89a1.png" width="30%" /></p>

<p>I’ve created two shortcuts. One called “<strong>Start Morning</strong>” to enable Wi-Fi/Bluetooth, and another called “<strong>Night Time</strong>” to disable Wi-Fi/Bluetooth and put the display to sleep, as shown below. They both use the “<em>Set Wi-Fi</em>” and “<em>Set Bluetooth</em>” actions, which you can find using the Action Library on the right.</p>

<p><img src="/assets/images/1_Shortcuts-StartMorning.png" alt="Start Morning" /></p>

<p><img src="/assets/images/2_Shortcuts-NightTime.png" alt="Night Time" /></p>

<h2 id="creating-automator-scripts">Creating Automator Scripts</h2>

<p>Next, I opened up the <strong>Automator</strong> app — the <code class="language-plaintext highlighter-rouge">Cmd + Space</code> works here too — and go to <em>File &gt; New</em> to create a new automation. I need to do this twice, once for each action.</p>

<p>Search for the “<strong>Run Shell Script</strong>”  action. Then in the settings, select <strong>/bin/bash</strong> as the Shell, and enter this code in the bash code block:</p>

<div class="language-plaintext highlighter-rouge"><div class="highlight"><pre class="highlight"><code>shortcuts run "Start Morning"
</code></pre></div></div>

<p>Here, <code class="language-plaintext highlighter-rouge">"Start Morning"</code> is the name of your first shortcut. If you named it something else, update the name here accordingly. The executable command <code class="language-plaintext highlighter-rouge">shortcuts</code> can also be run from the Mac Terminal app, and is simply a handy, automated way to interact with your shortcuts on the Shortcuts app.</p>

<p>Here’s a screenshot of this — you can name this <code class="language-plaintext highlighter-rouge">StartMorning.app</code> and save it to your <code class="language-plaintext highlighter-rouge">/Applications</code> folder, but here you can see I’ve saved it to under my <code class="language-plaintext highlighter-rouge">iCloud Drive &gt; Automator</code> , for an important reason I’ll cover later:</p>

<p><img src="/assets/images/3_Automator-StartMorning.png" alt="" width="200%" /></p>

<p>Lastly, go to <em>File &gt; New</em> again and search for the “<strong>Run Shell Script</strong>”  action. Then in the settings, select <strong>/bin/bash</strong> as the Shell as last time, and enter this code in the bash code block:</p>

<div class="language-plaintext highlighter-rouge"><div class="highlight"><pre class="highlight"><code>shortcuts run "Night Time"
</code></pre></div></div>

<p>Replacing <code class="language-plaintext highlighter-rouge">"Night Time"</code> if you chose to use a different name for the shortcut. I’ve again saved this to my iCloud Drive, as shown below:</p>

<p><img src="/assets/images/4_Automator-NightTime.png" alt="" width="200%" /></p>

<p>Now, there’s a few way to schedule these two automations on a Mac. You can either set up a cron job or, in my case, I chose to use the Calendar app. I got all these steps from an article a long time ago, but now for the life of me I can’t seem to find that article — I guess that’s one reason to bookmark an interesting site that you come across.</p>

<h2 id="scheduling-with-calendar">Scheduling with Calendar</h2>

<p>Regardless, the next step is to open the <strong>Calendar</strong> app on your Mac.</p>

<p>Now, remember how I saved the Automator scripts to iCloud Drive, inside an “Automator” folder? There’s a reason for that. If you’re using just one Mac — say, a personal laptop — saving the scripts to <code class="language-plaintext highlighter-rouge">/Applications</code> works fine. But in my case, I use both a <em>MacBook Air</em> (personal) and a <em>MacBook Pro</em> (work). I wanted the Wi-Fi and Bluetooth toggling to sync across both devices.</p>

<p>After some trial and error, I found that Calendar events sync automatically across Apple devices — but local file paths like <code class="language-plaintext highlighter-rouge">/Applications</code> do not. So, if the script lives in <code class="language-plaintext highlighter-rouge">/Applications</code> on one Mac, the synced calendar event on the second Mac will break. By storing the script in iCloud Drive, both Macs can access the same path, and I only have to set up the Calendar automation once (in theory, at least).</p>

<p>First thing I did was hit the <strong>+</strong> button at the top to create a new Calendar event. I called the first one “<strong>Start Morning</strong>”, set it to <strong>repeat daily</strong> at <strong>8:00 AM</strong>, and the important bit here is to expand the event, click on “Add Alert, Repeat, or Travel Time”, and then to go to where you see <code class="language-plaintext highlighter-rouge">alert: None</code>, click the dropdown, and go to <code class="language-plaintext highlighter-rouge">Custom...</code>, choose <code class="language-plaintext highlighter-rouge">Open File</code> and then in the second dropdown choose <code class="language-plaintext highlighter-rouge">Other...</code> . In the Finder window, locate and select the file location for the Automator script <code class="language-plaintext highlighter-rouge">StartMorning.app</code>  that you saved in previous step. Next, though technically not needed, I clicked the dropdown to alert <strong>15 Minutes before</strong> and changed it to <strong>At time of event</strong>.</p>

<p>You can see the event which turns on Wi-Fi/Bluetooth here:</p>

<p><img src="/assets/images/5_Calendar-StartMorning.png" alt="Start Morning Calendar Event" width="50%" /></p>

<p>Lastly, do the same for the “<strong>Night Time</strong>” event! I set it to <strong>repeat daily</strong> at <strong>11:00 PM</strong> based on my sleep schedule, but feel free to adjust accordingly based on yours! I followed the same steps as above. I chose <code class="language-plaintext highlighter-rouge">Open File</code> and then in the second dropdown choose <code class="language-plaintext highlighter-rouge">Other...</code> . In the Finder window, locate and select the file location for the Automator script <code class="language-plaintext highlighter-rouge">NightTime.app</code>  that you saved in previous step.</p>

<p>You can see the final event which switches off Wi-Fi/Bluetooth here:</p>

<p><img src="/assets/images/6_Calendar-NightTime.png" alt="Night Time Calendar Event" width="50%" /></p>

<p>And that’s it! All my Mac devices will effectively go into Airplane Mode at my sleep time at 11 PM, and wake up from Airplane Mode at 8 AM the next day automatically. Problem solved!</p>

<h2 id="scheduling-on-iphone">Scheduling on iPhone</h2>

<p>Is it possible to schedule the same on an iPhone?</p>

<p>You betcha! It’s actually a bit easier, since you only have to set Airplane Mode, rather than Wi-Fi and Bluetooth individually.</p>

<p>I opened the “<strong>Shortcuts</strong>” app on my iPhone. I created my first automation, which runs on a schedule — at <strong>11:00 PM, daily</strong> in my case — and the action I chose is <strong>Set Airplane Mode &gt; ON</strong>. This is shown below:</p>

<p><img src="/assets/images/7_iPhone_Shortcuts.jpeg" alt="" width="50%" /></p>

<p>Lastly, rather than turn on my iPhone in the morning at a specific time, I chose to create an automation with a trigger that runs when my phone is disconnected from power — since I wirelessly charge it overnight — and the action I chose is <strong>Set Airplane Mode &gt; OFF</strong>. This is shown below:</p>

<p><img src="/assets/images/8_iPhone_Shortcuts.jpeg" alt="" width="50%" /></p>

<h2 id="scheduling-on-apple-watch">Scheduling on Apple Watch</h2>

<p>The final piece of the puzzle is my Apple Watch. Since I wear it every night to track sleep, I’d hoped to schedule Wi-Fi shutoff there as well. Unfortunately, even with the Shortcuts app, there doesn’t seem to be a way to automate Wi-Fi toggling on the Watch. For now, I’ve resorted to doing it manually: unlock the Watch, press the side button, and tap the blue Wi-Fi icon. Not ideal, but a small inconvenience — especially since everything else is automated.</p>

<p>Whether or not Wi-Fi exposure truly impacts sleep quality remains an open question. But for me, this setup offers peace of mind. And that, in itself, helps me sleep better.</p>

<p>Hope this was helpful — and if you end up building something similar, I’d love to hear how it goes.</p>

<p>Thanks for reading.</p>]]></content><author><name>Ritvik Nag</name><email>me@ritviknag.com</email></author><category term="tech-tips" /><category term="sleep" /><category term="automation" /><category term="apple" /><category term="health" /><category term="productivity" /><summary type="html"><![CDATA[How I automated turning off Wi-Fi and Bluetooth on my Apple devices at night to reduce distractions and improve sleep quality — step by step.]]></summary></entry><entry><title type="html">On My First Race and Running</title><link href="https://ritviknag.com/blog/on-my-first-race-and-running/" rel="alternate" type="text/html" title="On My First Race and Running" /><published>2024-04-28T01:11:40-04:00</published><updated>2024-04-28T01:11:40-04:00</updated><id>https://ritviknag.com/blog/on-my-first-race-and-running</id><content type="html" xml:base="https://ritviknag.com/blog/on-my-first-race-and-running/"><![CDATA[<p>I ran my first half marathon this April. It wasn’t perfect — I got lost (twice), spilled Gatorade on myself mid-stride, and battled dehydration, rogue hills, and tired legs. But somehow, I crossed the finish line — first in my age group, and fifth overall.</p>

<p>This is a story about more than just a race. It’s about rediscovering a long-lost joy, learning on the go, and pushing the body beyond what it thinks it can do. If you’ve ever wondered what it’s like to run 13.1 miles for the first time — the chaos, the adrenaline, the tiny victories — read on.</p>

<hr />

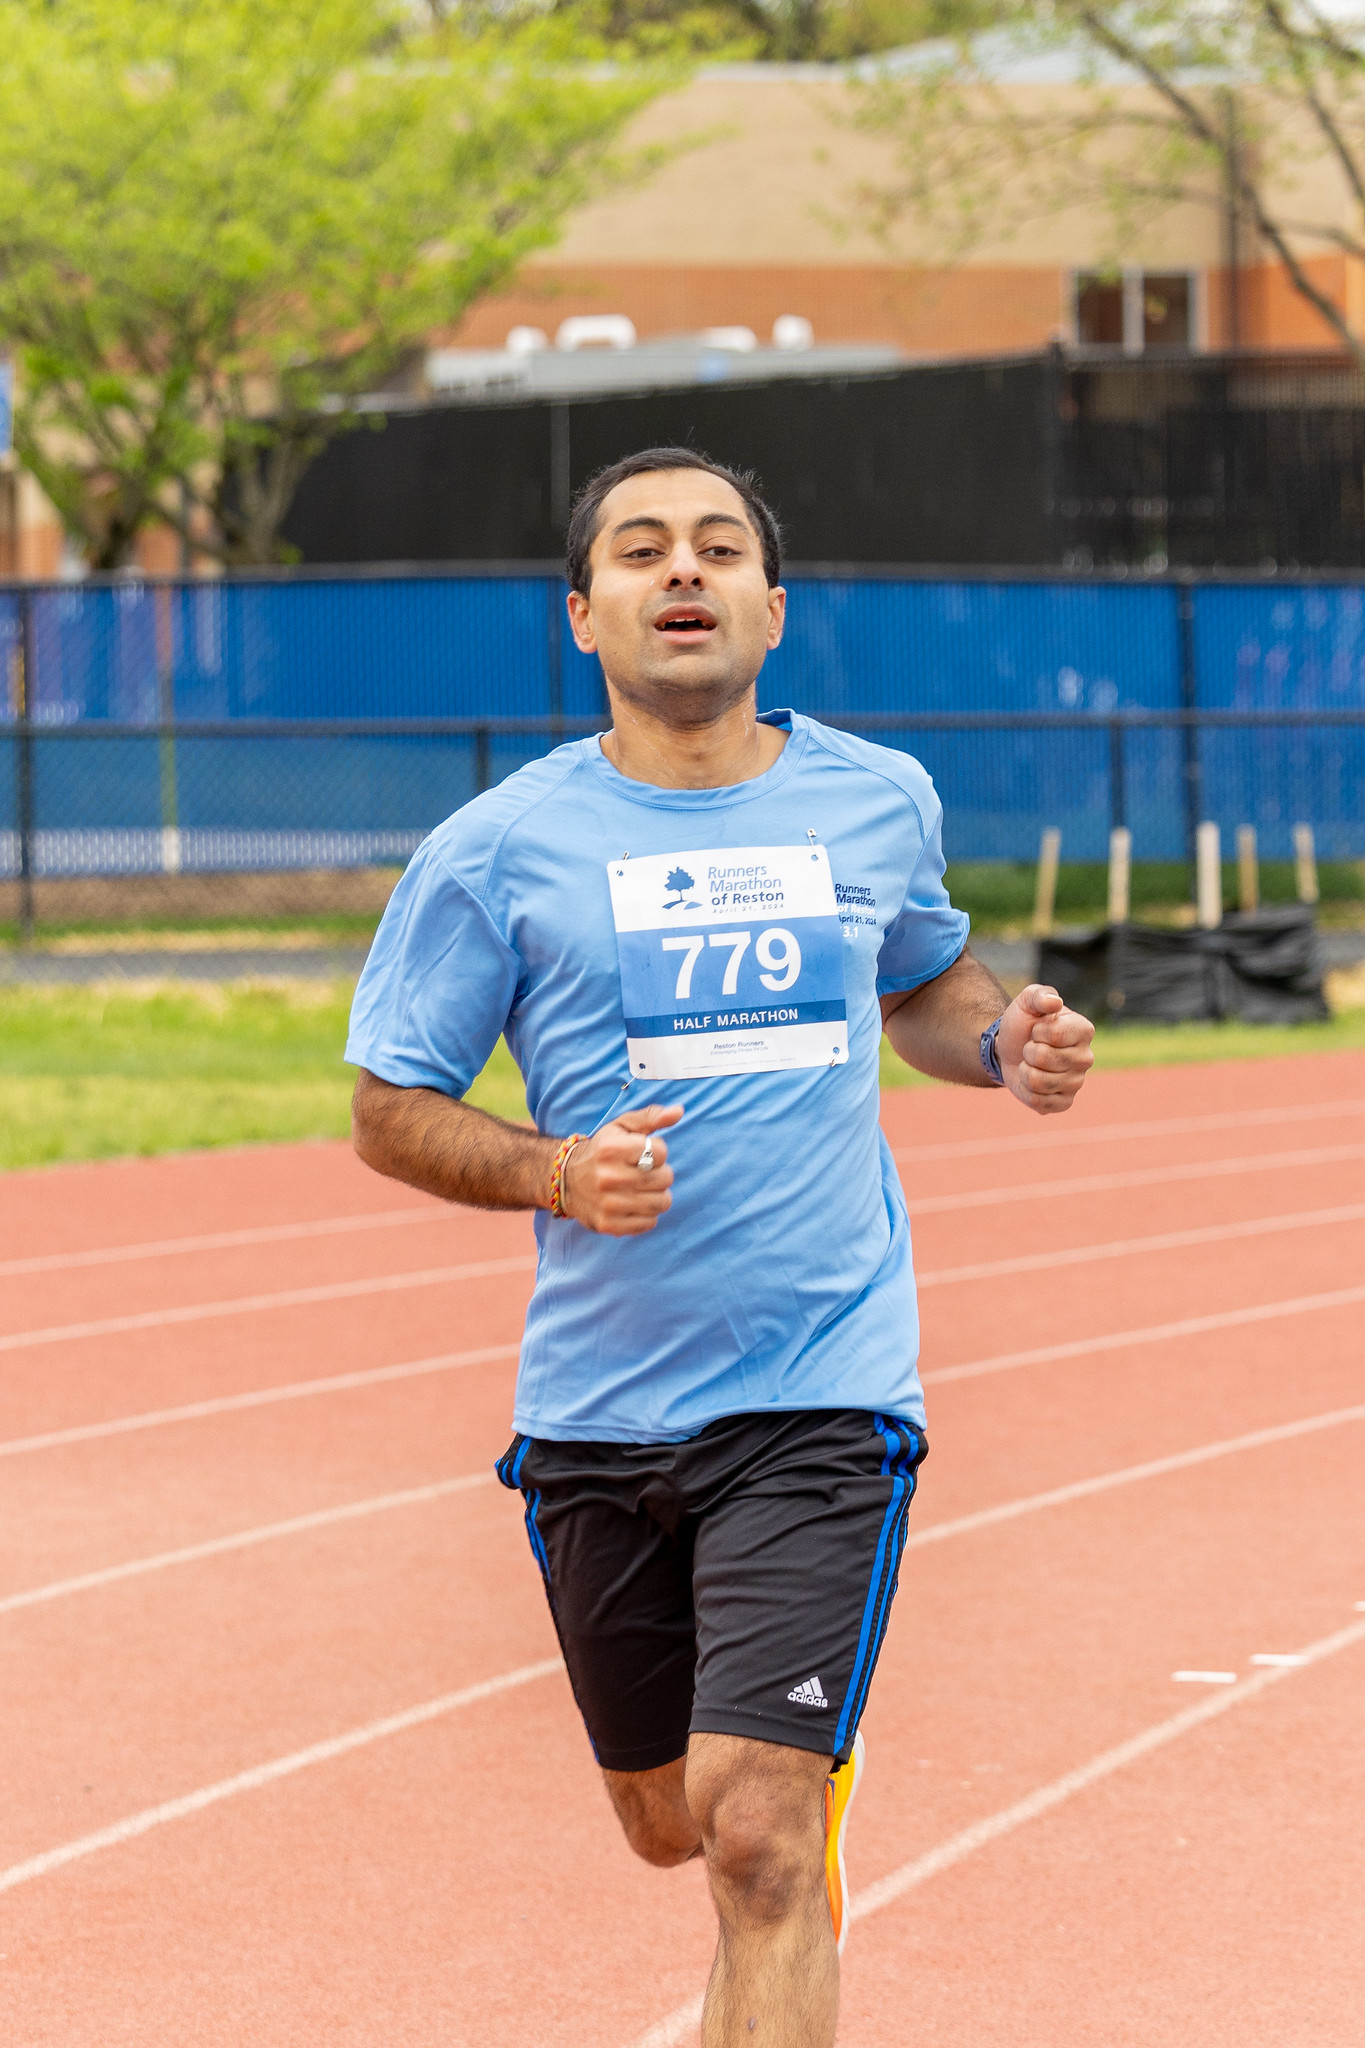
<p>This month, on Sunday, April 21st, I participated in my first half marathon race.</p>

<p>There’s a lot to unpack there and talk about, and not sure if I’ll have the time or dedication to do it. But sometimes you gotta start somewhere, so here I go.</p>

<p>I signed up for the race on March 27th, about a whole month before the race. I paid about $100 for the registration, which certainly feels like I’m getting milked for all I’m worth.</p>

<p>The flyer for the race was being displayed at my gym for the longest time, and I figured, why not, it’s close to home and I’ve been thinking about when and if I’ll ever do a marathon lately, wouldn’t it be easier to train for and start with a half marathon first?</p>

<p>So anyway, that’s the story of how I signed up for my first half marathon.</p>

<p>A large impetus for signing up for my first half, was the passion for running that’s been rekindled in me recently. Ever since I started going back to gym, since I started Orangetheory, a little over a year ago now, the joy (and spark) of running has been alive in me again. It’s like re-learning how to use an extraneous muscle. Like riding a bike again. You never forget how that used to be. You just learn more about it, dive deeper into the sport, and introspect further and learn how your body handles it, and adapts to it.</p>

<p>Anyway, consistency is key, and I would give credit where credit is due - the gym I go, Orangetheory Fitness, has especially been inspiring me to helping me to stay consistent and motivated. Further, they have motivational work outs and benchmark challenges every now and then. For example, the 1 mile run, a 12-minute timed tread for distance, and a longer 22-minute run. More recently, they have something called Tread 50 workouts, which is just a 45-minute block where you have access to the treadmill. Which is great to try out something new, or to prep for an upcoming work out or challenge. It’s all up to you, but the idea here is that motivation is never lacking.</p>

<p>If anything, the benchmark challenges for running are fun, and well — <em>challenging</em> — and they inspire me to put my best foot forward.</p>

<p>They also re-kindle in me once again, the joy for running. This is actually a large part of the reason why I signed up for my first half marathon. To fully embrace my newfound (or re-discovered?) joy of running, and share that with others. I do love running, and I hope to continue it going forward.</p>

<p>One other thing. Running on the treadmill, believe it or not, is sub-optimal to preparing for a half marathon. For training purposes, it is indeed sub-optimal. So while I have been signing up for Tread 50 and challenging myself to run at base or base-push the whole 45-minute block, without stopping, it is lacking in something. Don’t get me wrong, it keeps me on my toes, keeps me active and in shape. It builds endurance and willpower.</p>

<p>What the treadmill does not build, is leg strength, or real-world experience. Experience with hills and just the feel of the stones and rough asphalt under your feet. That you’ll only ever get with outdoor running. Freed from the metaphorical chains, without the treadmill running belt to  help you, you are effectively at the mercy of Mother Nature and the elements. The biting cold. Rain pouring down. Wind gusts battering you at over 10 MPH, slowing down your progress and grinding it to a near halt. Making your very bones shake. Causing your mind to falter in its resolution and drive. This is the sort of thing that one would only ever get exposed to by choosing to embrace the elements, and run outdoors.</p>

<p>So slowly, I have been building a routine in order to prepare myself and train for my first race. At the end of March, I ran roughly a 10K with a running group. An average pace around 8:30/mile. Cadence of 167 SPM.</p>

<p>Between March and April, I have been running at least a 10K outdoors, every week — and I hope to continue this routine, and this <em>consistency</em>, moving forward. Because if there’s anything that Orangetheory and working out has taught me, it’s that consistency is key.</p>

<p>Anyway — the next week, start of April, I knocked out another 10K outdoors, and averaged an 8:00/mile pace. Cadence of around 172 SPM. So overall, slightly improved from last time.</p>

<p>The following day, for the very first time, I did a longer run outdoors. I am talking over 10 miles. Prior to this, I had never run this sort of distance before, in my entire life.</p>

<p>I ran outside at the WO &amp; D trail, which is close to me and was recommended to me by friends and family both. While I did 16 miles total, it looks like I only ran about 12 miles of that. I remember the reason why that was. I had got my new waist pack which was a gift from the fam. It had holders for mini- plastic bottles with little plastic sippy-heads (microplastics, yay!) and pockets which I could put my keys and phone in.</p>

<p>There were only two annoying things with my first long run outdoors:</p>
<ul>
  <li>I had no idea how to use Strava, and I wanted to stream the run to Strava, which is some new app for runners. It took me too long to figure out.</li>
  <li>The strap for the waist pack was too loose. I tried to tighten it but it kept falling off and it was mighty frustrating.</li>
</ul>

<p>Regarding the first point, I walked the first 2 miles because I was fiddling around with Strava and trying to record the exercise from within that app. I also started the outdoor activity on my Apple Watch. In hindsight, one thing I learned — Strava can auto-import workouts from the Apple Watch, so you only realistically need to record it on there, don’t need to do it twice as I did.</p>

<p>Regarding the second point, adjusting the waist pack was an eternal struggle, and I don’t know if I ever got it fully correct that whole 16 mile walk-run effort. After the first ten minutes, I wanted to just remove my waist pack and toss it to the ground, and stamp on it. I was that frustrated. But thankfully, after I did some last-minute adjusting, it stayed on, and didn’t fall off at least, even if it was kind of loose. So <em>shrug</em>, better than nothing, so I shrugged it off and started the run.</p>

<p>Plus, I needed the waist pack. For my AirPods case, and keys. Phone so that I could listen to music, since my watch didn’t have 3G or cellular. So given that my phone was bulky, it wouldn’t be possible to fit everything in my pants pocket and run with it. At least, it would be uncomfortable to run like that. So, in that sense the waist pack really delivered and came through. That’s not even considering the water. Water really helps to stay hydrated on a longer (over 10 miles) run outdoors.</p>

<p>So anyway, that first long run outdoors, my average pace was 10:57/mile, which was bad because I walked about 4 miles of that. Looks like I burned almost 2000 calories from that (1600 active calories), so there is a silver lining with that. All in all, I was out of breath near the end, and my legs were essentially destroyed after a run of 12 miles. This is why I had to walk the last 2 or 3 miles. Well, the reason I was forced to walk the last distance, actually is that I overshot when I was back-tracking or looping back. Went too far, guess you could say. So I needed to back-track yet again to get to where I had parked my car. In order to do that, my legs and knee was totaled, so literally I could not run, I could only walk (or limp) back. I contemplated more than once on taking an Uber back, but ultimately I just walked the half hour or so back. It wasn’t the end of the world. At least, mission accomplished there with that long run. Longest run I’ve run in my entire life leading up to that, was on that day.</p>

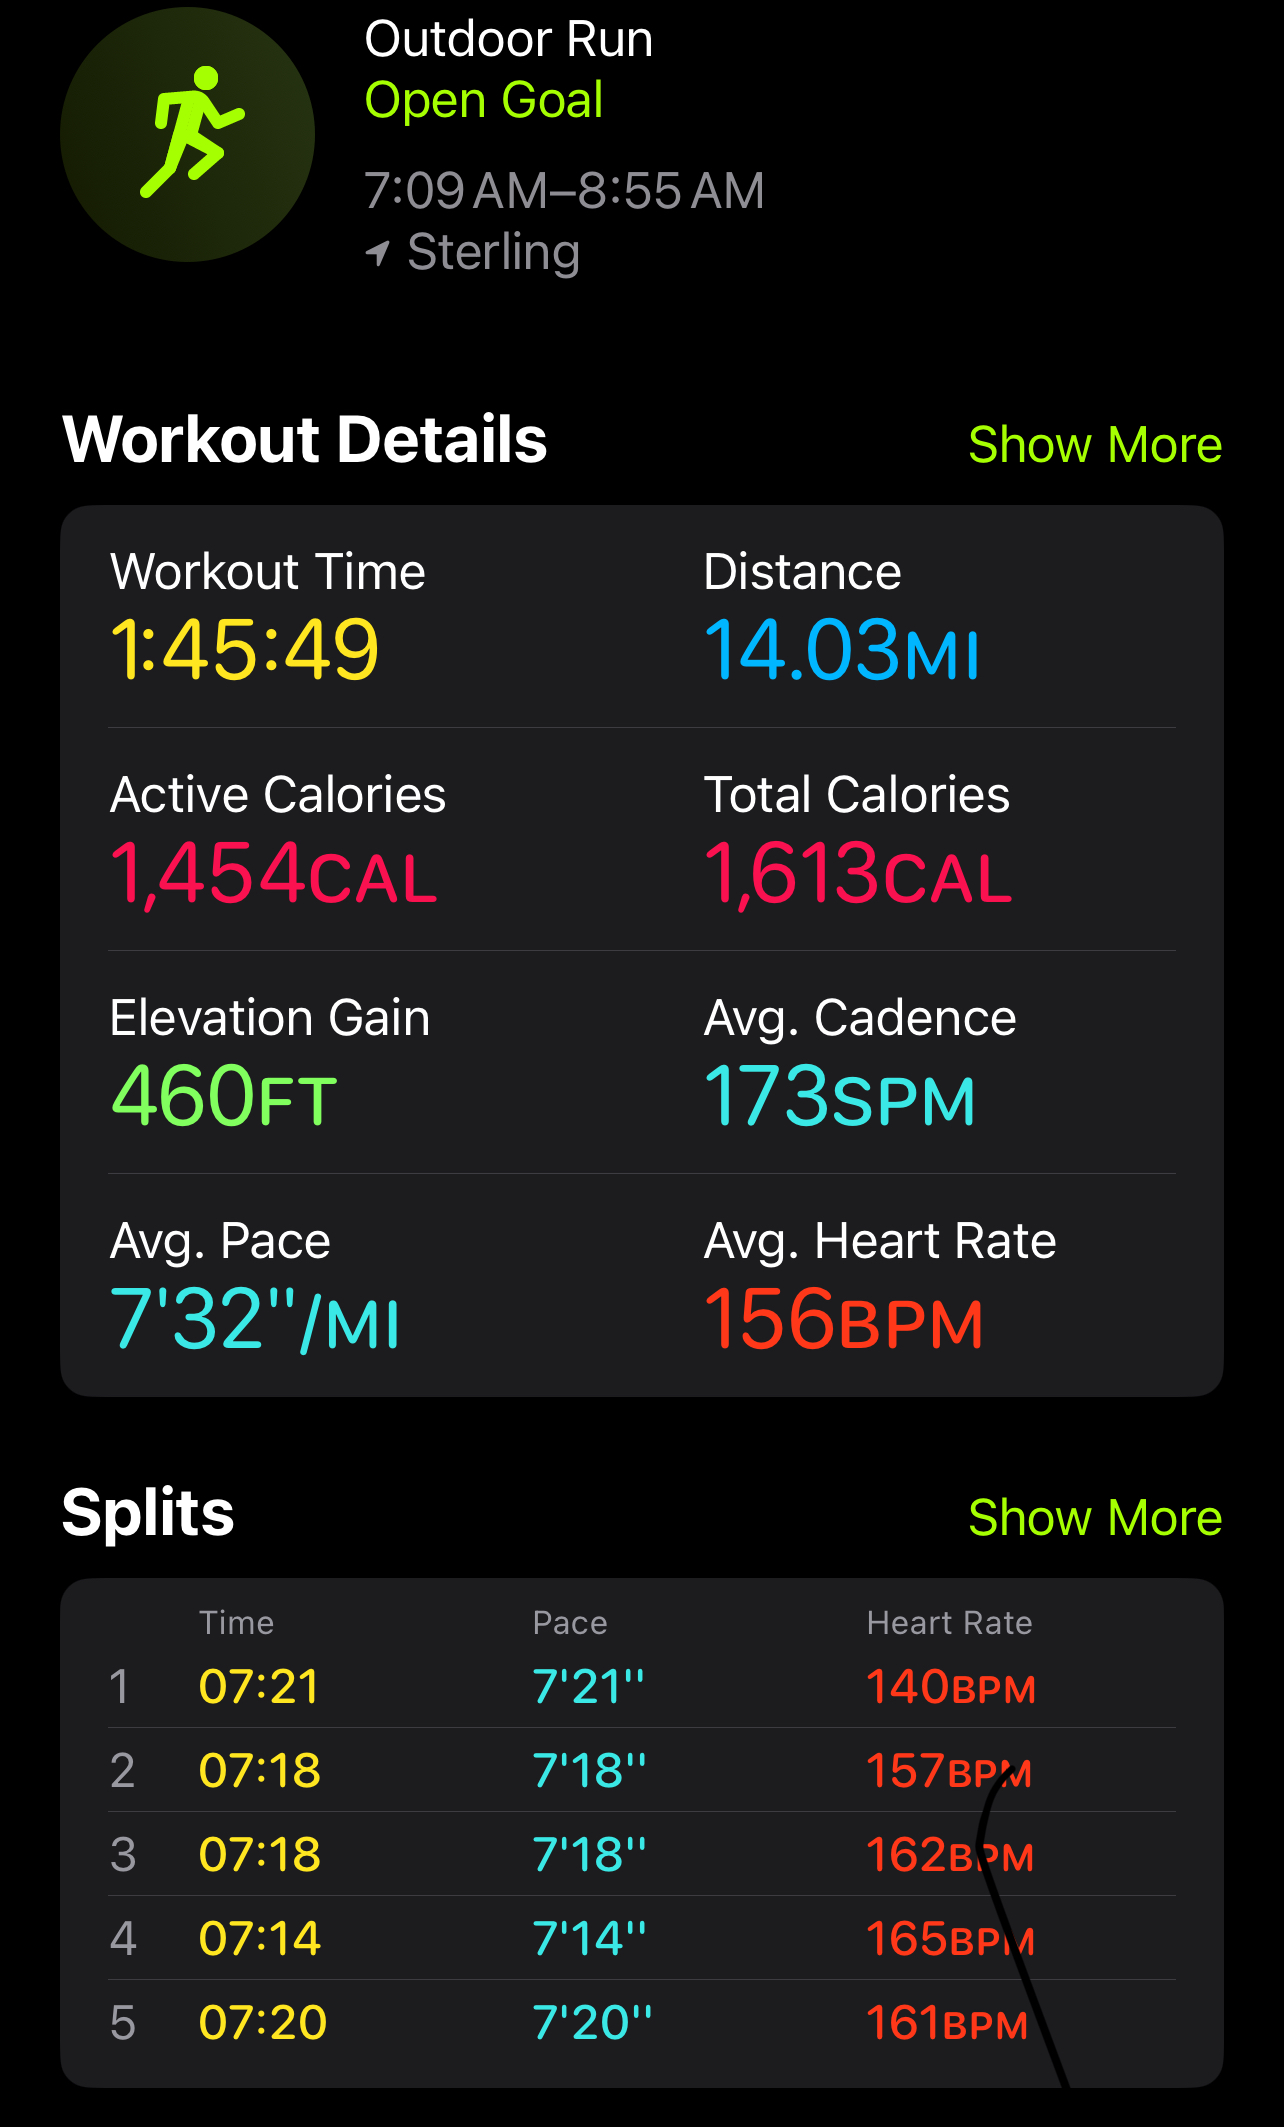
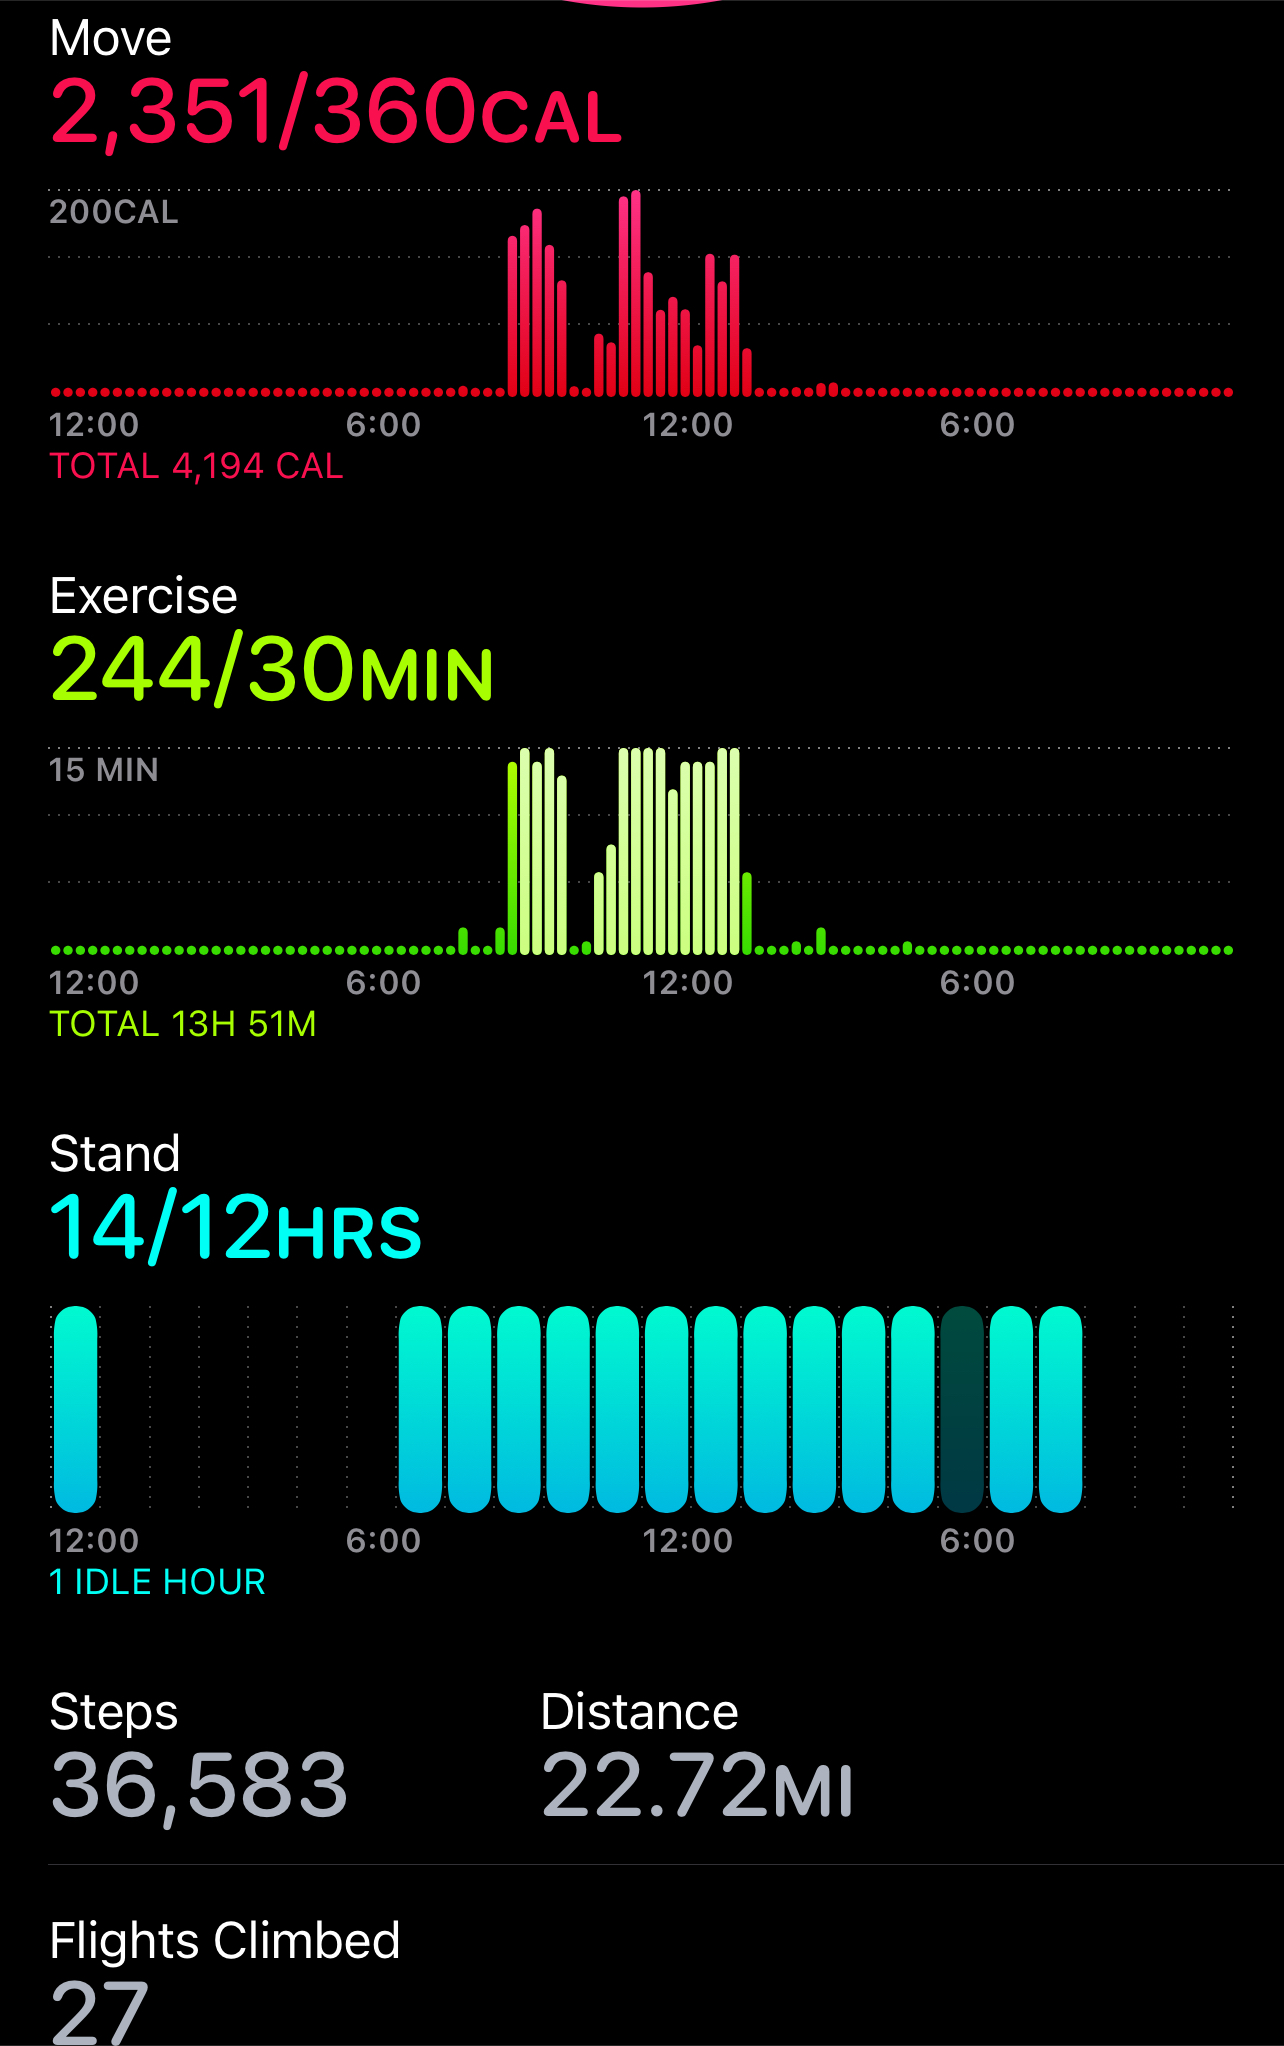
<p>Roughly 10 days after that, because I was having a hard time finding time, I went for a run at 7AM on a weekday. Yeah, that’s right. I wanted to wrap up around 9AM. So I ran pretty fast due to that. Here are the results in the screenshot below.</p>

<p><img src="/assets/images/half-training.jpeg" alt="Half Marathon Training Results" width="70%" /></p>

<p>Looks like my best half-marathon time was 1:31:08, as Apple Watch claims. I don’t know if this is accurate or not. If so, it would be my fastest half marathon time ever, which is great.</p>

<p>Anyway, very tired after that, so I went back, drank electrolytes, whey protein to recover, and iced my knees.</p>

<p>On Sunday, April 21st, I had my first half marathon race, so here’s how that went.</p>

<h2 id="first-half-marathon">First Half Marathon</h2>

<p>On Sunday, April 21st, I had my first race ever, a half marathon.</p>

<p>The day before, I had the carbo-load meal at Davio’s in Reston. Portions were small, but it tasted great. They charged me close to $50 for that. But there was pasta, and there was carbs abounding. So not much to complain.</p>

<p>That day I went to sleep early like around 11am.</p>

<p>The day of the race, I woke up about 5:30am. Got ready, drank some matcha, had early morning banana, apple, and oatmeal with berries. Also had a honey protein bar. Then I got dressed, laced up my bright orange Hoka Mach 5 shoes, which a subreddit on Reddit had convinced me to wear, and off to the race I went.</p>

<p>It was less than a 15 minute drive for me to the race’s gathering point.</p>

<p>One thing I had desired in my first race, my first half for that matter, is a good distance for commute purposes. I didn’t want to fly, didn’t want to drive 4 hours for a race. So having a first half marathon so close to home, was a godsend for this reason. I didn’t have to worry about commute. I honestly could eliminate that issue as otherwise it would be another stress point for me.</p>

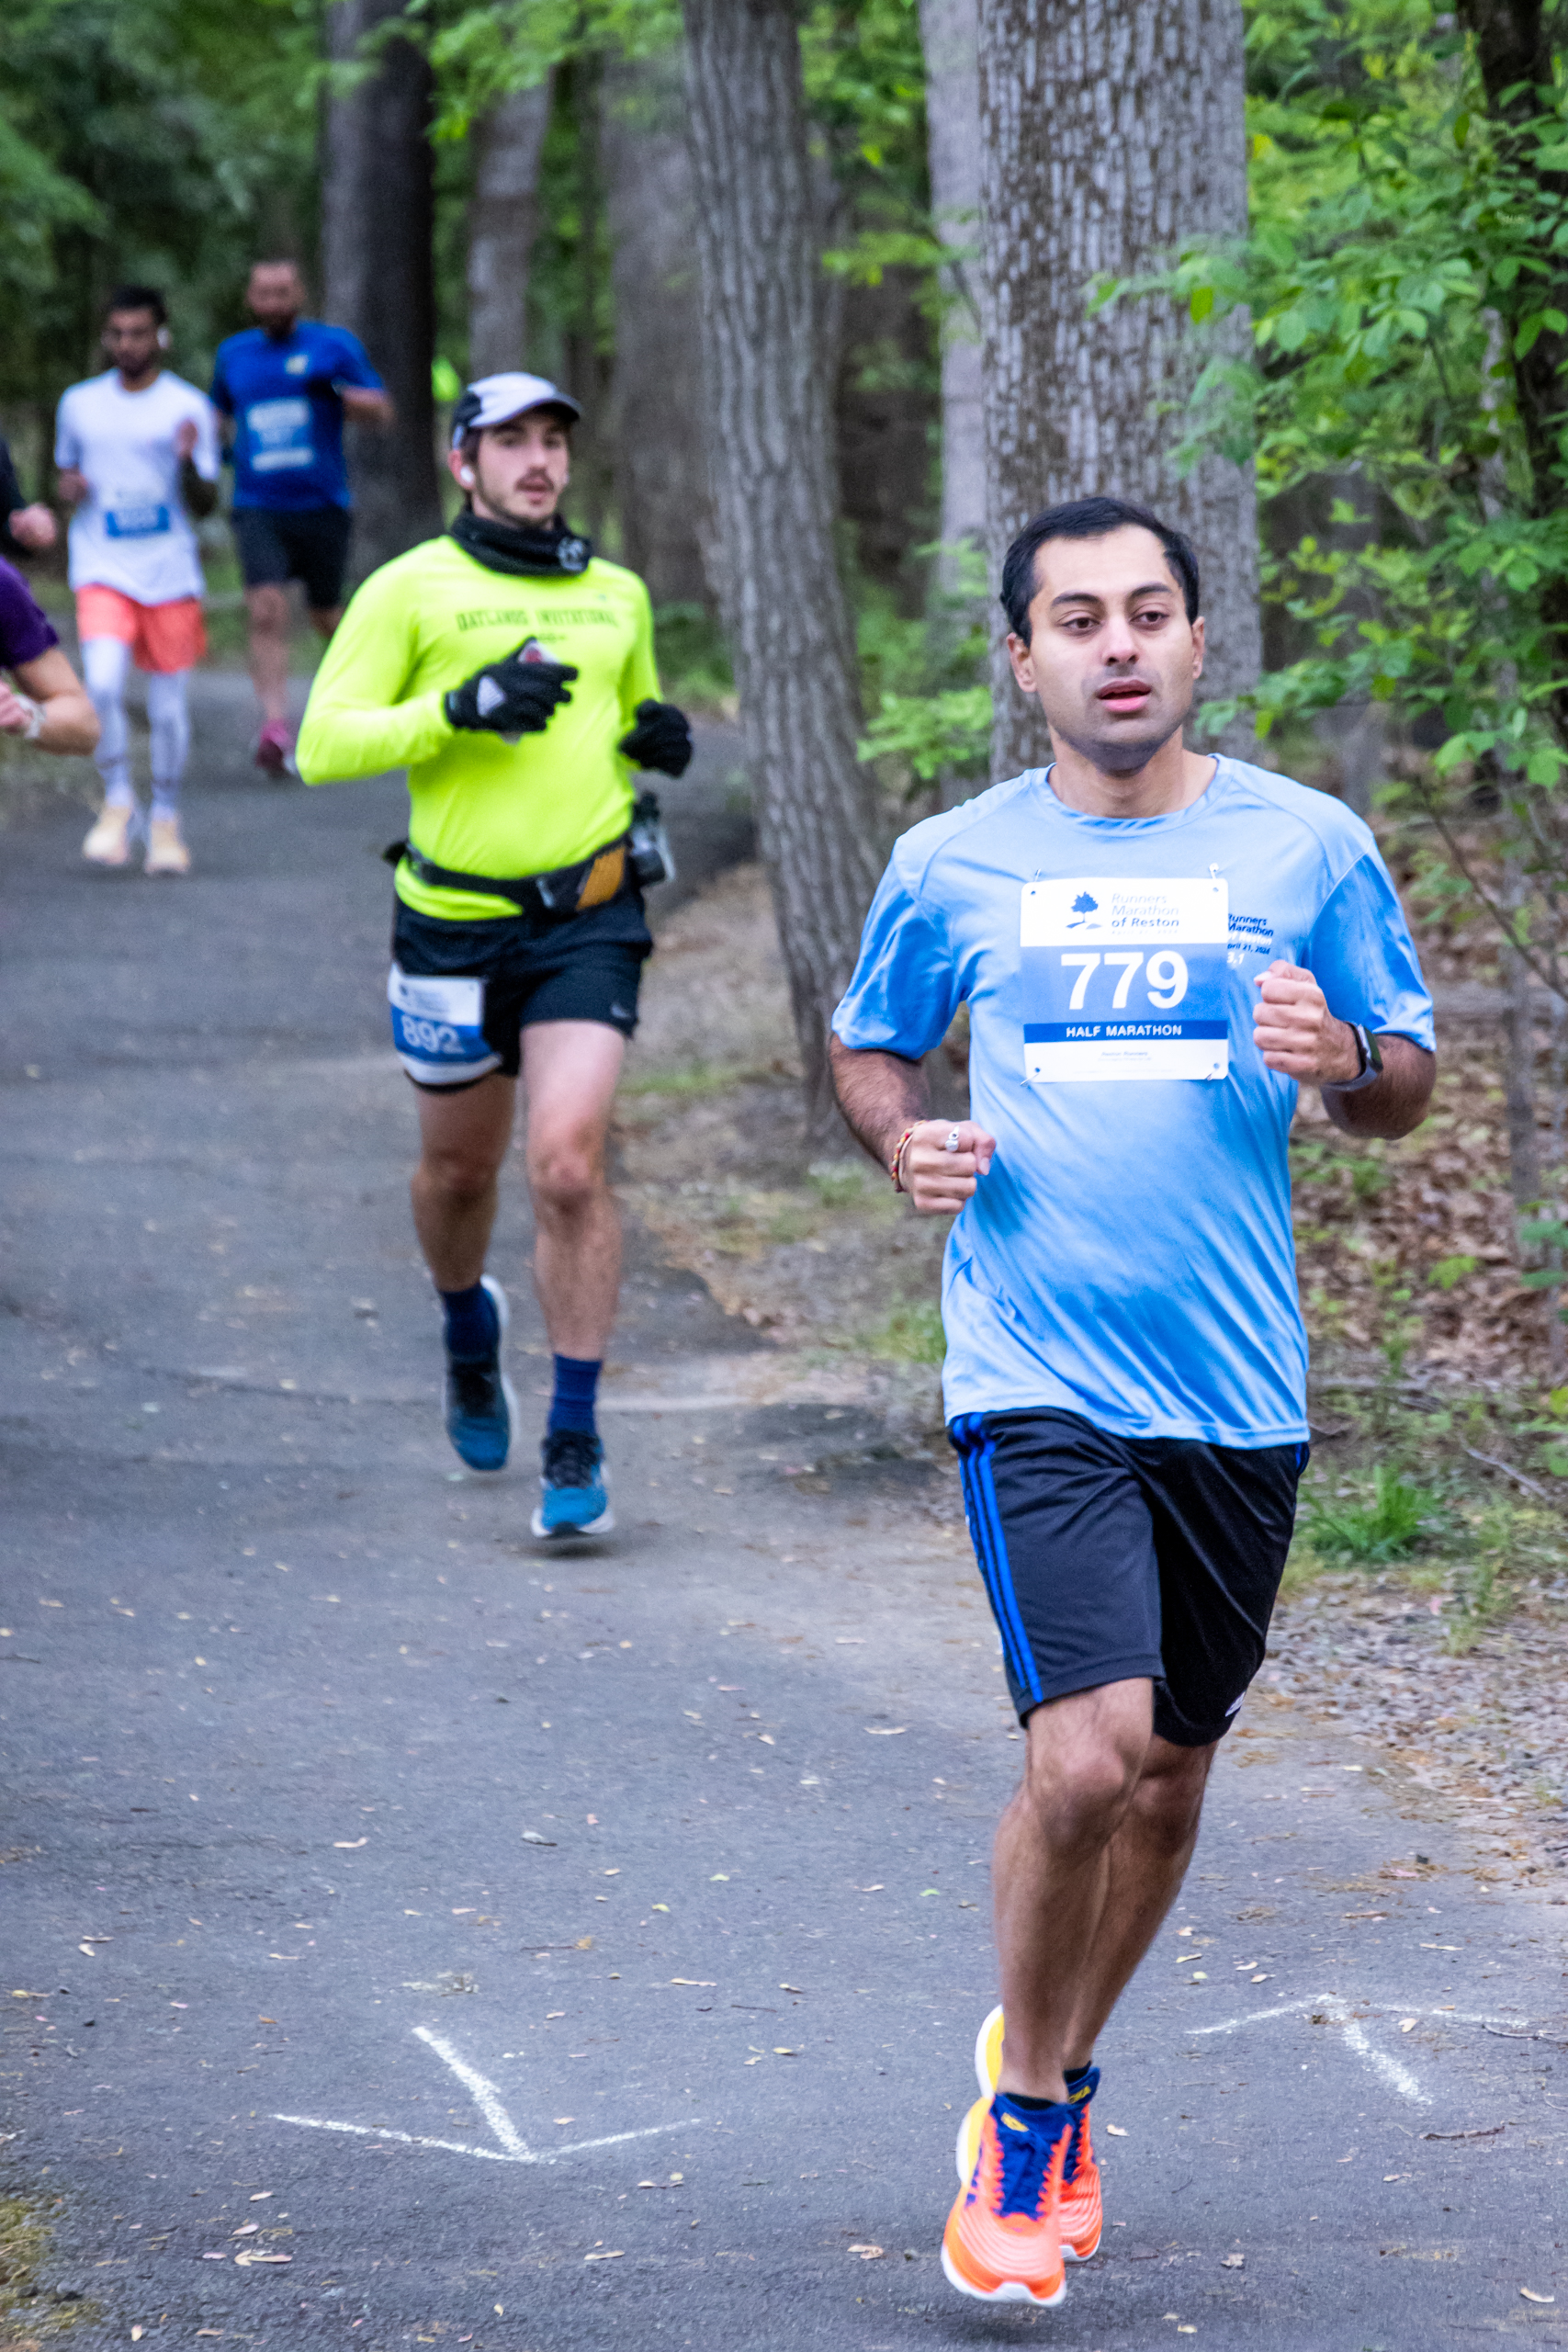
<p>Fast forward to the start of the race. If I remember, I joined the middle of the pack. I wanted to take it somewhat easy, but not too easy. I still wanted to challenge myself. So I tried to stay with some folks who seems like they were maintaining a 7:30-8:00/mile pace, which is a pretty respectable, but easy enough, pace to be running at.</p>

<p>Here is a photo of me on that race:</p>

<p><img src="/assets/images/RMR_half_on_race_1.jpg" alt="RMR Half Marathon - On Race #1" width="70%" /></p>

<p>Most of what I remember from that race, my very first, is that I probably had ate a bit much, and also I seemed to lack energy, since potentially I had not carb-loaded properly. It’s always hard to estimate these things, especially for one’s first race. Also, I was for some reason thirsty, all the time. I didn’t carry my waist pack with me on this run, in an attempt to slash on unnecessary weight, and potentially gain speed and pick up the pace as a result.</p>

<p>That reminds me, it was about 45 degrees out that morning, but I was wearing a t-shirt and shorts, and I saw lot of others wearing similar attire, so thankfully I was not alone. Some folks were even wearing sleeveless. Then again I saw lot of others in long-sleeved and even pants. Because 45 degrees is understandably chilly for some.</p>

<p>Anyway, going back to hydration. At around mile 3 or 5, some volunteers were on the sidelines offering water and gatorade, so I snagged one quick. I tried to drink while jogging, a mistake, as I spilled some on my shirt. I tossed it after I’d drunk most of it, but the damage was done. My shirt was soaked and I wasn’t too well hydrated. On top of that I had lost on pacing slightly, since I had slowed down. So turns out, bad idea overall.</p>

<p>Most of what I remember on that run, on my first half marathon, basically boils down to five things. One, it was a scenic run, as promised, lot of green grass and vegetation, and trees, and overall just a pleasant run. Two, the weather was perfect and it was a little bit chilly but that’s much preferred over humid any day of the week. Three, so many hills, and I was not prepared for them. Four, did I mention dehydration, as it always seemed as my throat was parched. Five, my lungs and mind were fighting me constantly, but my legs only after mile 10.</p>

<p>Let’s dive a little bit deeper into some points. Starting with the hills. The uphills were especially brutal, and even though there were hills on the WO&amp;D trail, they were nothing like these. The uphill jog efforts really snuck up on you, and took their toll on me. The downhills were much better.</p>

<p>In the words of a volunteer on the sidelines —</p>
<blockquote>
  <p>Gravity is your friend!</p>
</blockquote>

<p>That basically is a nod to the fact that downhill, running is so much easier. Actually gravity carries your legs faster and further than you could normally run unaided. This is actually the reason why some world records for the mile run were discounted — because the track in those cases were downhill, which is not fair since other competitors didn’t have that edge. Make no doubt, running downhill certainly gives you an edge, at least compared to running on flat ground, and most certainly when compared to running uphill. Long story short, running uphill sucks, running downhill is a godsend.</p>

<p>More on the dehydration aspect. I felt thirsty, like my throat was parched, constantly. At mile 3, I drank water. I drank gatorade again at mile 6, and same as last time I tried to drink while running, and spilled the fluids on myself again. At mile 11, I snagged gatorade, and gave in to my mind telling me to take a break, also because my legs were completely beat, and I just stood still and finished that cup of gatorade. Wasting a lot of time and crashing my pace, since I was immobile in one spot, but what can you do, when both your legs and mind are fighting you over your sustained efforts. Anyway, I estimate a total of 3-4 water or gatorade stops on my part. Too many frequent breaks I suppose, but for a first half marathon I suppose it can be forgiven.</p>

<p>Lastly, about my lungs and mind fighting me. I did try to keep up with the group, in order to pace myself better, and mostly I stuck with this one dude until about mile 7. He was a pretty good pacer, and we were both averaging about 7:20/mile. Certainly under 7:30/mile. It felt good to have someone to pace with, to run with, so I just decided to have a relaxed run in that manner, us alternating taking the lead, and the lungs issue was tabled for a while.</p>

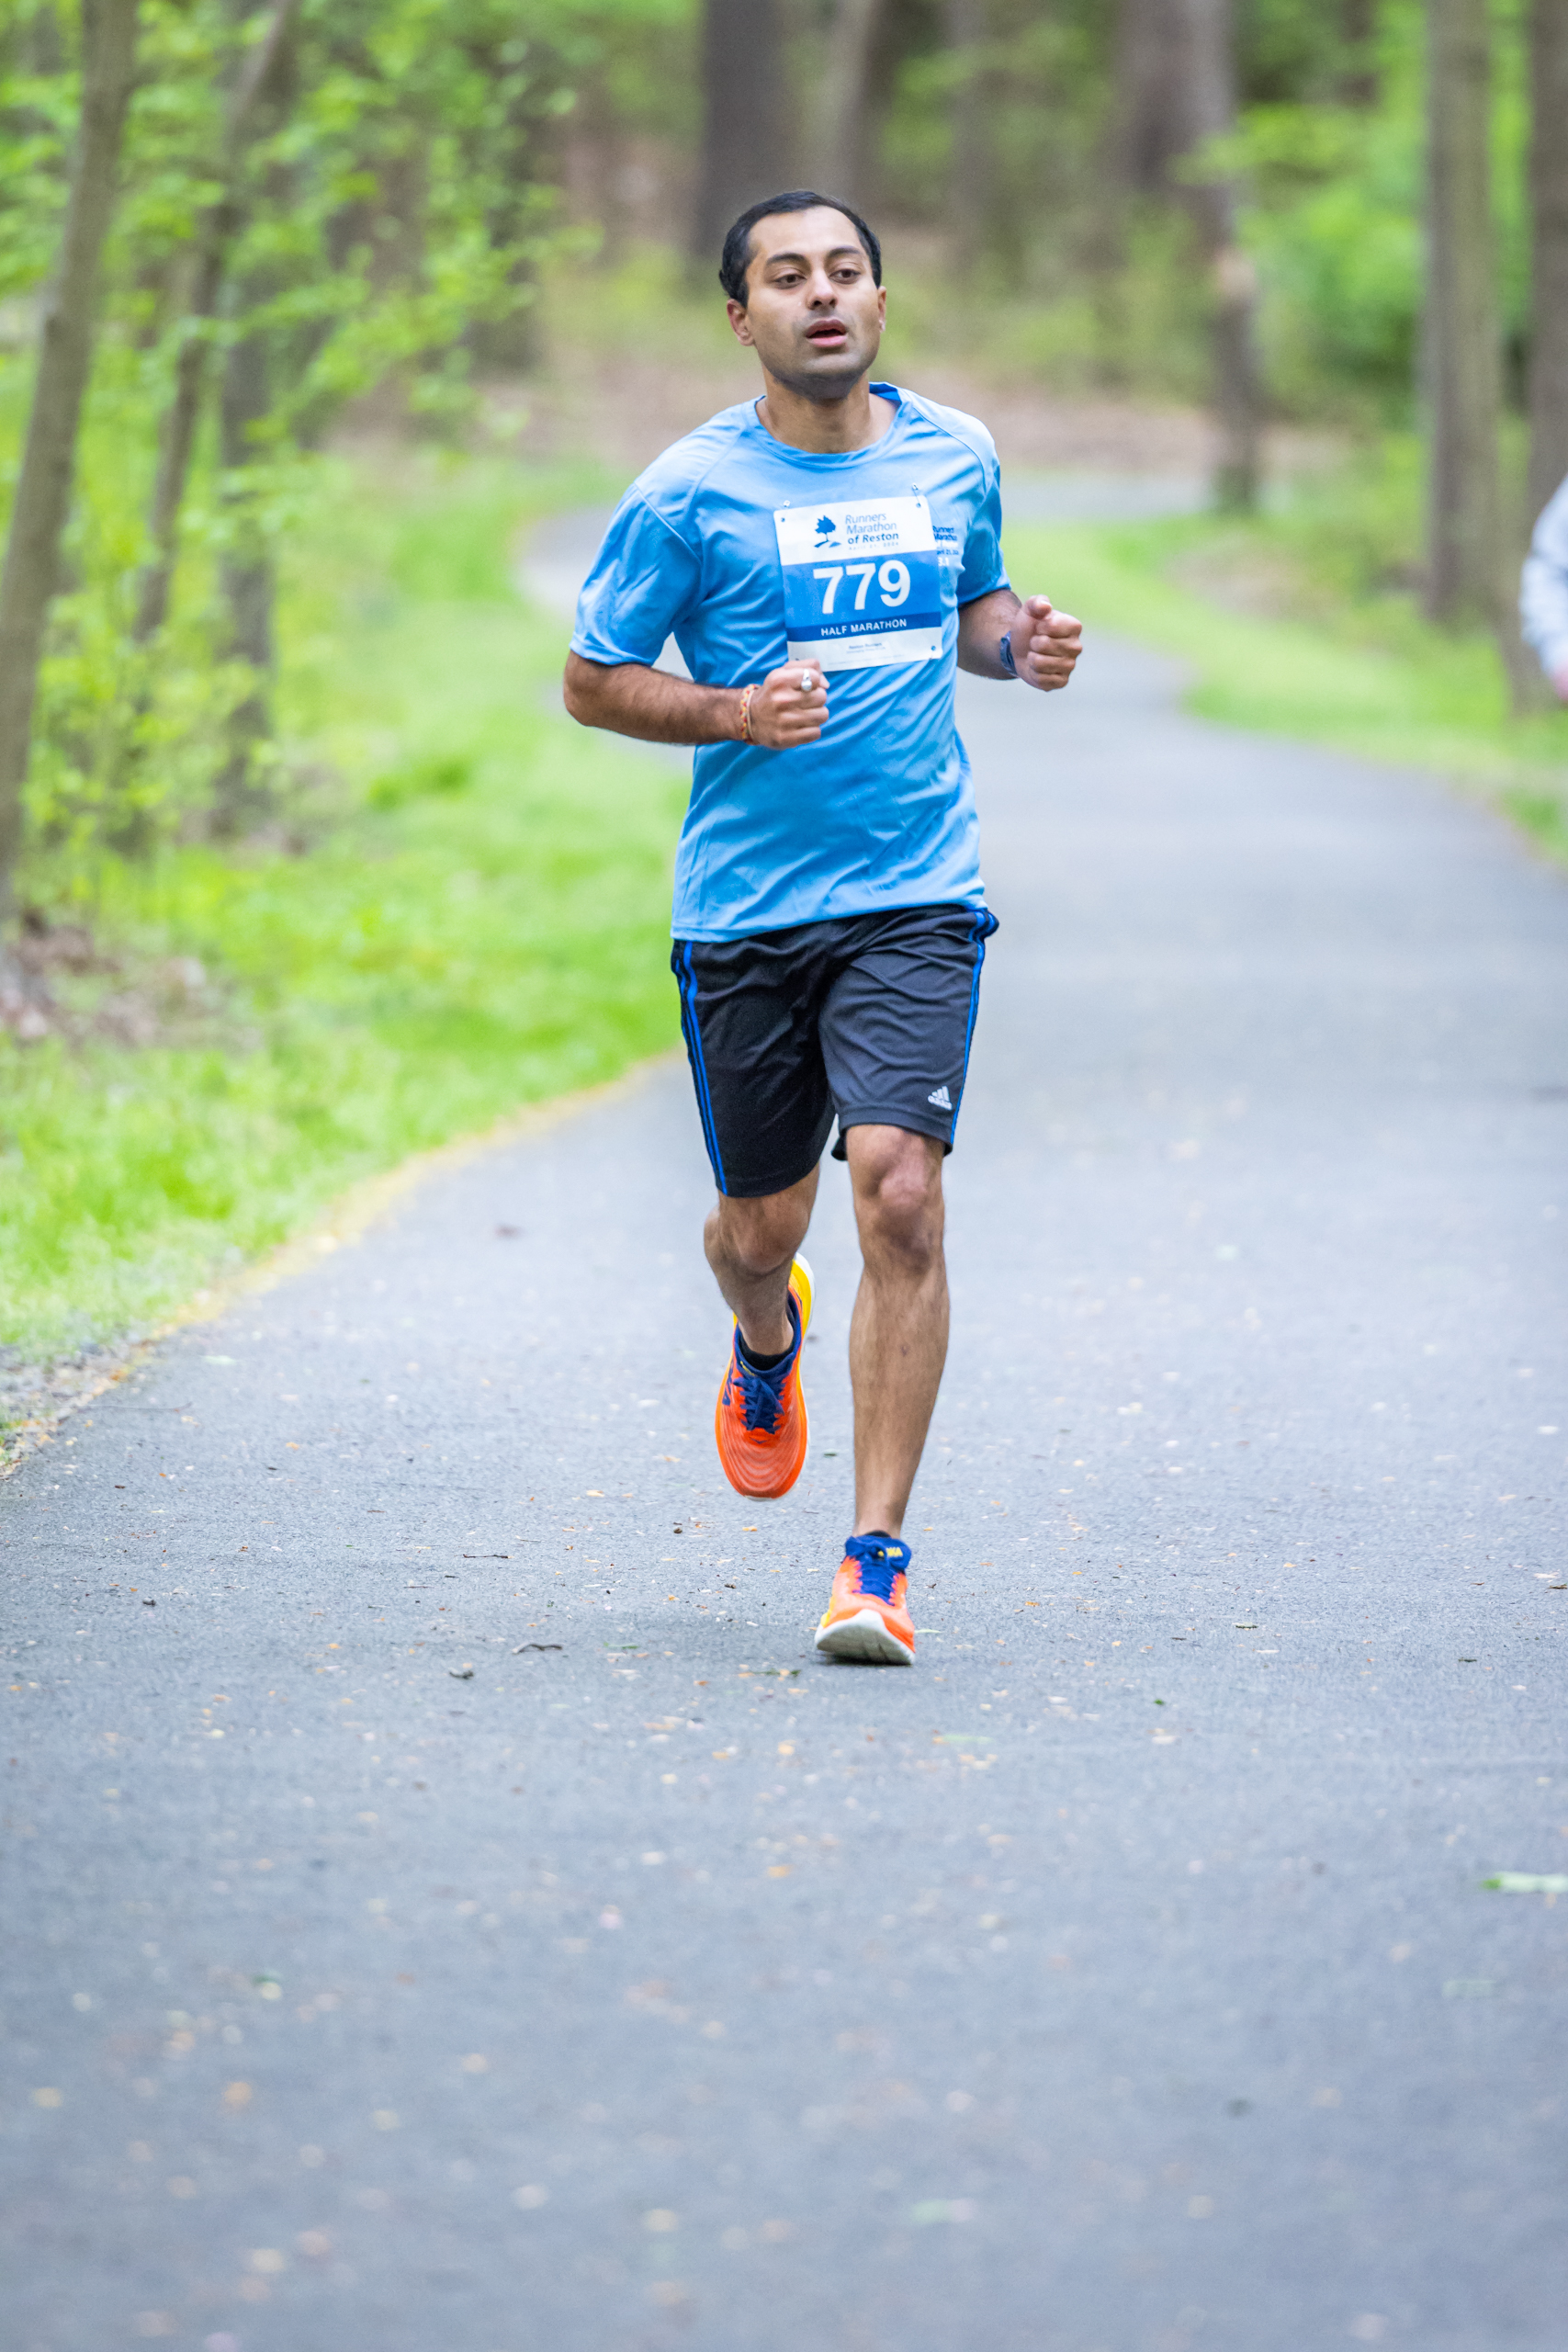
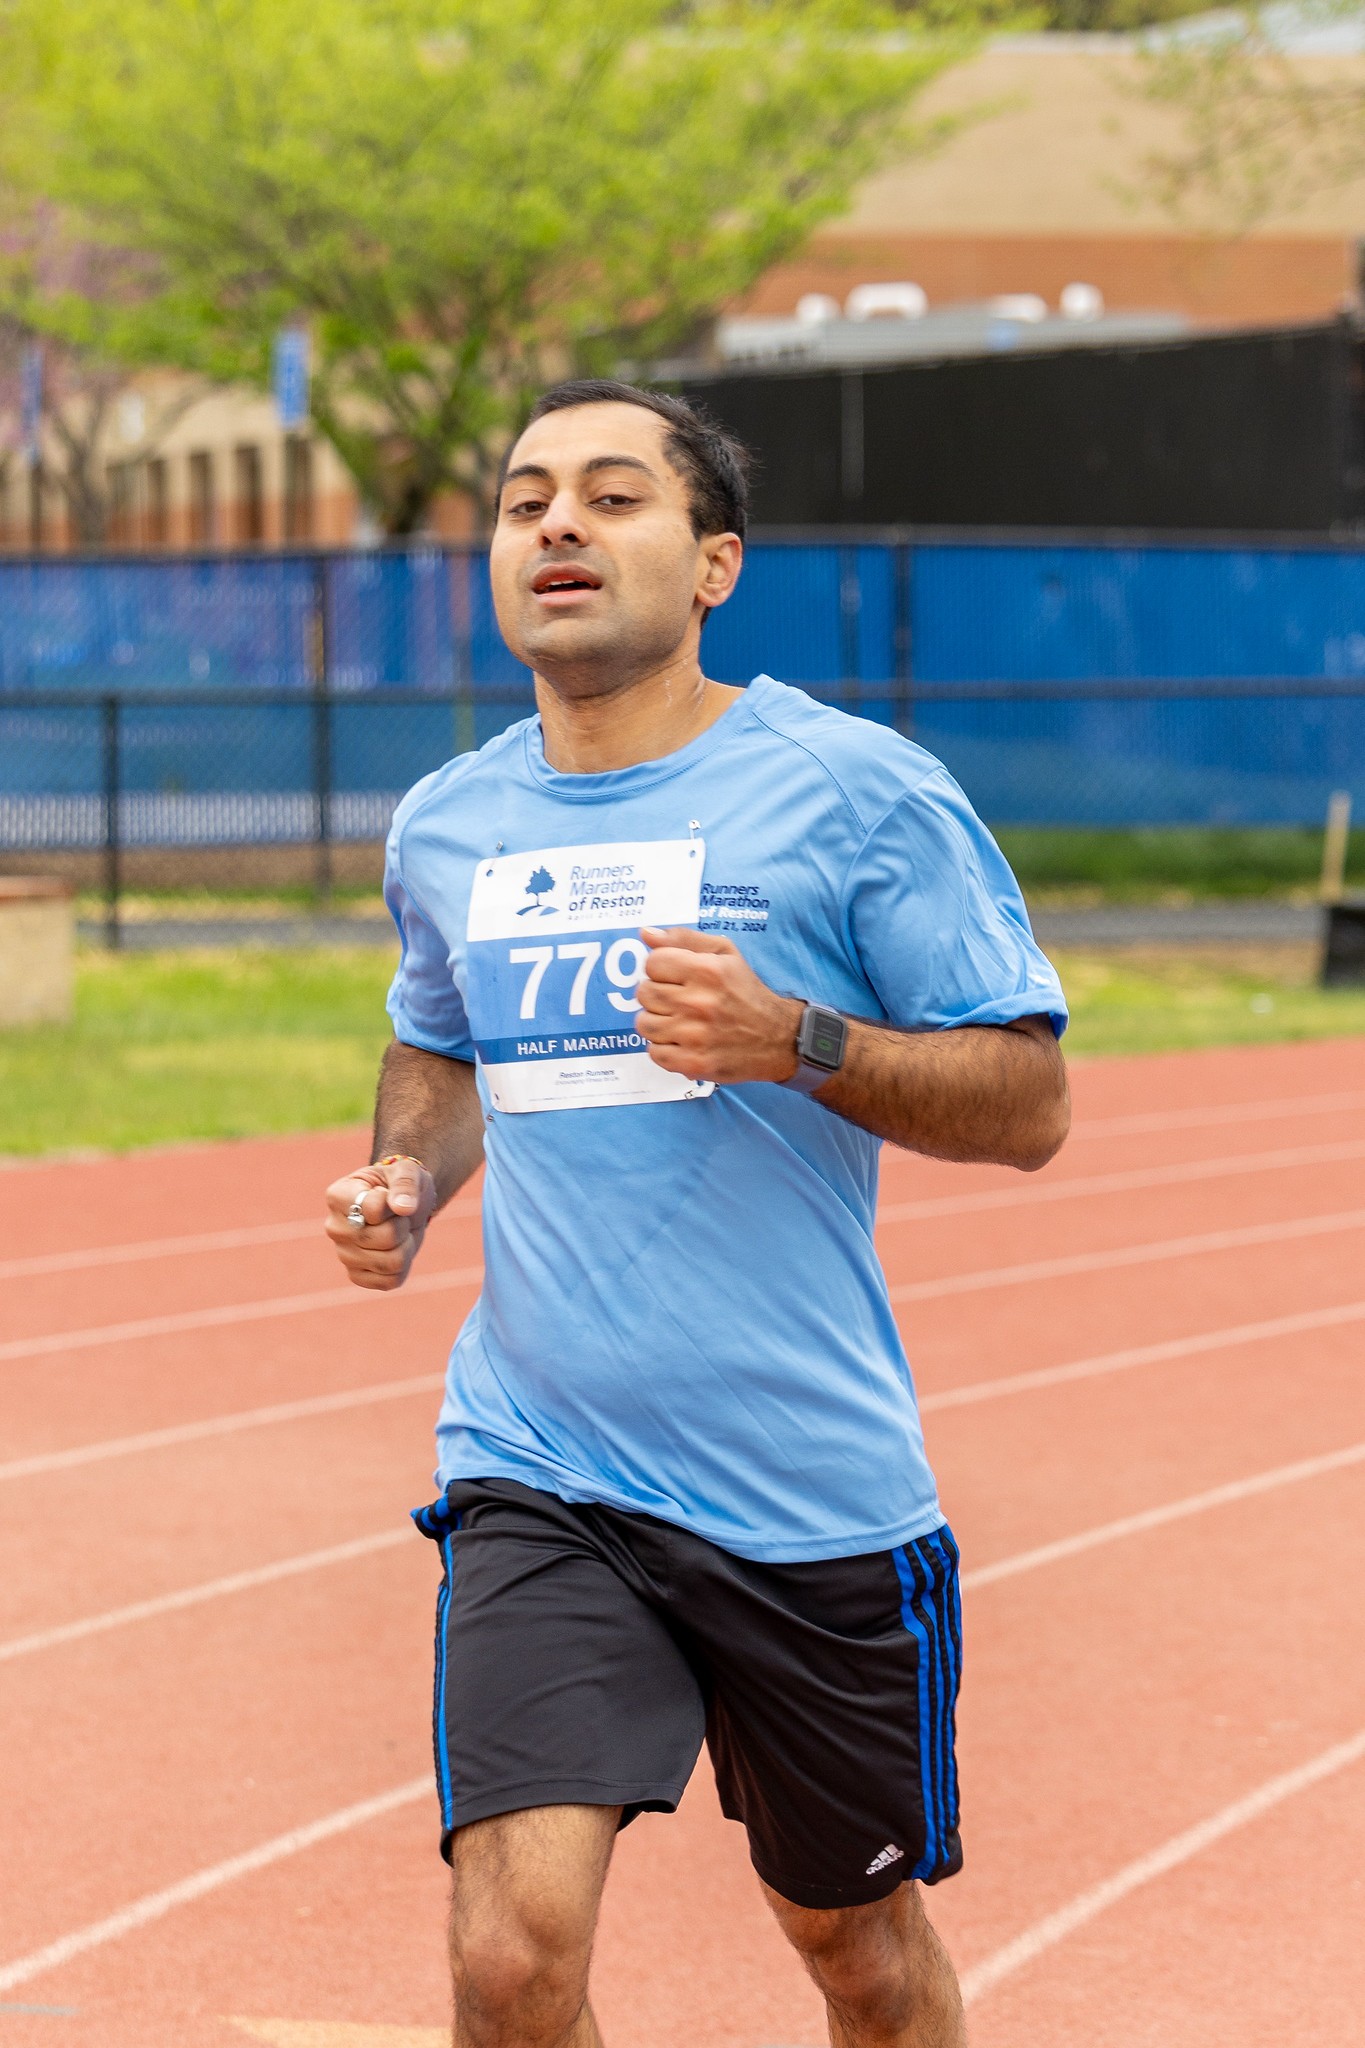
<p>At around mile 7, I broke up and sped off in an (unrealistic) effort to catch up with the frontrunners, and also to challenge myself to push the pace, and get a decent finish time.</p>

<p>Another photo, ostensibly taken when I decided to “fly solo” at around mile 7-8:</p>

<p><img src="/assets/images/RMR_half_on_race_2.jpg" alt="RMR Half Marathon - On Race #2" width="70%" /></p>

<p>This is more or less where I started having a “consistent” pacing issue, and at the same time started having a breakdown of my lungs and mind unanimously. The hard part was not starting at the distance readout on my Apple Watch every few minutes. Seeing those mile plaques or posters or whatever, on the race, pop up every mile as a benchmark, was actually more disheartening than reassuring. It felt like how much distance I’d achieved, and how much my lungs were burning and screaming at me, were totally at odds.</p>

<p>At around mile 9, my lungs were almost at my limit and I just wanted to throw in the towel. At mile 10, it felt like an eternity in coming, but at the same time, that’s when you’re supposed to realize that it’s only a 5K distance left. That is, 3.1 miles remaining. So I was <em>supposed</em> to speed up, because it’s only a 5K race now, but in reality I couldn’t. My lungs had been fighting me every mile of the way, and apparently now it was my legs’ turn to take over the battle.</p>

<p>It seemed unfair, for the legs to refuse to move at the same pace, to slacken and grow tired, but that’s exactly what ended up happening. Rather than speeding up for the last 5K distance, I struggled even with maintaining what I assumed was my 7:30/mile pace that I had going on. Maintaining that pace was the hardest part. Shouting down my mind that told me to walk it out, and punishing my lungs for fighting me by continuing the battle with them, seemed especially cruel but necessary.</p>

<p>Anyway, near the end, I almost got lost twice. Once when I didn’t know if I should take a right or go straight. Some volunteer sitting in a pickup truck told me to go straight after I asked. But again, that questioning wasted no small amount of time.</p>

<p>Finally, at last leg of the race, once I got on the track again, where the race was supposed to start and end, I again got lost. I saw “Finish” and supposed I should go left. I was shooed by volunteers and told to go right. Then I stopped prematurely, assuming I was done, only to be told to keep going, I have to go all the way to the “Finish” line.</p>

<p>If you’d ask me, this last part was not coordinated or handled well. Why is it so easy to get lost on that last home stretch, while on the track and you see the words reading “Finish”? I don’t know. It seems like it shouldn’t be so easy to get lost, but it was, for me at least.</p>

<p>Running the whole length of that track to the Finish line seemed like it took an eternity by itself.</p>

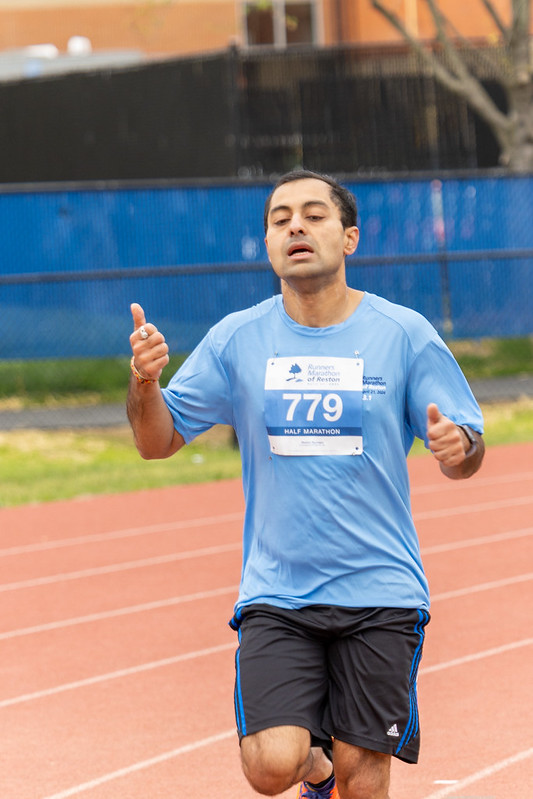
<p>You can see how tired and out of breath I was, and must have been, by seeing how I looked right before I punched through the finish line:</p>

<p><img src="/assets/images/RMR_half_finish_1.jpg" alt="RMR Half Marathon - Finish #1" width="67%" /></p>

<p>By getting lost twice and stopping for breaks to hydrate, I must have wasted about 2 or 3 minutes easily by that itself. But again, sometimes it’s the journey that matters more than the destination. Given that it was my first race ever, and first half marathon, I really was not expecting to break a PR or get first place overall — that would have been unrealistic at any rate.</p>

<p>You can see the joy etched on my face, of having finally finished that dreadful half marathon, and returning power back to – and releasing the noose around – my lungs and my blessed legs, that carried me so far. 13.1 miles, all the way to the finish line.</p>

<p><img src="/assets/images/RMR_half_finish_2.jpg" alt="RMR Half Marathon - Finish #2" width="55%" /></p>

<p><img src="/assets/images/RMR_half_finish_3.jpg" alt="RMR Half Marathon - Finish #3" width="55%" /></p>

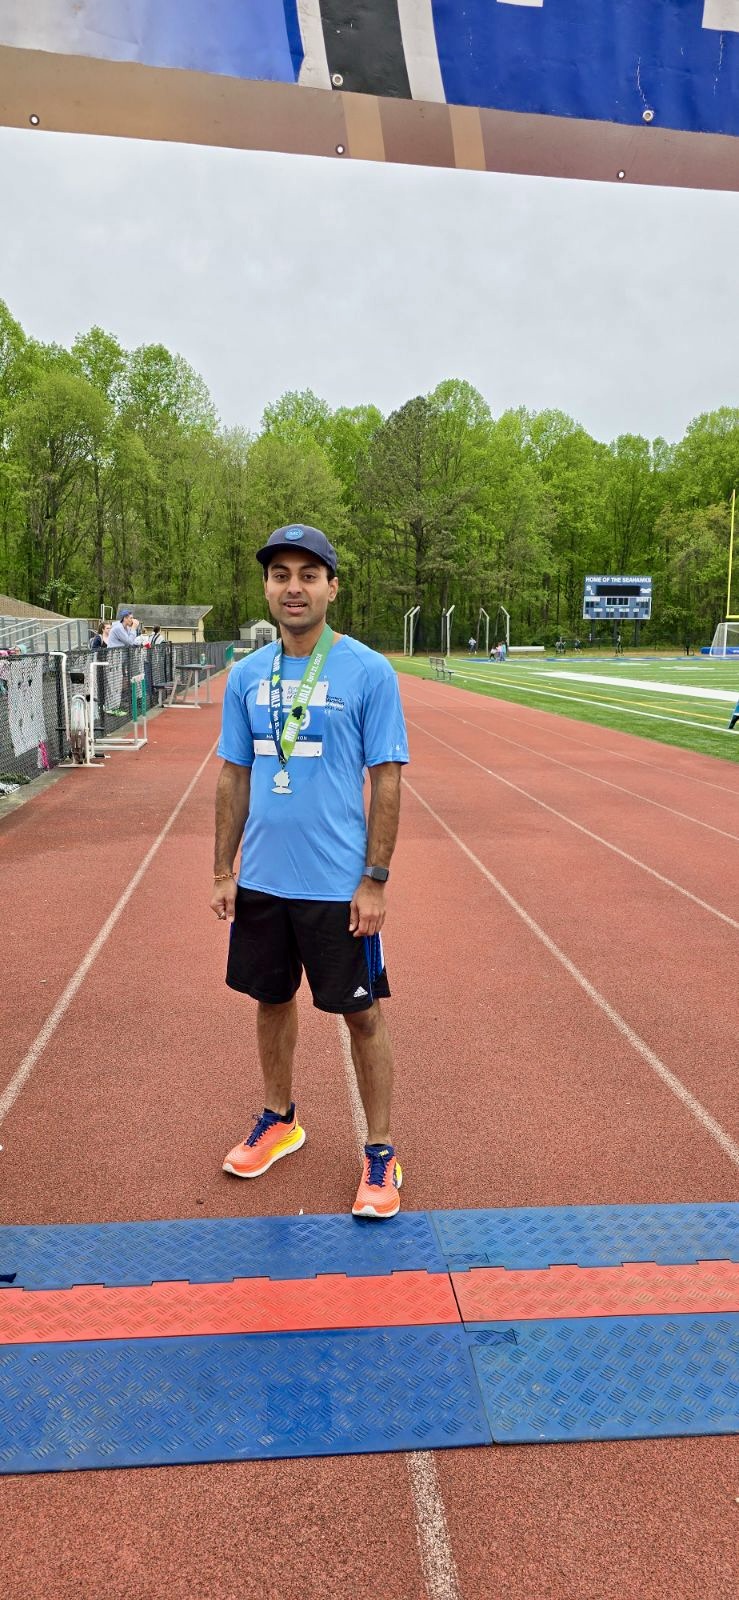
<p>Anyway, I finished first in my age group, and fifth overall in the race.</p>

<p>I got a finish time of 1:36:41 for my first half marathon.</p>

<p>Here’s a splendid, dashing photo of me basking in my glory and victory, after the conclusion of the race:</p>

<p><img src="/assets/images/RMR_half_after_race.jpg" alt="RMR Half Marathon - After Race" width="70%" /></p>

<p>Can I say it was worth it?</p>

<p>Absolutely, for the experience along. Even though that first half marathon, felt like a <em>full</em> marathon to me, it taught me some valuable lessons on endurance and leg strength especially, which I hope to fully utilize and learn from going forward.</p>

<p>Going forward, I will plan to incorporate some amount of long runs (at least 10 miles) outdoors, at a frequency of 2-3 weeks. This is just so that I maintain the endurance and leg strength that my first half marathon race has imparted to me.</p>

<p>One thing I enjoyed about my first half marathon is it enabled me to display and embrace my passion of running, and even after finishing it, the passion and respect for running has only increased, it has not reduced or stayed the same.</p>

<p>Going to cut it short here. I am proud of my achievement of my first half marathon, and hope to continue incorporating lessons I have gained from it, such as improved endurance and fitness. I aim to shoot for running at least a 10K distance outdoors once a week, and a 10+ miles outdoor run at least 1-2 times a month.</p>

<p>Participating in my first half marathon has imparted to me much-needed endurance and leg strength, and I hope to continue running, pushing myself, and next time around I hope to improve on my half marathon finish time. Also, here’s to hoping I don’t get lost or get frazzled by those hydration breaks in my next half marathon 😜.</p>]]></content><author><name>Ritvik Nag</name><email>me@ritviknag.com</email></author><category term="blog" /><category term="half marathon" /><category term="run" /><category term="running" /><category term="endurance" /><category term="fitness" /><category term="first race" /><summary type="html"><![CDATA[My first half marathon: hills, hydration mishaps, and a finish line I almost missed — but somehow, I still placed first in my age group.]]></summary></entry><entry><title type="html">Navigating Medium API with JavaScript in 2024</title><link href="https://ritviknag.com/tech-tips/navigating-medium-api-with-javascript-in-2024/" rel="alternate" type="text/html" title="Navigating Medium API with JavaScript in 2024" /><published>2024-02-17T19:07:00-05:00</published><updated>2024-02-17T19:07:00-05:00</updated><id>https://ritviknag.com/tech-tips/navigating-medium-api-with-javascript-in-2024</id><content type="html" xml:base="https://ritviknag.com/tech-tips/navigating-medium-api-with-javascript-in-2024/"><![CDATA[<p class="notice--warning">This article has been cross-posted on my <a href="https://medium.com/@ritviknag">Medium</a> and <a href="https://dev.to/ritvik-nag">Dev.to</a>.
<br /><br />
If you found this post useful, please consider <em>following me</em> on those platforms as I would be really grateful for the support. Thanks!</p>
<!-- {: .notice--info} -->

<hr />

<h2 id="background">Background</h2>

<p>I’m trying to integrate Medium blogging into my personal site at <em>myname.com</em>.</p>

<p>That is, I’m trying to automate the process of publishing an article on my personal blog, and have the contents of the Jekyll-based markdown post – a <code class="language-plaintext highlighter-rouge">.md</code> file – be posted to the two other blogging sites I’m currently signed up on, <a href="https://medium.com"><code class="language-plaintext highlighter-rouge">medium.com</code></a> and <a href="https://dev.to"><code class="language-plaintext highlighter-rouge">dev.to</code></a>.</p>

<p>Towards that end, I tried to search online to see if there is such as a thing as a Medium API that allows me to:</p>

<ul>
  <li>Publish and/or update a post for a user</li>
  <li>Retrieve a list of posts for a user</li>
</ul>

<p>Turns out, only the first point is currently possible via the <a href="https://developers.medium.com/">Official Medium API</a>, and that too, it’s only <em>partially</em> satisfied – there is currently no route via the API to update a post on a Medium. One can only <strong>create</strong> a new post on Medium via the API, but that’s about it.</p>

<p>With the Official <a href="https://github.com/Medium/medium-api-docs"><strong>Medium API</strong></a> as it stands – which is no longer supported or maintained by the Medium team – one can only retrieve user info and create a post, they cannot do anything much more useful than that, for example it is not possible to retrieve a list of a user’s posts via the API.</p>

<h3 id="how-to-auto-update-a-medium-post">How to Auto-Update a Medium Post</h3>

<p>This is slightly tangential to the matter, but I haven’t expressed my discontent with not being able to automate the updating of a post on Medium via an API. I fooled around this with their API – for example using an HTTP <code class="language-plaintext highlighter-rouge">PUT</code> request - for way too long, and didn’t get anywhere with that at all. It’s a real shame that we can only publish new posts via the API, and that it’s not possible to update an existing post via an API.</p>

<p>In fact, this proved the impetus or drive for me to publish an online web tool that easily translates posts from <em>markdown</em> to <em>medium</em>, which I have published on my website:</p>

<blockquote>
  <p><a href="https://ritviknag.com/markdown-to-medium">https://ritviknag.com/markdown-to-medium</a></p>
</blockquote>

<p>I made this above tool for myself, so I can take my personal blog posts, written in <code class="language-plaintext highlighter-rouge">.md</code> files, paste them in there and copy the output to Medium when using the editor to update an existing post.</p>

<hr />

<p>Anyway, slight detour there…</p>

<p>All this to say that I was not able to find a solution via the API that worked for me, to list all the posts under a given user. The reason for this is purely for automation purposes, such that whenever I change a blog post – or <code class="language-plaintext highlighter-rouge">.md</code> file – on my website, I want to publish a new post to Medium, but <em>only</em> if there is not already an existing post with that same title. So basically, I want to avoid re-publishing a post every time I make an update to it – if that’s even possible!</p>

<h2 id="my-search">My Search</h2>

<p>My search led me to Google search for something along the lines of “<strong>medium api get all user posts</strong>”, which led me more or less to this somewhat informative article on StackOverflow:</p>

<blockquote>
  <p><a href="https://stackoverflow.com/q/36097527/10237506">https://stackoverflow.com/q/36097527/10237506</a></p>
</blockquote>

<p>As the accepted answer says, the Medium API is only intended for <em>Publishing</em> and is not intended to retrieve posts.</p>

<p>A workaround that is suggested is to simply use the RSS feed that Medium offers, as such:</p>

<blockquote>
  <p><code class="language-plaintext highlighter-rouge">https://medium.com/feed/@username</code></p>
</blockquote>

<p>For example, here is the RSS feed for my user:</p>

<blockquote>
  <p><a href="https://medium.com/feed/@ritviknag">https://medium.com/feed/@ritviknag</a></p>
</blockquote>

<p>One can simply get the RSS feed via <code class="language-plaintext highlighter-rouge">GET</code>, then if it’s needed in JSON format just use an NPM module like <code class="language-plaintext highlighter-rouge">rss-to-json</code> and we’re good to go.</p>

<p>However, there is an issue with this approach, as another answer in the same SO post confirms:</p>

<blockquote>
  <p>[…] has a limit of the <strong>latest 10 posts</strong>.</p>
</blockquote>

<p>So, there is a limit of only retrieving 10 posts for a given user using the RSS feed option.</p>

<p>Looks like we need another solution!</p>

<h2 id="unofficial-medium-api">Unofficial Medium API</h2>

<p>I would be remiss if I didn’t mention an alternate approach.</p>

<p>There is an <strong>Unofficial</strong> Medium API that someone has come up with. This is the link to it below:</p>

<blockquote>
  <p><a href="https://mediumapi.com">https://mediumapi.com</a></p>
</blockquote>

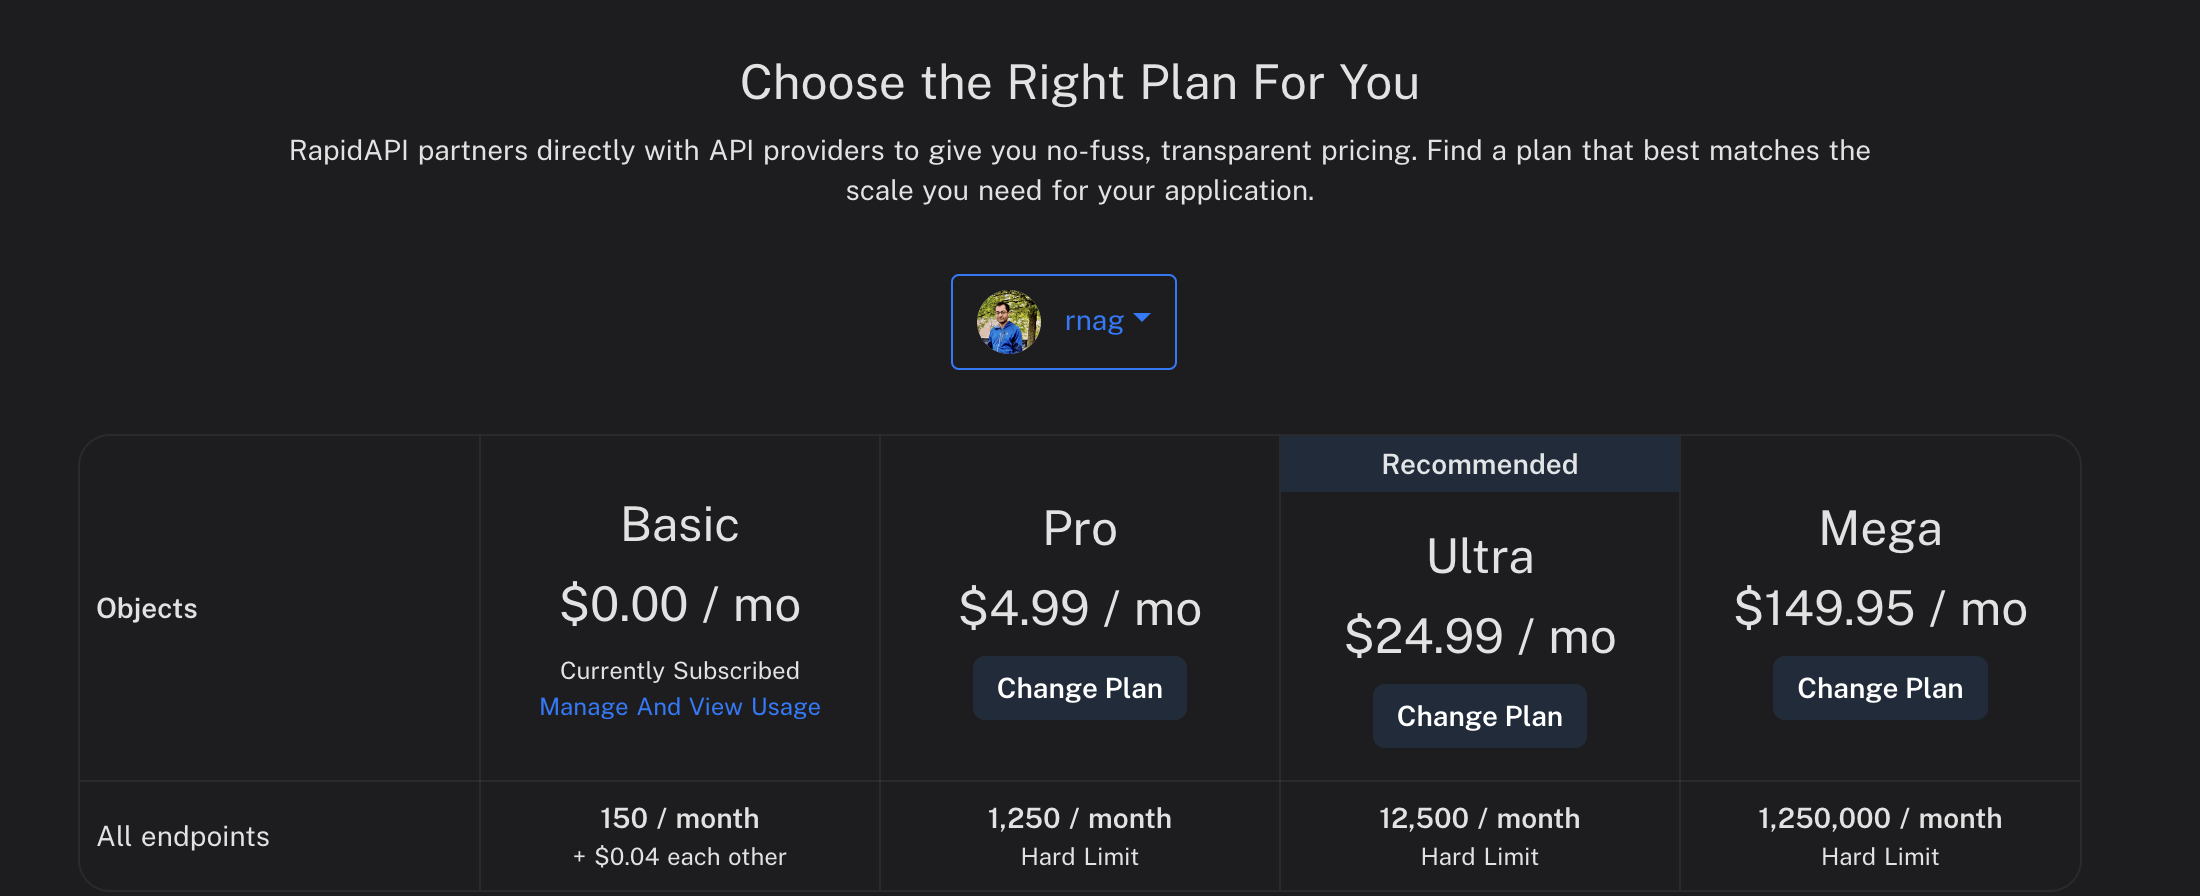
<p>Unfortunately, it’s not an insignificant commitment to sign up with that API. Take a look below:</p>

<p><img src="/assets/images/medium-api-sub.png" alt="Unofficial Medium API Subscription" /></p>

<p>As noted, there appears to be a subscription tier for using that API.</p>

<p>If I, as a developer, want to build an API wrapper around the Medium SDK to retrieve a User’s posts, using this option I would be forced into:</p>

<ul>
  <li>Create a RapidAPI key for <code class="language-plaintext highlighter-rouge">mediumapi.com</code>, or directing users of the library to sign up on <em>another</em> site and acquire a RapidAPI key for requests to <code class="language-plaintext highlighter-rouge">mediumapi.com</code>.</li>
  <li>Rate limiting my library at <strong>150 requests / month</strong>, assuming I want to hardcode and provide users with my RapidAPI key, in order to provide convenience and promote adoption of said library.</li>
</ul>

<p>In short, this is likewise a disaster, albeit of different proportions. There is <strong>no way</strong> I can use a third-party, unofficial API, even though I have personally tested out this API endpoint and confirmed that it returns the correct and desired data.</p>

<p>Thus, the unavoidable road to the <strong><em>DIY project</em></strong>, begins…</p>

<h2 id="the-eureka-moment">The “Eureka!” Moment</h2>

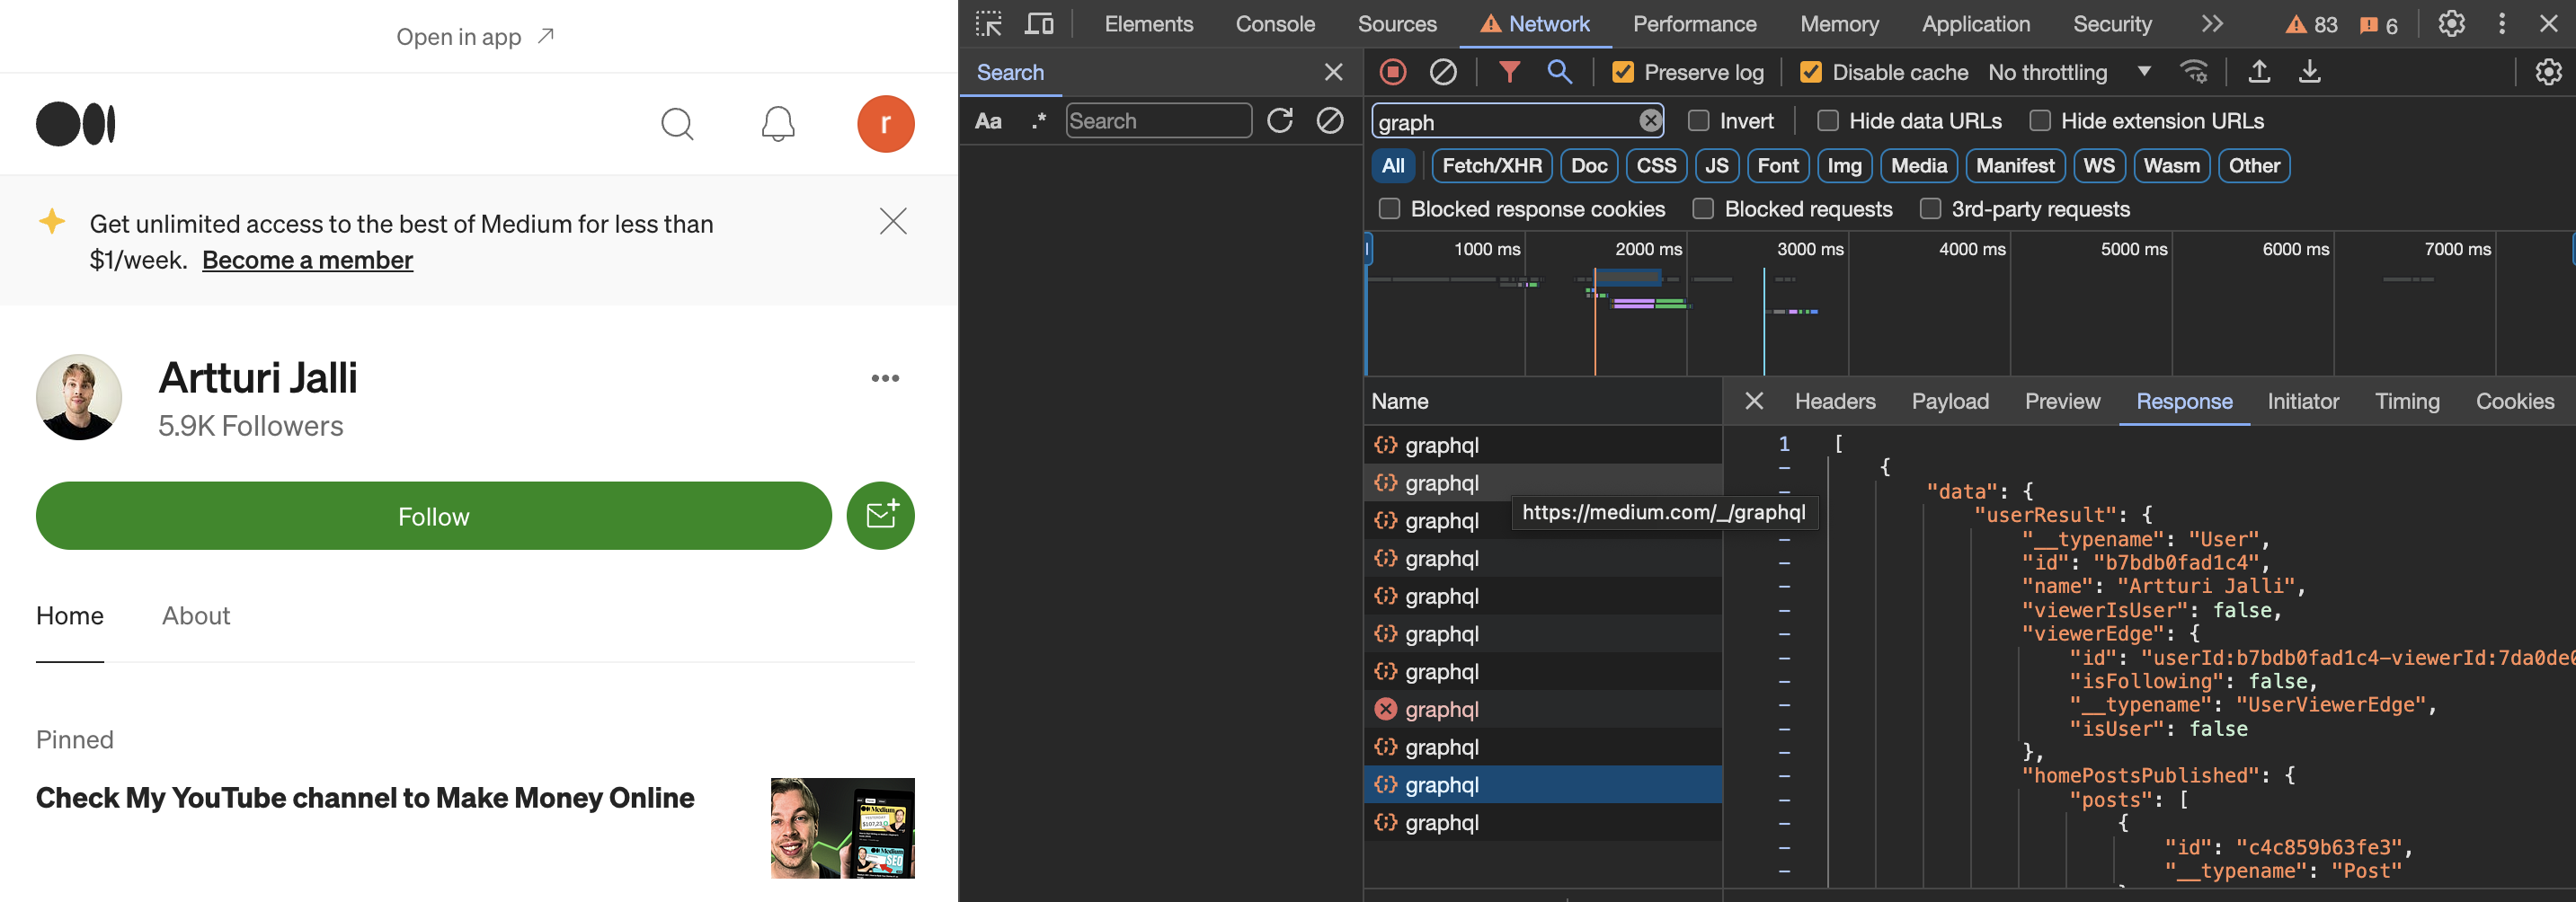
<p>To me, the lightbulb went off, when I was just bored and staring at a random Medium user’s profile, and I had Chrome Developer tools open and was just browsing casually through the <code class="language-plaintext highlighter-rouge">Network</code> tab.</p>

<p>The <code class="language-plaintext highlighter-rouge">graphql</code> endpoints, in particular, stood out to me:</p>

<p><img src="/assets/images/chrome-dev-graphql.png" alt="Chrome Dev GraphQL" height="200%" /></p>

<p>If curious, the URL to that is <code class="language-plaintext highlighter-rouge">https://medium.com/_/graphql</code>, and it’s an HTTP <code class="language-plaintext highlighter-rouge">POST</code> request that gets sent.</p>

<p>Shortly after, I fired up Google search again and this time inputted keywords “<strong>how to use medium api graphql to fetch all user posts</strong>”.</p>

<p>The result was this highly informative post on using Medium’s GraphQL endpoint to retrieve Medium posts for a user:</p>

<blockquote>
  <p><a href="https://medium.com/@mike820324/web-crawler-getting-medium-post-a6e52fd36fd6">https://medium.com/@mike820324/web-crawler-getting-medium-post-a6e52fd36fd6</a></p>
</blockquote>

<p>I decided to implement the same logic in the JavaScript (Node.js + TypeScript) library I was writing, with an intent to publish as an NPM package to <a href="https://npmjs.com/"><code class="language-plaintext highlighter-rouge">npmjs.com</code></a>.</p>

<p>The hardest part for me was how to:</p>

<ul>
  <li>Modify the GraphQL query to only return user post titles</li>
  <li>Paginate through the results, as GraphQL appears to have a limit of <code class="language-plaintext highlighter-rouge">25</code> results (posts) per request.</li>
</ul>

<p>I managed to figure that out, even though it took me a long while.</p>

<p>By the way, I adapted the code from <a href="https://github.com/redco/medium-sdk-nodejs">a fork of the Medium SDK for Node.js</a>.</p>

<p>I made my own changes, and a <strong><em>lot</em></strong> of updates along the way.</p>

<p>Simply said, this was the very first <em>TypeScript NPM package</em> I had ever written. So there was a lot of learning curve.</p>

<h2 id="the-result">The Result</h2>

<p>The work was split into a few main parts:</p>
<ul>
  <li>Porting over existing Medium SDK code from <em>Node.js</em> to <em>TypeScript</em>.</li>
  <li>The hurdle that come with publishing a TypeScript NPM package, such as setting up <code class="language-plaintext highlighter-rouge">tsconfig.json</code> to allow support for <a href="https://www.sensedeep.com/blog/posts/2021/how-to-create-single-source-npm-module.html">both ESM and CommonJS syntax</a> simultaneously.</li>
  <li>Integrating pagination and GraphQL into the codebase.</li>
  <li>Best practices for NPM projects in TypeScript, such as setting up code quality checks and CI/CD automation – such as publishing package to a registry (NPM) automatically.</li>
</ul>

<p>This project is the direct result of my hard work and effort:</p>

<p><a href="https://github.com/rnag/medium-sdk-ts">https://github.com/rnag/medium-sdk-ts</a></p>

<p>Below is the package on the NPM registry:</p>

<p><a href="https://www.npmjs.com/package/medium-sdk-ts">https://www.npmjs.com/package/medium-sdk-ts</a></p>

<h3 id="install">Install</h3>

<p>The package can be installed with <a href="https://www.npmjs.com/">npm</a>, or a package manager of choice:</p>

<div class="language-sh highlighter-rouge"><div class="highlight"><pre class="highlight"><code>npm i medium-sdk-ts
</code></pre></div></div>

<h3 id="import">Import</h3>

<p>The library supports importing via the newer, more modern <em>ES Module (ESM)</em> syntax prevalent in TypeScript code:</p>

<div class="language-ts highlighter-rouge"><div class="highlight"><pre class="highlight"><code><span class="k">import</span> <span class="p">{</span>
  <span class="nx">MediumClient</span><span class="p">,</span>
  <span class="nx">PostContentFormat</span><span class="p">,</span>
  <span class="nx">PostPublishStatus</span><span class="p">,</span>
<span class="p">}</span> <span class="k">from</span> <span class="dl">'</span><span class="s1">medium-sdk-ts</span><span class="dl">'</span><span class="p">;</span>
</code></pre></div></div>

<p>Or, for <em>CommonJS</em> syntax in Node.js, using <code class="language-plaintext highlighter-rouge">require</code>:</p>

<div class="language-js highlighter-rouge"><div class="highlight"><pre class="highlight"><code><span class="kd">const</span> <span class="p">{</span>
    <span class="nx">MediumClient</span><span class="p">,</span>
    <span class="nx">PostContentFormat</span><span class="p">,</span>
    <span class="nx">PostPublishStatus</span><span class="p">,</span>
<span class="p">}</span> <span class="o">=</span> <span class="nx">require</span><span class="p">(</span><span class="dl">'</span><span class="s1">medium-sdk-ts</span><span class="dl">'</span><span class="p">);</span>
</code></pre></div></div>

<h3 id="usage">Usage</h3>

<p>Now create a client for the <strong>Medium SDK</strong>:</p>

<div class="language-ts highlighter-rouge"><div class="highlight"><pre class="highlight"><code><span class="c1">// Access Token is optional, can also be set</span>
<span class="c1">// as environment variable `MEDIUM_ACCESS_TOKEN`</span>
<span class="kd">const</span> <span class="nx">medium</span> <span class="o">=</span> <span class="k">new</span> <span class="nx">MediumClient</span><span class="p">(</span><span class="dl">'</span><span class="s1">YOUR_ACCESS_TOKEN</span><span class="dl">'</span><span class="p">);</span>
</code></pre></div></div>

<p>Retrieve User Details:</p>

<div class="language-ts highlighter-rouge"><div class="highlight"><pre class="highlight"><code><span class="kd">const</span> <span class="nx">user</span> <span class="o">=</span> <span class="k">await</span> <span class="nx">medium</span><span class="p">.</span><span class="nx">getUser</span><span class="p">();</span>
<span class="nx">console</span><span class="p">.</span><span class="nx">log</span><span class="p">(</span><span class="s2">`User: </span><span class="p">${</span><span class="nx">JSON</span><span class="p">.</span><span class="nx">stringify</span><span class="p">(</span><span class="nx">user</span><span class="p">,</span> <span class="kc">null</span><span class="p">,</span> <span class="mi">2</span><span class="p">)}</span><span class="s2">`</span><span class="p">);</span>
</code></pre></div></div>

<p>Publish a new <em>Draft Post</em> under your user:</p>

<div class="language-ts highlighter-rouge"><div class="highlight"><pre class="highlight"><code><span class="kd">const</span> <span class="nx">post</span> <span class="o">=</span> <span class="k">await</span> <span class="nx">medium</span><span class="p">.</span><span class="nx">createPost</span><span class="p">({</span>
    <span class="c1">// Only `title` and `content` are required to create a post</span>
    <span class="na">title</span><span class="p">:</span> <span class="dl">'</span><span class="s1">A new post</span><span class="dl">'</span><span class="p">,</span>
    <span class="na">content</span><span class="p">:</span> <span class="dl">'</span><span class="s1">&lt;h1&gt;A New Post&lt;/h1&gt;&lt;p&gt;This is my new post.&lt;/p&gt;</span><span class="dl">'</span><span class="p">,</span>
    <span class="c1">// Optional below</span>
    <span class="na">contentFormat</span><span class="p">:</span> <span class="nx">PostContentFormat</span><span class="p">.</span><span class="nx">HTML</span><span class="p">,</span>   <span class="c1">// Defaults to `markdown`</span>
    <span class="na">publishStatus</span><span class="p">:</span> <span class="nx">PostPublishStatus</span><span class="p">.</span><span class="nx">DRAFT</span><span class="p">,</span>  <span class="c1">// Defaults to `draft`</span>
    <span class="c1">// tags: ["my", "tags"],</span>
    <span class="c1">// canonicalUrl: "https://my-url.com",</span>
<span class="p">});</span>

<span class="nx">console</span><span class="p">.</span><span class="nx">log</span><span class="p">(</span><span class="s2">`New Post: </span><span class="p">${</span><span class="nx">JSON</span><span class="p">.</span><span class="nx">stringify</span><span class="p">(</span><span class="nx">post</span><span class="p">,</span> <span class="kc">null</span><span class="p">,</span> <span class="mi">2</span><span class="p">)}</span><span class="s2">`</span><span class="p">);</span>
</code></pre></div></div>

<p>Retrieve a User’s Published Posts (using GraphQL endpoint, which does not require an access token):</p>

<div class="language-ts highlighter-rouge"><div class="highlight"><pre class="highlight"><code><span class="c1">// Get User's Published Posts</span>
<span class="kd">const</span> <span class="nx">posts</span> <span class="o">=</span> <span class="k">await</span> <span class="nx">medium</span><span class="p">.</span><span class="nx">getPosts</span><span class="p">(</span><span class="dl">'</span><span class="s1">@username</span><span class="dl">'</span><span class="p">);</span>
<span class="nx">console</span><span class="p">.</span><span class="nx">log</span><span class="p">(</span><span class="s2">`User Post: </span><span class="p">${</span><span class="nx">JSON</span><span class="p">.</span><span class="nx">stringify</span><span class="p">(</span><span class="nx">posts</span><span class="p">,</span> <span class="kc">null</span><span class="p">,</span> <span class="mi">2</span><span class="p">)}</span><span class="s2">`</span><span class="p">);</span>
</code></pre></div></div>

<p>Or, to simply retrieve the user’s post titles only – note that this results in a slightly more simplified GraphQL query being sent:</p>

<div class="language-ts highlighter-rouge"><div class="highlight"><pre class="highlight"><code><span class="c1">// Get User's Published Posts (Title Only)</span>
<span class="kd">const</span> <span class="nx">postTitles</span> <span class="o">=</span> <span class="k">await</span> <span class="nx">medium</span><span class="p">.</span><span class="nx">getPostTitles</span><span class="p">(</span><span class="dl">'</span><span class="s1">@username</span><span class="dl">'</span><span class="p">);</span>
<span class="nx">console</span><span class="p">.</span><span class="nx">log</span><span class="p">(</span><span class="s2">`User Post Titles: </span><span class="p">${</span><span class="nx">JSON</span><span class="p">.</span><span class="nx">stringify</span><span class="p">(</span><span class="nx">postTitles</span><span class="p">,</span> <span class="kc">null</span><span class="p">,</span> <span class="mi">2</span><span class="p">)}</span><span class="s2">`</span><span class="p">);</span>
</code></pre></div></div>

<p>That’s all for now!</p>

<p>I hope this post was informative. Feel free to play around with this NPM package I have published.</p>

<p>Again, here is the source code for it: <a href="https://github.com/rnag/medium-sdk-ts">https://github.com/rnag/medium-sdk-ts</a></p>

<p>If this library has proved useful in your automation efforts, please let me know via the comments down below, and feel free to also <strong>star</strong> the project on GitHub if you’d like.</p>

<p>As mentioned, this is my first-ever TypeScript library package I have published to NPM, so I would appreciate the support or feedback on it – do certainly let me know if there’s anything else I can improve on it.</p>]]></content><author><name>Ritvik Nag</name><email>me@ritviknag.com</email></author><category term="tech-tips" /><category term="medium-api" /><category term="graphql" /><category term="programming" /><category term="javascript" /><category term="npm-package" /><summary type="html"><![CDATA[Leverage the Medium API in JavaScript to publish a post to medium.com, and retrieve a list of all (published) posts for a user.]]></summary></entry><entry><title type="html">How to Mount Current Working Directory To Your Docker Container</title><link href="https://ritviknag.com/tech-tips/how-to-mount-current-working-directory-to-your-docker-container/" rel="alternate" type="text/html" title="How to Mount Current Working Directory To Your Docker Container" /><published>2024-02-09T11:12:54-05:00</published><updated>2024-02-09T11:12:54-05:00</updated><id>https://ritviknag.com/tech-tips/how-to-mount-current-working-directory-to-your-docker-container</id><content type="html" xml:base="https://ritviknag.com/tech-tips/how-to-mount-current-working-directory-to-your-docker-container/"><![CDATA[<p class="notice--warning">This article has been cross-posted on my <a href="https://medium.com/@ritviknag">Medium</a> and <a href="https://dev.to/ritvik-nag">Dev.to</a>.
<br /><br />
If you found this post useful, please consider <em>following me</em> on those platforms as I would be really grateful for the support. Thanks!</p>
<!-- {: .notice--info} -->

<hr />

<p>My team has been building out a new web app in <em>Express.js</em>, and for local deployment and testing we use <code class="language-plaintext highlighter-rouge">nodemon</code>, <code class="language-plaintext highlighter-rouge">babel</code>, and Docker.</p>

<p>One of the burning questions we wanted to find an answer to - apart from the ultimate question of all life, the universe, and everything - is how can we mount our local (current) directory to the running Docker container, so that <code class="language-plaintext highlighter-rouge">nodemon</code> can listen for local file changes when we develop, and automatically reload or restart the (containerized) web server as needed.</p>

<p>Towards that end, I hastily Googled online for “Can Docker mount local drive and listen for file changes”, and even kicked this same prompt to my work-approved AI assistant (*wink* ChatGPT alternative?). Anyway, the responses from the AI prompt are recorded separately below.</p>

<p>By the way, this article is inspired by some other articles on that I found on the web while researching if such a thing is possible - e.g. mounting a local folder to a Docker container - including the following article on Medium, which does a good job of condensing the main points:</p>

<blockquote>
  <p><a href="https://medium.com/@kale.miller96/how-to-mount-your-current-working-directory-to-your-docker-container-in-windows-74e47fa104d7"><strong>How To Mount Your Current Working Directory To Your Docker Container In Windows</strong></a></p>
</blockquote>

<p>As I and my team are developing on an (Apple Silicon-based) Mac, we don’t care too much about the <code class="language-plaintext highlighter-rouge">docker run</code> command being compatible between Mac and Windows overmuch.</p>

<p>However, I certainly agree that Docker is super handy for anyone wanting to write software in a Linux environment while still running a Mac (or Windows) computer.</p>

<h2 id="theory">Theory</h2>

<p>Our <code class="language-plaintext highlighter-rouge">Dockerfile</code> - we use the same one for development and production - looks something like this:</p>

<div class="language-bash highlighter-rouge"><div class="highlight"><pre class="highlight"><code><span class="c"># Start from the Node.js image for AMD64 architecture</span>
FROM <span class="nt">--platform</span><span class="o">=</span>linux/amd64 node:latest

<span class="c"># Set the working directory for your Node.js app</span>
WORKDIR /usr/app

ARG PORT
ARG NODE_ENV

ENV <span class="nv">PORT</span><span class="o">=</span><span class="nv">$PORT</span>
ENV <span class="nv">NODE_ENV</span><span class="o">=</span><span class="nv">$NODE_ENV</span>

<span class="c"># Some installation steps</span>
...

<span class="c"># Copy your Node.js application files and the startup script</span>
COPY <span class="nb">.</span> <span class="nb">.</span>
COPY start.sh <span class="nb">.</span>

<span class="c"># Make the startup script executable</span>
RUN <span class="nb">chmod</span> +x ./start.sh

<span class="c"># Install Node.js dependencies</span>
RUN npm <span class="nb">install</span> <span class="nt">--include</span><span class="o">=</span>dev

<span class="c"># Expose the port your app runs on</span>
EXPOSE <span class="nv">$PORT</span>
EXPOSE 80

<span class="c"># Command to run the startup script</span>
CMD <span class="o">[</span><span class="s2">"./start.sh"</span><span class="o">]</span>
</code></pre></div></div>

<p>We have a custom <code class="language-plaintext highlighter-rouge">start.sh</code> script we use to start our web server. This basically calls <code class="language-plaintext highlighter-rouge">npm run start &amp;</code> within it - e.g. our <strong>npm</strong> script <code class="language-plaintext highlighter-rouge">start</code>.</p>

<p>The above <code class="language-plaintext highlighter-rouge">Dockerfile</code> basically expects arguments to be passed in during the Docker <code class="language-plaintext highlighter-rouge">build</code> step.</p>

<p>This allows us to pass in environment variables (and Bash script values) such as the <code class="language-plaintext highlighter-rouge">PORT</code> for the web server, and <code class="language-plaintext highlighter-rouge">NODE_ENV</code> for the web app - such as <code class="language-plaintext highlighter-rouge">dev</code> or <code class="language-plaintext highlighter-rouge">production</code> .</p>

<div class="language-bash highlighter-rouge"><div class="highlight"><pre class="highlight"><code>docker build <span class="se">\</span>
  <span class="nt">--build-arg</span> <span class="nv">PORT</span><span class="o">=</span><span class="k">${</span><span class="nv">PORT</span><span class="k">}</span> <span class="se">\</span>
  <span class="nt">--build-arg</span> <span class="nv">NODE_ENV</span><span class="o">=</span><span class="k">${</span><span class="nv">NODE_ENV</span><span class="k">}</span> <span class="se">\</span>
  <span class="nt">--tag</span> <span class="k">${</span><span class="nv">TAG</span><span class="k">}</span> <span class="se">\</span>
  <span class="nb">.</span>
</code></pre></div></div>

<p>To the question of mounting a local folder to a Docker container, obviously we only want to enable this behavior when running in development mode.</p>

<p>That is, we only want to mount a local directory to the container into the location at <code class="language-plaintext highlighter-rouge">/usr/app</code> - the <code class="language-plaintext highlighter-rouge">WORKDIR</code> from the Docker instructions above - when we are in development mode, and we <em>don’t</em> want to mount anything when we are building a production Docker image, to later ship to <a href="https://www.freecodecamp.org/news/build-and-push-docker-images-to-aws-ecr/">Amazon ECR</a> for example.</p>

<p>This is a great use case for the potential solution, which will be discussed below. Now that we have the theory in place of what we want to achieve:</p>

<ul>
  <li>
    <p>We would rather not update <code class="language-plaintext highlighter-rouge">Dockerfile</code> to mount a volume or a local folder.</p>
  </li>
  <li>
    <p>Not necessary (or desirable) to mount local folder to a volume when running <code class="language-plaintext highlighter-rouge">docker build</code> to create an image from a <code class="language-plaintext highlighter-rouge">Dockerfile</code> . This is because need to create separate <code class="language-plaintext highlighter-rouge">docker build</code> commands for development and non-development, which is harder to management.</p>
  </li>
  <li>
    <p>Ideal solution will be to update only <code class="language-plaintext highlighter-rouge">docker run</code> command. Which we only run locally anyway. We do not need to execute <code class="language-plaintext highlighter-rouge">docker run</code> for production, as generally for production we just push the final image directly to ECR via a shell command.</p>
  </li>
</ul>

<h2 id="goal">Goal</h2>

<p>Now that theory is knocked out of the way, we understand that we prefer to update <code class="language-plaintext highlighter-rouge">docker run</code> command syntax, rather than touch <code class="language-plaintext highlighter-rouge">docker build</code> or <code class="language-plaintext highlighter-rouge">Dockerfile</code> itself.</p>

<p>Also, it is important here to go over the problem statement once more.</p>

<p>The goal that we are trying to solve is <strong>how to obviate the need to rebuild the Docker image every time an HTML, JS, EJS, CSS, or similar file in the current local directory changes.</strong></p>

<p>The host’s current directory is the same that we are copying over to <code class="language-plaintext highlighter-rouge">/usr/app</code> on the Docker container, as specified in the above <code class="language-plaintext highlighter-rouge">Dockerfile</code> .</p>

<p>This can be a simple change because of renaming your project, or changing any of the code for the project itself. This is not ideal.</p>

<p>There is a way to mount a local folder as a volume on a Docker container. This will solve it for us, when we are running <code class="language-plaintext highlighter-rouge">nodemon</code> on the Docker container to listen for file changes on the <code class="language-plaintext highlighter-rouge">/usr/app</code> location on the container side. We can instead trick Docker to listen for local file changes instead - let us see how this is possible.</p>

<h2 id="online-results">Online Results</h2>

<p>When searching online for the prompt “Can Docker mount local drive and listen for file changes” - as this would be incredibly helpful for local development - I found the below articles to be helpful.</p>

<p>Also, note that the first result is from the official Docker documentation itself. This was helpful for me to determine if Docker can mount local drive and listen for file changes.</p>

<ul>
  <li>
    <p><a href="https://docs.docker.com/storage/bind-mounts/">https://docs.docker.com/storage/bind-mounts/</a></p>
  </li>
  <li>
    <p><a href="https://medium.com/@kale.miller96/how-to-mount-your-current-working-directory-to-your-docker-container-in-windows-74e47fa104d7">https://medium.com/@kale.miller96/how-to-mount-your-current-working-directory-to-your-docker-container-in-windows-74e47fa104d7</a></p>
  </li>
  <li>
    <p><a href="https://stackoverflow.com/q/23439126/10237506">https://stackoverflow.com/q/23439126/10237506</a></p>
  </li>
</ul>

<p>In short, this appears to be a question of <code class="language-plaintext highlighter-rouge">--volume</code> vs. <code class="language-plaintext highlighter-rouge">-- mount</code> with a <code class="language-plaintext highlighter-rouge">type:bind</code>. The <a href="https://docs.docker.com/storage/bind-mounts/#differences-between--v-and---mount-behavior">Docker docs</a> (<em>see first link above)</em> mention that using <code class="language-plaintext highlighter-rouge">--volume</code> is the old style, and there is one important difference in behavior. Hence, using <code class="language-plaintext highlighter-rouge">--mount</code> explicitly going forward seems to be the safer (and more future-proof) approach.</p>

<p>However, note that either approach (<code class="language-plaintext highlighter-rouge">--volume</code> or <code class="language-plaintext highlighter-rouge">--mount</code>) should work for our use case.</p>

<h2 id="ask-an-ai-assistant">Ask an AI Assistant</h2>

<p>When I kicked the same prompt (more or less) to an AI assistant, this is what it replied with - rest of its response truncated for abbreviation sake.</p>

<hr />

<p>Yes, Docker mount local drive to listen for file changes should certainly be possible.</p>

<h3 id="mounting-a-host-directory-in-a-docker-container">Mounting a Host Directory in a Docker Container:</h3>

<ul>
  <li>You can use the <code class="language-plaintext highlighter-rouge">-v</code> flag with the <code class="language-plaintext highlighter-rouge">docker run</code> command to mount a local directory into a container. For example:</li>
</ul>

<div class="language-bash highlighter-rouge"><div class="highlight"><pre class="highlight"><code>docker run <span class="nt">-v</span> /path/to/host/directory:/path/in/container my_image
</code></pre></div></div>

<ul>
  <li>
    <p>Replace <code class="language-plaintext highlighter-rouge">/path/to/host/directory</code> with the actual path to your local directory and <code class="language-plaintext highlighter-rouge">/path/in/container</code> with the desired path inside the container.</p>
  </li>
  <li>
    <p>This approach ensures that any updates made in the host directory are reflected within the container.</p>
  </li>
</ul>

<hr />

<p>Wow, that wasn’t too bad. It got us more than halfway there. Honestly, if we want to use the legacy <code class="language-plaintext highlighter-rouge">--volume</code> option, we can just go with the AI suggestion. But to future-proof it, we can make a small tweak and use <code class="language-plaintext highlighter-rouge">--mount</code> instead, as we’ll see below.</p>

<h2 id="the-trick">The Trick</h2>

<p>I’ve found the best, future-proof method is to use the <code class="language-plaintext highlighter-rouge">--mount type=bind</code> flag when running the <code class="language-plaintext highlighter-rouge">docker run</code> command. With this command, you can attach the local directory to your docker container at runtime instead of during the build process.</p>

<p>The <code class="language-plaintext highlighter-rouge">--mount type=bind</code> command takes a single parameter formatted like so:</p>

<blockquote>
  <p><em><code class="language-plaintext highlighter-rouge">src=&lt;host directory&gt;,dst=&lt;target directory&gt;</code></em></p>
</blockquote>

<p>If we want to <em><strong>exclude</strong></em> any sub-folders in our <code class="language-plaintext highlighter-rouge">&lt;host directory&gt;</code> when mounting the local folder to the Docker container, we need to pass <code class="language-plaintext highlighter-rouge">--mount type=volume</code> with the full path to that sub-folder, and exclude the <code class="language-plaintext highlighter-rouge">src</code> argument, as follows:</p>

<blockquote>
  <p><em><code class="language-plaintext highlighter-rouge">dst=&lt;host directory to not mount&gt;</code></em></p>
</blockquote>

<h2 id="example">Example</h2>

<p>It’s easier to understand the trick when put into practice.</p>

<p>Putting it all together, here I’ve created a scenario where I would like to:</p>

<ul>
  <li>
    <p>Mount my current working directory (<code class="language-plaintext highlighter-rouge">/Users/rnag/Git-Projects/Work/my_project</code>) into the <code class="language-plaintext highlighter-rouge">alpine:latest</code> image at the <code class="language-plaintext highlighter-rouge">/usr/app</code> location in the container.</p>
  </li>
  <li>
    <p>Make the <code class="language-plaintext highlighter-rouge">run</code> command compatible for Apple-silicon-based Mac’s, with <code class="language-plaintext highlighter-rouge">--platform linux/amd64</code> .</p>
  </li>
  <li>
    <p>Exclude (skip) copying over the <code class="language-plaintext highlighter-rouge">node_modules</code> sub-folder in my current working directory, when mounting my current working directory <code class="language-plaintext highlighter-rouge">.</code> to the <code class="language-plaintext highlighter-rouge">/usr/app</code> location in the container.</p>
  </li>
</ul>

<p>We would do that as so:</p>

<blockquote>
  <p><em><code class="language-plaintext highlighter-rouge">docker run -it --platform linux/amd64 --mount type=bind,src=.,dst=/usr/app --mount type=volume,dst=/usr/app/node_modules alpine:latest</code></em></p>
</blockquote>

<p>Or, prettified a bit more, for all you neat freaks (like me):</p>

<div class="language-bash highlighter-rouge"><div class="highlight"><pre class="highlight"><code>docker run <span class="se">\</span>
  <span class="nt">-it</span> <span class="se">\</span>
  <span class="nt">--platform</span> linux/amd64 <span class="se">\</span>
  <span class="nt">--mount</span> <span class="nb">type</span><span class="o">=</span><span class="nb">bind</span>,src<span class="o">=</span>.,dst<span class="o">=</span>/usr/app <span class="se">\</span>
  <span class="nt">--mount</span> <span class="nb">type</span><span class="o">=</span>volume,dst<span class="o">=</span>/usr/app/node_modules <span class="se">\</span>
  alpine:latest
</code></pre></div></div>

<p>This should start up your container and attach your working directory. Now any changes you make locally (i.e. in your Mac or Windows machine) will be reflected in your Docker container!</p>

<p>In short, this will solve it for us, when we are running <code class="language-plaintext highlighter-rouge">nodemon</code> or similar on the Docker container to listen for file changes on the <code class="language-plaintext highlighter-rouge">/usr/app</code> location on the container side. We have successfully tricked Docker to listen for local file changes instead - what a win!</p>]]></content><author><name>Ritvik Nag</name><email>me@ritviknag.com</email></author><category term="tech-tips" /><category term="docker" /><category term="mac" /><category term="linux" /><category term="expressjs" /><category term="nodejs" /><summary type="html"><![CDATA[Learn how to obviate the need to rebuild a Docker image every time an local file in the host's current directory changes, with the power of Bind mounts!]]></summary></entry><entry><title type="html">Ruby (Versioning) Hell with Jekyll &amp;amp; GitHub Pages</title><link href="https://ritviknag.com/tech-tips/ruby-versioning-hell-with-jekyll-&-github-pages/" rel="alternate" type="text/html" title="Ruby (Versioning) Hell with Jekyll &amp;amp; GitHub Pages" /><published>2024-01-28T22:06:58-05:00</published><updated>2024-01-28T22:06:58-05:00</updated><id>https://ritviknag.com/tech-tips/ruby-versioning-hell-with-jekyll-&amp;-github-pages</id><content type="html" xml:base="https://ritviknag.com/tech-tips/ruby-versioning-hell-with-jekyll-&amp;-github-pages/"><![CDATA[<p class="notice--warning">This article has been cross-posted on my <a href="https://medium.com/@ritviknag">Medium</a> and <a href="https://dev.to/ritvik-nag">Dev.to</a>.
<br /><br />
If you found this post useful, please consider <em>following me</em> on those platforms as I would be really grateful for the support. Thanks!</p>
<!-- {: .notice--info} -->

<hr />

<p>So, huge disclaimer, a lesser-known fact (who am I kidding, I’m not ashamed to admit it) is that I’m a bit of a <code class="language-plaintext highlighter-rouge">ruby</code> newbie.</p>

<p>That is, I’ve never cared to learn <code class="language-plaintext highlighter-rouge">ruby</code> before. Also, perhaps as a direct result of that, I am a little taken aback when a project asks me to install <code class="language-plaintext highlighter-rouge">ruby</code> and use tools that it provides such as <code class="language-plaintext highlighter-rouge">bundler</code> , because the assumption there is that I know what I am doing.</p>

<p>Just to set the record straight, I don’t know what I am doing when it comes to <em>anything</em> <code class="language-plaintext highlighter-rouge">ruby</code> .</p>

<p>Recently, a lot of stuff blew up and hell broke loose, when I inadvertently ran <code class="language-plaintext highlighter-rouge">brew upgrade</code> on my new Mac to update (or upgrade?) packages installed by <strong>homebrew</strong>.</p>

<p>But alas, I did not take <code class="language-plaintext highlighter-rouge">ruby</code> into account. A while back, I had installed <code class="language-plaintext highlighter-rouge">ruby</code> with homebrew:</p>

<div class="language-ruby highlighter-rouge"><div class="highlight"><pre class="highlight"><code><span class="err">$</span> <span class="n">brew</span> <span class="n">install</span> <span class="n">ruby</span>
</code></pre></div></div>

<p>Homebrew, without my permission, apparently took it upon itself to upgrade the bundled <code class="language-plaintext highlighter-rouge">ruby</code> version - from 3.2.3 to 3.3.0.</p>

<p>Hell broke lose when I <code class="language-plaintext highlighter-rouge">cd</code>‘d into my project repo that I use for <a href="https://github.com/rnag/rnag.github.io">my website</a>, and ran <code class="language-plaintext highlighter-rouge">bundle</code> to install fresh dependencies - which was needed, since <code class="language-plaintext highlighter-rouge">ruby</code> version was upgraded, so it was a fresh environment with no gems available.</p>

<div class="language-ruby highlighter-rouge"><div class="highlight"><pre class="highlight"><code><span class="err">$</span> <span class="n">bundle</span> <span class="n">install</span>
</code></pre></div></div>

<p>The error I received was something like this:</p>

<div class="language-bash highlighter-rouge"><div class="highlight"><pre class="highlight"><code>~/&lt;user&gt;/somewhere <span class="nv">$ </span>bundle <span class="nb">exec </span>jekyll serve
jekyll 3.9.3 | Error:  undefined method <span class="sb">`</span><span class="o">[]</span><span class="s1">' for nil
/usr/local/Cellar/ruby/3.3.0/lib/ruby/3.3.0/logger.rb:384:in `level'</span>: undefined method <span class="sb">`</span><span class="o">[]</span><span class="s1">' for nil (NoMethodError)

    @level_override[Fiber.current] || @level
</span></code></pre></div></div>

<p>This indeed was the specific error message I saw:
 <code class="language-plaintext highlighter-rouge">Error: undefined method '[]' for nil</code></p>

<p>Searching online, you can see a whole slew of posts that mention this error, and apparently it only happens with ruby <code class="language-plaintext highlighter-rouge">3.3.0</code> and the <code class="language-plaintext highlighter-rouge">jekyll</code> version <code class="language-plaintext highlighter-rouge">3.9.3</code> that comes bundled with <code class="language-plaintext highlighter-rouge">github-pages</code> .</p>

<ul>
  <li>
    <p><a href="https://stackoverflow.com/questions/77851863/bundle-exec-jekyll-serve-not-working-locally">https://stackoverflow.com/questions/77851863/bundle-exec-jekyll-serve-not-working-locally</a></p>
  </li>
  <li>
    <p><a href="https://talk.jekyllrb.com/t/unable-to-install-jekyll-on-m3-macbook/8836">https://talk.jekyllrb.com/t/unable-to-install-jekyll-on-m3-macbook/8836</a></p>
  </li>
  <li>
    <p><a href="https://talk.jekyllrb.com/t/error-when-executing-bundle-install/8822">https://talk.jekyllrb.com/t/error-when-executing-bundle-install/8822</a></p>
  </li>
</ul>

<p>Hence, while it might not bear repeating, it helps to clarify - upgrading <code class="language-plaintext highlighter-rouge">jeykll</code> version for a project is a <strong>no-go</strong>, especially when the project <code class="language-plaintext highlighter-rouge">Gemfile</code> relies explicitly on <code class="language-plaintext highlighter-rouge">github-pages</code> dependency, which <em>itself</em> relies on <code class="language-plaintext highlighter-rouge">jekyll</code> :</p>

<div class="language-csharp highlighter-rouge"><div class="highlight"><pre class="highlight"><code><span class="n">gem</span> <span class="s">"github-pages"</span><span class="p">,</span> <span class="k">group</span><span class="p">:</span> <span class="p">:</span><span class="n">jekyll_plugins</span>
</code></pre></div></div>

<p>And yes, just to double check, the <code class="language-plaintext highlighter-rouge">Gemfile.lock</code> should show the lines that clearly show the dependency relationship between the</p>

<div class="language-scss highlighter-rouge"><div class="highlight"><pre class="highlight"><code>    <span class="nt">github-pages</span> <span class="o">(</span><span class="nt">228</span><span class="o">)</span>
      <span class="nt">github-pages-health-check</span> <span class="o">(=</span> <span class="nt">1</span><span class="nc">.17.9</span><span class="o">)</span>
      <span class="nt">jekyll</span> <span class="o">(=</span> <span class="nt">3</span><span class="nc">.9.3</span><span class="o">)</span>
    <span class="nc">...</span>
</code></pre></div></div>

<p>To recap, if one installs <code class="language-plaintext highlighter-rouge">ruby</code> with <code class="language-plaintext highlighter-rouge">brew</code> and runs <code class="language-plaintext highlighter-rouge">brew upgrade</code> or similar and results in <code class="language-plaintext highlighter-rouge">ruby@3.3.0</code> being inadvertently installed, this can break when attempting to work with projects that rely on a specific version of <code class="language-plaintext highlighter-rouge">jekyll</code>, especially ones that rely on <code class="language-plaintext highlighter-rouge">github-pages</code> gem for deployment.</p>

<p>There does not appear to be any solution involving <code class="language-plaintext highlighter-rouge">brew</code> and <code class="language-plaintext highlighter-rouge">ruby</code> alone.</p>

<p>Upon catching the issue that the mismatch b/w the two gems caused the build error when running <code class="language-plaintext highlighter-rouge">bundle exec jekyll serve</code> , I immediately tried some steps, that first involved installing <code class="language-plaintext highlighter-rouge">csv</code> , as apparently there was a warning printed to terminal since that doesn’t come bundled in ruby 3.3.0</p>

<div class="language-ruby highlighter-rouge"><div class="highlight"><pre class="highlight"><code><span class="err">$</span> <span class="n">bundle</span> <span class="n">install</span> <span class="n">csv</span>
</code></pre></div></div>

<p>Then I tried to upgrade all <code class="language-plaintext highlighter-rouge">gem</code> versions in project by running:</p>

<div class="language-ruby highlighter-rouge"><div class="highlight"><pre class="highlight"><code><span class="err">$</span> <span class="n">bundle</span> <span class="n">upgrade</span>
</code></pre></div></div>

<p>That didn’t help, so I tried to specify both gems explicitly:</p>

<div class="language-ruby highlighter-rouge"><div class="highlight"><pre class="highlight"><code><span class="err">$</span> <span class="n">bundle</span> <span class="n">update</span> <span class="n">jekyll</span>
<span class="err">$</span> <span class="n">bundle</span> <span class="n">update</span> <span class="n">github</span><span class="o">-</span><span class="n">pages</span>
</code></pre></div></div>

<p>Still no dice, and I was at wit’s end by now. Manually upgrading either of those <code class="language-plaintext highlighter-rouge">gem</code> versions specified in <code class="language-plaintext highlighter-rouge">Gemfile.lock</code> didn’t help either. There was a dependency conflict if I upgraded <code class="language-plaintext highlighter-rouge">jekyll</code>, as <code class="language-plaintext highlighter-rouge">github-pages</code> relied on a specific version.</p>

<p>I also tried deleting <code class="language-plaintext highlighter-rouge">Gemfile.lock</code> file completely and running <code class="language-plaintext highlighter-rouge">bundle</code> again, but still no dice.</p>

<p>In short, this was exactly what they call “dependency hell”. I cannot change either gem versions, and hence this is basically a “SNAFU!” situation. As in, there’s no solution to be had that allows me to keep the up-to-date <code class="language-plaintext highlighter-rouge">ruby</code> version 3.3.0 for use with my project.</p>

<p>I even tried uninstalling and re-installing specific ruby version 2.3.2 via <strong>homebrew</strong>, but if you can believe it there <em>still</em> was no dice:</p>

<div class="language-shell highlighter-rouge"><div class="highlight"><pre class="highlight"><code><span class="nv">$ </span>brew uninstall ruby
<span class="nv">$ </span>brew <span class="nb">install </span>ruby@3.2
<span class="nv">$ </span><span class="nb">echo</span> <span class="s1">'export PATH="/opt/homebrew/opt/ruby@3.2/bin:$PATH"'</span> <span class="o">&gt;&gt;</span> ~/.zshrc
<span class="nv">$ </span><span class="nb">source</span> ~/.zshrc
<span class="nv">$ </span>ruby <span class="nt">-v</span>
ruby 3.2.3
<span class="nv">$ </span>gem <span class="nb">install </span>bundler
<span class="nv">$ </span>bundle
&lt;error&gt;
</code></pre></div></div>

<p>I’ll be honest, I felt like tearing my hair out at this point. Sweat started metaphorically trickling down my back. Being a <code class="language-plaintext highlighter-rouge">ruby</code> newb, I was about to throw in the towel, and as a last resort maybe open up an issue on the project page for one of the gems, or post about it on a forum asking other users for help.</p>

<p>Now that I think about it, maybe ChatGPT could have helped me. Hello ChatGPT? Can you explain this error please, and suggest me a solution &lt;<em>paste stack trace</em>&gt;.</p>

<p>However, thankfully, that was ultimately not needed. I found a workaround that helps me to maintain <code class="language-plaintext highlighter-rouge">ruby</code> version across different machines, consistently.</p>

<p>After researching online for quite a bit, I found out that someone was using <code class="language-plaintext highlighter-rouge">rbenv</code> and decided to look into what that is. Turns out, it’s something similar like <code class="language-plaintext highlighter-rouge">pyenv</code> for <code class="language-plaintext highlighter-rouge">python</code>, or basically a version management tool for a programming language.</p>

<p>Feeling I was on to something at this point, and shrugging my shoulders after realizing I had nothing to lose, I decided to install it after all:</p>

<div class="language-shell highlighter-rouge"><div class="highlight"><pre class="highlight"><code><span class="nv">$ </span>brew <span class="nb">install </span>rbenv ruby-build
<span class="nv">$ </span><span class="nb">echo</span> <span class="s1">'eval "$(rbenv init - zsh)"'</span> <span class="o">&gt;&gt;</span> ~/.zshrc
<span class="nv">$ </span><span class="nb">source</span> ~/.zshrc
</code></pre></div></div>

<p>That got me the<code class="language-plaintext highlighter-rouge">rbenv</code> command, but of course I wasn’t done there yet.</p>

<p>I have to install my necessary previous <strong>ruby</strong> version <code class="language-plaintext highlighter-rouge">3.2.3</code> with <code class="language-plaintext highlighter-rouge">rbenv</code> :</p>

<div class="language-ruby highlighter-rouge"><div class="highlight"><pre class="highlight"><code><span class="err">$</span> <span class="n">rbenv</span> <span class="n">install</span> <span class="mf">3.2</span><span class="o">.</span><span class="mi">3</span>
</code></pre></div></div>

<p>After installing a version with <code class="language-plaintext highlighter-rouge">rbenv</code> , you can set it either <strong>globally</strong> (so that <code class="language-plaintext highlighter-rouge">ruby</code> version is changed regardless of your location in terminal) or <strong>locally</strong>, so it will only affect a project after you <code class="language-plaintext highlighter-rouge">cd</code> into its folder.</p>

<p>I decided to do <em>both</em>, because the default <code class="language-plaintext highlighter-rouge">ruby</code> version that comes bundled with my new Mac Air M2 laptop is something like <code class="language-plaintext highlighter-rouge">2.x</code> , which is hella old. And I’m clearly never gonna use the built-in one.</p>

<div class="language-shell highlighter-rouge"><div class="highlight"><pre class="highlight"><code><span class="nv">$ </span>rbenv global 3.2.3
<span class="nv">$ </span>rbenv <span class="nb">local </span>3.2.3
</code></pre></div></div>

<p>Now we’re cooking! To double-check that we got the new <strong>ruby</strong> version installed:</p>

<div class="language-scss highlighter-rouge"><div class="highlight"><pre class="highlight"><code><span class="err">$</span> <span class="nt">ruby</span> <span class="nt">-v</span>
<span class="nt">ruby</span> <span class="nt">3</span><span class="nc">.2.3</span> <span class="o">(</span><span class="nt">2024-01-18</span> <span class="nt">revision</span> <span class="nt">52bb2ac0a6</span><span class="o">)</span> <span class="o">[</span><span class="nt">arm64-darwin23</span><span class="o">]</span>
</code></pre></div></div>

<p>Great! Now that’s out of the way, we want to install or upgrade <code class="language-plaintext highlighter-rouge">bundler</code>, and then we’re good to go.</p>

<div class="language-ruby highlighter-rouge"><div class="highlight"><pre class="highlight"><code><span class="err">$</span> <span class="n">gem</span> <span class="n">install</span> <span class="n">bundler</span>
<span class="err">$</span> <span class="n">bundle</span> <span class="o">-</span><span class="n">v</span>
<span class="no">Bundler</span> <span class="n">version</span> <span class="mf">2.5</span><span class="o">.</span><span class="mi">5</span>
</code></pre></div></div>

<p>If it helps, one might need to delete and re-create<code class="language-plaintext highlighter-rouge">Gemfile.lock</code> by running <code class="language-plaintext highlighter-rouge">bundle</code>, especially if it says the gems were installed with another version of <code class="language-plaintext highlighter-rouge">bundler</code> :</p>

<div class="language-sql highlighter-rouge"><div class="highlight"><pre class="highlight"><code><span class="n">BUNDLED</span> <span class="k">WITH</span>
   <span class="mi">2</span><span class="p">.</span><span class="mi">5</span><span class="p">.</span><span class="mi">4</span>
</code></pre></div></div>

<p>After that, you can run <code class="language-plaintext highlighter-rouge">bundle exec</code> or however you start up your project that relies on <code class="language-plaintext highlighter-rouge">jekyll</code> and <code class="language-plaintext highlighter-rouge">github-pages</code> , and then you should be all set.</p>

<p>If it helps, I’ve actually created an alias command <code class="language-plaintext highlighter-rouge">jb</code> , which serves that exact purpose in my case:</p>

<div class="language-bash highlighter-rouge"><div class="highlight"><pre class="highlight"><code><span class="nv">$ </span>which jb
jb: aliased to bundle <span class="nb">exec </span>jekyll serve <span class="nt">-low</span>
</code></pre></div></div>

<p>It’s easy enough to add that alias in to <code class="language-plaintext highlighter-rouge">bash</code> or <code class="language-plaintext highlighter-rouge">zsh</code> shell configuration. To add it to <code class="language-plaintext highlighter-rouge">zsh</code> - my default interpreter - here’s what I did:</p>

<div class="language-bash highlighter-rouge"><div class="highlight"><pre class="highlight"><code><span class="nb">echo</span> <span class="s2">"alias jb='bundle exec jekyll serve -low'"</span> <span class="o">&gt;&gt;</span> ~/.zshenv
</code></pre></div></div>

<p>Then <code class="language-plaintext highlighter-rouge">source ~/.zshenv</code> to reload the changes in the current terminal window.</p>

<p>All said, this whole ordeal took me <em><strong>&gt;1 hour</strong></em> of pointless debuggery. It was the exact opposite of fun. And, ideally not how I would have wanted to spend a Sunday morning.</p>

<p>However, the upshot is that the confusing <strong>ruby</strong> versioning hell along with two of the aforementioned gems - <code class="language-plaintext highlighter-rouge">jekyll</code> and <code class="language-plaintext highlighter-rouge">github-pages</code> - is now finally resolved, at long lost.</p>

<blockquote>
  <p>Here then was a lesson learned: manage <code class="language-plaintext highlighter-rouge">ruby</code> versions with <strong>rbenv</strong> instead of <strong>homebrew</strong>.</p>
</blockquote>

<p>Praise be! Massive dependency hell solved, and headache (mostly) avoided. Hope this helps someone else out. Now go out there and get coding!</p>]]></content><author><name>Ritvik Nag</name><email>me@ritviknag.com</email></author><category term="tech-tips" /><category term="ruby" /><category term="github-pages" /><category term="jekyll" /><category term="rbenv" /><category term="homebrew" /><summary type="html"><![CDATA[A how-to (with lessons learned) on Ruby versioning with Jekyll and GitHub Pages.]]></summary></entry><entry><title type="html">One Mile Run: My Experience</title><link href="https://ritviknag.com/blog/one-mile-run-my-experience/" rel="alternate" type="text/html" title="One Mile Run: My Experience" /><published>2024-01-24T23:10:28-05:00</published><updated>2024-01-24T23:10:28-05:00</updated><id>https://ritviknag.com/blog/one-mile-run:-my-experience</id><content type="html" xml:base="https://ritviknag.com/blog/one-mile-run-my-experience/"><![CDATA[<p>Earlier this year, I set out to achieve something I wasn’t sure was possible: run a sub-five-minute mile on a treadmill. I ended up doing it twice in one day — and nearly destroyed my legs in the process. This is the story of how it happened: a mix of questionable decisions, half-baked training, and sheer willpower.</p>

<p>I won’t pretend to have all the answers — this post isn’t a training guide or motivational sermon. It’s just my raw, personal account of chasing down a goal that meant something to me, even if it came with sore knees, mental battles, and a weird obsession with dates (the fruit, not the calendar). Keep reading for the full story of how it all went down.</p>

<h1 id="my-experience">My Experience</h1>

<p>Long story short, I achieved a personal goal to run under a five-minute mile on the treadmill, twice in a day – and nearly destroyed my legs in the process.</p>

<p>On January 22nd of this year — 2024 — which falls on a Monday, my gym that I go to (Orangetheory Fitness) was pushing a special challenge, which coincided with a seasonal fitness event they apparently have going on. This benchmark challenge was the One Mile Run — on the Treadmill. I attempted and completed it twice on that day, a Monday, and achieved my personal goal of sub-five-minute on the 1 Mile benchmark run. My thoughts and experiences follow.</p>

<h2 id="transformation-goals">Transformation Goals</h2>

<p>I wish I could spare more details on the seasonal fitness challenge-slash-event I alluded to above, but I’m somewhat of a newcomer myself. I joined only March of last year — 2023 — so I’m still a youngling compared to most other hardcore, devout members; not even a whole year under my belt, yet. So, I really can’t say much about this challenge, other than it’s a supposed gimmick to get you more fit. I say “supposed” because I’m wary of anything that costs money and promises to get you in better shape. I guess you can call me a fitness skeptic — I don’t know if that’s a phrase they use.</p>

<p>At any rate, this so-called “transformation” challenge can be viewed as a guiding stick —  or a handy tool of sorts — useful in one’s fitness journey if nothing else. Does one have to shell out an extra $50 or thereabouts to sign up for the challenge? You betcha, buddy. No way to work around that neither. And is there any immediate benefits of completing the challenge, such as a free t-shirt, or a nice, warm chocolate chip cookie and a lukewarm glass of 2% fat milk? A big way <strong><em>“no way, Jose!”</em></strong> on both counts. So you gain absolutely nothing, just a big handful of <em>imaginary</em> magic dust that you can scoop up, and blow away with the breath and scatter to the wind (at least in your dreams you can).</p>

<p>Jokes on you then, right? For signing up for a challenge that asks you to give up something, and yet apparently doesn’t give back — or gain you — anything. Seems pretty cut and dry, eh? Potentially, yeah, except well… for one thing. I suppose such a “transformation” journey / challenge is meant to teach you something, deep down on a fundamental, spiritual, or psychological level. Or whatever. Maybe it’s the same lesson that Buddha eventually chanced upon.</p>

<blockquote>
  <p>All Life is Suffering. Suffering is caused by an attraction to Desire.</p>
</blockquote>

<p>OK, so maybe not that deep. Maybe not that… spiritual. Maybe dial it down a tone, yeah?</p>

<p>OK, so let’s take three steps back. Perhaps I really meant to bring attention to Buddha’s stance and his admonishment on our fixation on material possessions, and in urging us to let go of it. There are a lot more than material possessions that Buddha was against, but let’s tackle one at a time.</p>

<p>So in that sense, is $50 really a lot to give up for? Think about it, the symbol <code class="language-plaintext highlighter-rouge">$</code> itself almost screams <strong>materialistic goods</strong>. Why do we, as a society, have such a fascination with money and riches, anyway? If you saw a beggar on the streets, or an orphaned child with a physical impairment or disability of some kind, and your heart was moved enough, would you not willingly transfer a meaningless $50 — or even $5,000 — from your hand to theirs? Or donate that amount to a beneficial cause, one worth fighting for? In that scope, and given that meaning, is $50 a lot to ask to give up, when there is no real benefit other than personal fitness improvement?</p>

<p>Of <em>course</em> not. If you walk the path of the Buddha, even for a tenth of a mile, and understand that all material possessions are largely useless, given that they are tied to your pointless, insignificant life on this Earth — then <em>of course</em> $50 is meaningless, in the grand scheme of things. I would gladly give up that sum of cash, if the benefit itself was even remotely apparent, albeit intangible.</p>

<p>However, let’s pivot now to look at it through another lens. Given that we’ve already established that the cost does not outweigh the gains. Let’s evaluate the specific <em>gains</em> once again. Is such a “body transformation” challenge really worth it? What the heck does it even entail? Well, if I understand correctly, the purpose of this personal fitness goal/event is to push or challenge one to improve one’s fitness, by achieving either one of 1) losing body fat or 2) gaining muscle. Seems pretty simple, right? For transparency, I went with option #1 as it seemed to align with my own personal goals.</p>

<p>Not to wax eloquent about it anymore, so suffice it to say I’m skeptical of such a “challenge” going into it. Seems more of a marketing stunt, a gimmick. That might be others’ thoughts too. So this might be the time to bust out that other lens, and gaze through it and illuminate the true benefits of the “challenge”. A few others on social media platforms have echoed my sentiments too, but I likewise agree, in that I feel that paying for the challenge is a way to hold oneself accountable. It’s almost like a <strong><em>contract</em></strong>. Almost. In the sense that you give up a part of yourself, something that you possess, and in return you <em>promise to yourself</em> to deliver on that thing which is clearly stipulated on the contract you sign. So in this case, I promise to lose body fat. I sign that contract. I give up that money. And the rights to my home, and my car. And all the clothes on my back. Actually, let’s simplify that and go with just the former point. So I throw up the dolla bills into the air. I brandish a (borrowed) pen and I sign that contract, that clearly states what I’m signing up for, that my goal is to lose some fat, and that <em>yessir</em>, I know what I’m doing, absolutely. So I’ve given up my money. Something I owned, that belonged to me. Now I have to deliver on that promise. I am held accountable to it. Sword to my neck, I have to “Just do it!” as Nike heartily encourages, or suffer eternal shame for having cast $50 of my hard-earned cash down the drain; or flushed it down the garbage disposal in the kitchen sink. Take your pick. It’s like having the words “Loser” engraved in permanent marker on your forehead for everyone to see, if you fail to deliver on that promise. Eternal Shame awaits you. So you flushed your money down the toilet again? Tsk, tsk. When <em>will</em> you learn? In that sense, I view it as a purely psychological exercise. Let’s say you give up your left arm, and if you manage to gain fat rather than lose it, you can’t have your left arm back. Motivation? Surely enough to go around. Probably more palatable, more real at that point. Not gonna lie. This challenge is that, but on a smaller-scale, and coming from a 100% more legal and ethical standpoint. It doesn’t force you to give up an arm and a leg, or even your firstborn child. Just material cash, which is (mostly) meaningless anyway. The part of it that <em>is</em> meaningful, or that one attaches significance to, is the part that is meant to drive and motivate one to deliver on and fulfill that promise. A promise to the self. As in, you’re not getting that money back, buddy, but you might as well try to ensure it’s “money best spent”. One can achieve that by succeeding rather than failing miserably, and hence risk being labeled as a pariah by society (and by one’s own mind of course).</p>

<p>So anyway, enough about that seasonal fitness event. I don’t really know anything about it. Don’t trust me. I might well fail miserably on it too. It’s too early to tell, and it’s my first time signing up for this event. Torpedo launched at my chest, I have no idea what I’m doing. That’s perfectly OK! The goal of it is not to compete against others. It’s a purely psychological experiment. I would probably seek to cut down on body fat and on unhealthy food either way. I can just view this as an experiment for working towards the same goals, more or less, in a slightly roundabout and more constricted fashion. Less room to move about in the playing field, with a barbed-wire fence completely enclosing the perimeter to boot. It’s all good! Let’s. Just. Do it. Nike had the right idea there, no doubt!</p>

<h2 id="preparation-for-1-mile-treadmill-run">Preparation for 1 Mile Treadmill Run</h2>

<p>Full disclaimer, I used to be on the track team in high school, but I kinda sucked at running, and I wasn’t running crazy competitively even then, and I was more of a mid- to long- distance running kind of guy. I don’t even remember competing on anything distance-related, period. I think I ran the one mile in a wide open running track loop outdoors, at least more than once. I don’t remember my best time. I think it was 6:30 or something. Maybe 7:30 if I’m being cautious. At that young age, it’s easy to think that’s hot stuff. I clearly thought I was hot stuff. To be fair, I wasn’t competing against anyone but myself. That was the way of the world back then. Not that long ago, probably around 2008. Anyway, I wasn’t a very good runner. By that, I wasn’t a competitive or exceptional runner in any sense. I guess I was OK.</p>

<p>So how does one gear up for their first one mile run ever, on the treadmill? Also, it’s been a hella long time since I’ve run a mile before. For me, it’s probably been a good 15 years. Almost two whole decades. So how the heck do I prepare? I used to be a little overweight, but I’ve lost a measly five pounds, and now I’m at a little over 145 pounds — what the heck? Am I even ready? Am I gonna crash and burn like last week’s hot sauce, or what?</p>

<p>I don’t know, I guess my journey to prepare for this one mile treadmill run — and for clarity, I knew about this benchmark run like a little over a month in advance — was a shaky and disorganized one. In the sense that, I didn’t really have a clue what I was doing, or how to best prepare. Some days I would take rest days to give my legs time to rest, and that just depended on whether my legs screamed at me and refused to walk much less run, without accompanying that with a dull ache or pain of some sort.</p>

<p>I have the history of classes I’ve taken since a month or two prior to the benchmark run day. If I wanted to, I could pull it up. I kind of know the broad strokes of it in my mind anyway. During Christmas break, I joined my fam on a road trip, and we stopped by Tennessee and then to Texas. Whilst in Texas we hit the big three, I guess you could call it. San Antonio. Austin. Houston. I went to the local gym studios in all those cities and locations. Incline workouts were challenging but necessary, to build leg strength. I completed the Everest challenge while I was in Texas too, so that helped gear me up. Likewise, I reached my max speed for a heart-pounding forty-five seconds at one of the gyms there, if memory serves correct. I think it was around 14.7 MPH, give or take. Then I went for an endurance run at one of the gyms there in Texas. Maintained my base and push intensity pace — both in double digits MPH — for two stretches of 15 minutes each. I thought that was pretty great. It took a lot out of me, but that taught me, or rather imparted to me a slice, of what endurance is. What it means to have endurance. It’s like you have to scream at your mind to shut up, constantly. It goes completely against human nature, and in most other walks of life, that’s a definite no-no. But in mid- to long- distance running, I feel you have to do that. Shut off your mind. <em>Tell</em> it to shut up. Shout it down if you have to. Hand over the reins to your heart, and to your lungs, and your legs. And. Just. Run. Because it’s exhausting, your mind and body will be screaming at you to stop, your lungs will tell you that you’re about to expire and come this close to dying from lack of oxygen, but that’s what you <em>gotta</em> do and it’s the only thing you need to do — gotta flip that switch off in your mind, and just run, like the devil is chasing you. Heck, maybe you <em>are</em> the devil. Not that it matters.</p>

<p>But this is what you need to do to succeed in a grueling, intensive endurance run, that takes a lot from you, and asks from you a lot to give. You just gotta shut off that part of your brain that commands you to please, for the love of puppies and kittens and Hershey’s kisses, just <em>stop</em>. Just take a breather for a mere second. Ease off, Jack. Sometimes it’s so very hard, to summon and maintain the necessary focus and willpower in order to ensure the <em>”follow through”</em>. I’ve been victim of this many a time myself, where the focus and drive just dissipates and leaves me, like a well that immediately dries up. Lot of times I cannot maintain a simple base running pace. It’s not really endurance that’s to blame, but rather willpower itself. In running — at least for me — willpower is everything. All is predicated on you shutting off your mind, and ignoring everything your body tells you. This goes against common sense and human nature for most of us. It’s almost a form of cruel and unusual punishment.</p>

<p>There’s a quote from one of my favorite novels and series of all time, and it goes like this:</p>

<blockquote>
  <p>Duty is heavier than a mountain, death is lighter than a feather.</p>
</blockquote>

<p>So when given a choice, opt for the harder one. The easier one is almost always the deceptive one, the wrong answer. The human body and mind is hardwired to seek respite in feelings and situations of extreme discomfort, and in particular high intensity, cardio workouts. The easiest thing to do is for the body to stop motion, so that the lungs can recover, and the heart can slow down so it doesn’t need to pump so much blood to the rest of the body. And so on. As a result, your mind screams at you, because it’s attuned to your body’s needs. That’s unfortunate, but it’s totally understandable. It’s just doing its job, in keeping you hale and hearty. And preferably not dead. So if you’re ever looking for a shoulder to lean on, lean on your mind, and by extension your body. Often times it’s also so hard to ignore the allure of the siren at the sea. By that I mean of course, the whisper in your ear, telling you to slow the hell down. Just take a breather, Jack, let your lungs gasp in one huge breath. Breathing is good, right? It’s actually a necessity for humans and most life here on Earth. So many times I’ve given into that haunting whisper that beseeches for a moment of rest and respite. The worst part of it is that it comes unbidden, and sometimes it goes against the grain, goes against what the workout calls for. If it’s an endurance run then it’s a given you’re never supposed to walk, so why does the body demand you to walk it out? It can be downright frustrating and result in a hair-pulling, teeth-gnashing reaction at times. Simply put, it’s like I’m at a constant war with my own mind and body in these running workouts, on the treadmill or even outdoors. Especially the lengthier endurance runs. It’s so easy to give in to the voice in your head telling you to slow down. But the answer is to shout it down. Drown it out. At least for a few extra seconds each time around.</p>

<p>Anyway. At around the first of the new year — 2024 — I was already back in Virginia. I started trying my hand at fasting, in particular intermittent fasting. It was not fun mixing that with workouts, especially the fast-paced ones at Orangetheory. It gave my legs a beating, especially as I tend to run at higher intensities. For reference, I stopped eating at around 8pm, and I would fast until noon the next day. So about 16 hours of fasting. The hardest part of this would be that I almost always had classes within my fasting window, which was unavoidable for most days in the week. So a 7am class, or a 10am one. Usually I would not be able to get any protein in until a good 4-5 hours later. The early morning classes would be more lenient, as I would have sufficient energy most of the time. But sometimes, lack of energy from the fasting would slowly defeat me, and I wouldn’t be able to run as fast or hard as I normally could. Not to mention, that likely because I wasn’t able to get a steady flow of protein and nutrients before and within a 3-hour window of my workout, my legs and muscles constantly ached and had what felt like a longer recovery rate. Long story short, 16-hour fasting and rigorous exercise (HIIT cardio and even strength training to an extent) do not mix well together; note to self to never attempt that ever again.</p>

<p>Still, while I slowly eased myself off an insane and unsustainable fasting schedule into a more manageable 12-hour fasting window, I started also watching my diet and intaking more nutrition along with just protein shakes and greek yogurt. Added some eggs and avocado in to the mix. Meanwhile, in the HIIT workout sessions I attended, once thing I noticed and picked up on, was the workout templates that were being offered were more and more geared towards preparation for the one mile benchmark challenge. Which was peculiar, although not unexpected, and honestly rather welcome. I feel that the coaches handled and communicated this workout template rather well.</p>

<p>As an example, one of the earliest “prep” opportunities for the mile run I remember was a 2 minute and 15 second <em>tread for distance</em>. What the heck is that, one might ask? Well bud, exactly what it says on the tin. You pick your running pace — and in a sense your poison — and you match and sustain that pace, for a little over 2 minutes. Seems easy, no? Actually, not really. Easier said than done, as it is with most things in life. I attempted this with my “goal mile pace”. For me that was an exact 5:00 (5 minute) mile pace. Which translates to a 12 MPH with 1% incline on the tread. A little over my push pace, so called because you “push” yourself to match that intensity (at least I think so?). One might think that maintaining a 12 miles-per-hour pace for 2 minutes is easy-peasy. A no-brainer. In fact, if one is mildly out of shape (like me), or even depending on diet and nutrition alone, or even if the body is not attuned well to a medium-distance endurance run, such an ask — run at 5:00 mile pace for 2:15 — is most assuredly unreasonable. I don’t have the results of that workout pulled up, but I <em>think</em> I succeeded at that self-set goal. Pick your poison, I chose 12 MPH. Ran it for one minute, nearly out of breath.  Ran it for two minutes, felt my body was screaming inside and waiting for me to flop over like a dying fish, or collapse in on my legs and fall down. Finally I reached 2:15 and forgot there was a thirty-second finisher at the end, and ultimately defeated by my body, had to give in and walk it out at around the 2:30 point. So truly not bad, and in my eyes only barely acceptable. So this initial workout taught me that I can sustain a half-mile at my target mile pace. That’s not worth much, but it’s worth something. Progress, at the least. Slowly I can build on that. The goalpost was at 2:30 before. Move the historic marker to there, and move the goalpost up another thirty seconds. Rinse and repeat, ad infinitum. Or at least ad diem challenge, I suppose.</p>

<p>So anyway, at the risk of not wanting to toot my own horn, that more or less was how I challenged myself to slowly build up my leg power and physical endurance. One micro-benchmark at a time. First it was my target mile pace for 2:30. Two days later I moved the goalpost to 3:00, then to 3:30, and then to the 4:00 mark. Ultimately, the workout templates were changing day-to-day, and as time wound ever closer to the day of the benchmark run, the templates themselves started to take on a mind and cruelty of their own, and become increasingly more merciless. Tread for distance for 3 minutes 30 seconds. Run at a push pace for 4:30. The last I was at half a mind to attempt at my target mile pace. But it was late already into that workout session, and I don’t think I had the drive, or energy, or motivation to follow through on that. So I went at a much easier, much more casual and manageable pace for that. Did I regret it? Maybe.</p>

<p>Perhaps that’s what prompted me to sign up for a new “Treadmill only” workout on the weekend. It was a freeform exercise, minimal workout template to work with, basically no coach yelling at you and telling you to speed up or to not walk it out, just you being your own master and commander (and trainer). You set the workout template of the day, <em>you</em> decide what <em>your</em> goal is that day. So, I kind of lied. There <em>was</em> a workout template of course, they don’t let you freeform it completely. Which is kind of a bummer, but also kind of not. It’s like taking a quiz but not being graded on it at all. It’s just meant to improve your knowledge. So was this workout, designed to help improve my strength and endurance. The workout template was very loose, and halfway through I decided to toss it out the window altogether, and do my own thing. By that I mean, run for three minutes at a 5:00 mile pace, stop when body screams at you to stop, let the lungs gulp in huge gulps of air, let the sweat slowly drench your forehead and soak your shirt. Walk it out. Then from strength block I went into an endurance block, just because I was bored of that. Challenged myself to run at a base pace for a good 10 minutes. I didn’t make it, of course, and stopped a little before. Out of breath again. After walking it out again, took a much longer break. Then, without planning to, I just set my target mile speed on the tread, and off I went. This last block was totally unplanned, same as the previous ones. I did not know going into that day that I would do a power-endurance-power block on repeat. This was a total surprise for me. When I set the pace I wanted to run at, the good ol’ trusty 12 MPH, I didn’t really have a clue how long I wanted to run at that speed for. Maybe, just beat my 3 minute mark I’d set earlier in that same workout. That was really my only goal. But I pushed past 3:30, body felt tired but I noticed my lungs were more capable this time around, so I decided to keep going to see far I could get. At around 4:00, the same familiar sensation came over me, of the lungs and body screaming at me, and beseeching me to give it up. Squashed the feeling ruthlessly, and it got a little more manageable. At around 4:30, I remember stopping, but also feeling that I could <em>maybe</em> have made it to 5:00, if I wanted to, that is if I wanted to stretch it out another thirty seconds. What is another thirty seconds, after all? I think it’s at that point I knew I was as prepared as I was going to get.</p>

<p>Which is good, because it looks like that “Treadmill-only” workout basically took my legs out of commission, for a good day or more. Still it was a week until the 1 mile run was supposed to take place, but looking at my attendance history, I skipped the next day and only went for a strength class, since my legs were basically beat and could not run on them that day. The day after that I went to a regular workout, but apparently my legs <em>still</em> weren’t feeling it, so I substituted the bike for the treadmill. So essentially, it was three whole days that my legs were out of commission for after that intense workout (whole fault was mine) where I couldn’t run in them at all. Serves me right, I suppose. But at least, the self-taught lesson in endurance stayed with me the whole time.</p>

<p>Not much to say, other than I continued going to regular exercises on treadmill everyday after that. Never went at my target mile pace for over 3:30 again. Part of the reason was that I knew it would surely destroy my legs again if I sustained it at past 4-minute mark. So I didn’t even try it. Only knew in the back of my mind that it was possible. Possible because I had just done it once, just recently.</p>

<p>Anyway, that Friday — January 19th — was a strange, unexpected day. I’d signed up for a weigh-in at the gym that day so I could see how much I weighed and I could get my muscle mass measured. Well, wouldn’t you know it, the weather had other plans. Yes indeed, it snowed that exact morning, something like 4 inches at least. Covered all the streets in my neighborhood, and my car was buried in at least a half-foot of snow. I didn’t even go out to check, stayed indoors that whole day. The snowplow truck came at around noon, rather late, to clear out the local roads in our community. I didn’t step foot outside, much less operate my car, that whole day. Lethargy was the name of the game that day.</p>

<p>Saturday I was busy and I couldn’t go to exercise, so Sunday I went to class with a passion to make up for that. Normally I would leave a rest day before something intense like a one-mile run, especially at such a fast pace on the treadmill. But I had not had opportunity to go workout for two whole days, so I felt I was about due. I went to an hour-and-half class. Eventually pushed myself to run 5:00 mile pace for a little over 4:00. Then took rest, and did a run for 3:00 minutes at that same speed, then a short break, then 2:00 again. All together, the second half was 5:00 in total, with only a short break in between. Technically, we were only supposed to run at a “push” pace and not at an “all out, burn yourself out” intensity, which is usually what 12 MPH is for most folks at any rate. But it was the day before the one-mile benchmark tread run, and I wanted to ensure that my body was prepared for it. Getting back up to speed was the hard part, and in my experience “historic” endurance is crap as you constantly need to go back and revisit it, to teach your body it again so that it sticks for a short time again. Because your body conveniently “forgets” remembered endurance if you leave even a few days gap from whence it learned it. So it’s necessary at least for me to go back and teach the body and mind to revisit that same pace and intensity. Besides, nowhere is it more useful than the day before “race day”, as they oft say.</p>

<h2 id="the-run">The Run</h2>

<p>Now as to the results or outcome. I’ll attempt to keep this brief as I’m wasting too much time already with this blog post. The goal is not to write a novel but to convey the outline correctly.</p>

<p>A couple days before “race day” — January 22nd, which fell on a Monday — I’d pre-booked the classes I for sure wanted to attend. This is because I didn’t want to deal with waitlists and potentially worry about whether I was booked for that class, because I had a feeling workout sessions on that day would be booked due to everyone scrambling to try their hand at the (leg-crushing) challenge.  So I had hastily pre-booked classes that day. An early morning class — around 7AM — at Fairfax, and an evening class at Reston. All said, there was at least a good ten hours rest in between.</p>

<p>Gearing up for this, I loaded my body up with nutrition and followed a strict diet that whole week. More so the day before. I loaded up with eggs, avocado, whole grain, PB and nut butter, poultry, sweet potato, spinach, beans, broccoli, and fruits such as dates, apples, pomegranate, pineapple, blueberries, watermelon, golden berries, and blackberries. Then just staple protein bars, protein shakes, and low-fat greek yogurt. Basically anything I could get my hands on, which had protein and fat, but close to no added sugar. The last part was key. Also portion control, and ensuring I did not eat more than 3 dates in a day, for example.</p>

<p>I’m honestly not sure if that helped, but my legs felt less sore that next day, so I feel it must have done <em>something</em> at least. Thirty minutes before class at 7AM, I popped two dates in my mouth for a quick, carb-rich energy boost. First meal of the day. Then I went to class in my bright-orange Hoka shoes that I’d spent way too much money on, and in sleeveless and shorts. Sleeveless is necessary to reduce a bit of body weight, IMO. It helps a minuscule amount, but I feel it’s more of a psychological thing — same as with shorts that weigh almost nothing. It elevates your mood and helps you get into that mindset and zone that you need to be in. Anyway, signed up first for the treadmill, was a bit nervous going in, but after a brief warmup on the tread, set my target 5:00 mile pace and just ran. At thirty seconds before at around 4:30, I felt I had ammo left in the barrel, so I hitched a ride on second wind and pumped it up to 13.5 MPH. I finished with a 4:57 mile time, so slightly less than my target of 5:00 minute mile, which was awesome.</p>

<p>Felt good about that. Came back, immediately ate a bowl of blueberries, some hand-cut slices of watermelon, a packaged cup of pomegranate from Costco, a <a href="https://www.amazon.com/Rise-Whey-Protein-Bars-Ingredients/dp/B014R5T8TW">Rise protein bar</a> with cinnamon and honey, drank some tea, showered, changed, ate a light brunch at around noon that consisted of an egg, avocado mash, whole grain oatmeal, greek yogurt, and whole wheat bread with nut butter — if memory serves correct. Supplemented with more blueberries and watermelon because my legs were still a bit sore. Went back to work, then again at half an hour before the next gym class, I ate one date. I could have eaten two dates again, but I wanted to limit myself to a maximum of three dates per day for weight control.</p>

<p>Anyway, headed to class at the studio in Reston, and honestly going in to it did not know what my running pace would be this time. I only know that I would better it to test my body and push myself to the limits of what I knew was possible. I started with floor exercises which involved mobility and lifting weights, so I went easy on weight selection. Very soon it was my turn to shine, on the tread. I did a full-motion leg warmup before, though in hindsight I’m not sure if that helped, or that anything could have helped. Running a mile at faster than 5:00 mile pace, that too twice in a day, is bound to take its toll on the body.</p>

<p>In any case, there wasn’t really any gradual “slow-run, gradually up to base pace, then walk it out” warmup this time around, as it was in the morning. We just dived right in. Probably for a short while, like a minute or so before that, I knew what pace I would set and try to maintain. In this case, it turned out to be a 4:45 mile pace I think. On the treadmill that translates roughly to 12.5 MPH @ 1% on incline. So I say the goal was to maintain that, but my body was beat and could not sustain it for long. At around the 3 minute mark, my body was already screaming at me telling it cannot maintain that incredibly exhaustive pace any longer. So I dialed it back to 12.3 MPH. One might say that .2 MPH is hardly a huge difference. The point here was that was more of a psychological move. It might be strange, but indeed somehow it worked. I managed to sustain 12.3 for a whole another minute. At a little past the 4 minute mark I started dying inside, but as the saying goes —</p>

<blockquote>
  <p>When your body screams at you to <strong><em>stop</em></strong>, that’s exactly the point where you should <strong><em>speed up</em></strong>.</p>
</blockquote>

<p>Actually, that’s a nearly-nonsensical quote, which can be attributed to me. I like to think up clever things like that attempt to turn them into action, in order to actually prove the (admittedly nonsensical) saying right.</p>

<p>So at around 4:00 mark, forty-five seconds before when I was expecting to finish, my legs and body and lungs and heart were all unanimously throwing their hands up and screaming at me to stop, because they cannot sustain a second more of it. But based on what I proposed above, the exact point when you should speed up for an “empty the tank” effort, is when your body is about to mutiny or else crash and burn, giving you the middle finger essentially because it cannot put up with your insane demands for a heartbeat longer. This then, is exactly what I did. I dialed it up all the way to 12.9 MPH, just shy of 13 MPH. No reason why I stopped there I suppose, other than I truly don’t think I could have managed even a .1 increase above it.</p>

<p>Anyway, I don’t think I could have sustained even that last burst of speed for the home stretch for a whole 45 seconds, but this dude on the treadmill next to me started cheering me on loudly. If not for that, I don’t think I would have kept going. Sometimes willpower alone is not enough, sometimes the necessary thing is strong words and encouragement from others, even one other. Just as it was in this case. Heart pounding like a wild animal against my chest, breath coming in great gulps of air sucked into my mouth as if through a straw, legs sore and screaming and about to give out, but somehow I made it. Hit the stop button at exactly 1.00 miles reached. Read the one-mile time at 4:47. Honestly was surprised, but also a little disappointed at the same time. I was trying to get better than 4:40 at the least, but I didn’t realize how hard it is to even shave a few seconds off something like a mile time. Also didn’t realize it at the time, but that’s a whole <em>ten seconds</em> faster than my previous record, set earlier by me that selfsame day.</p>

<p>Finally, here’s the long-awaited photo of me, with the 1 Mile leaderboard – not the ultimate version, as it only had participants up until my gym session.</p>

<p><img src="/assets/images/me-1-mile-board.jpg" alt="Me with 1 Mile Board" width="70%" /></p>

<p>For those curious, I added a similar post <a href="https://www.instagram.com/p/C2il8ZCp8Uj">on my Instagram</a> as well.</p>

<h2 id="recap">Recap</h2>

<p>What an experience! Exhausted beyond words, but the words of encouragement and general appreciation from others, felt good to bask in the glow of pride and happiness. Knowing that I wanted to get better than 5:00 minute mile, for no other reason than to prove to myself that I could do it. Honestly I was just competing against myself. The early morning “me” handily beat my goal and ended up with a 4:57. The evening “me” beat even the early morning “me”, and while I did not get my desired time I was shooting for, I got close at 4:47 which is really respectable in itself. In the words of the jovial, burly dude on the treadmill next to me:</p>

<blockquote>
  <p>Running a mile in 5 minutes is just brutal by itself, bro.</p>
</blockquote>

<p>Indeed. Indeed it is. I would never, ever dream of disagreeing with such an eloquently worded statement. Even a five-minute mile is a huge benchmark of sorts, and an amazing achievement in and of itself. I am certainly proud to have beat a personal record of a five-minute mile, and that too for the first time in my life.</p>

<p>Yes, I certainly don’t think I could have envisaged at the young age of 16 or so, that I would ever be able to achieve a 5:00 mile. Much less, a sub- 5:00 mile. But I am glad to know that not only was it possible, but that I achieved my personal goal for the indoor mile run on the tread, and that now I have a new personal record to beat.</p>

<p>To be frank, there are immediately apparent downsides [to doing what I did]. The foremost of which is, it hurts your legs. It hurts them a lot. For me, running an indoor mile twice on the treadmill on the same day, later basically translated into a wrecking ball that came to decimate my legs — particularly my knees and calf muscles. The whole next day, I could barely walk. Indeed I had to walk with a minor limp, because the knee and calf muscles in my left leg were too weak to even bear my weight. The day after that — which is admittedly today — I am somewhat more recovered, but still am not fully there. So all said, I had to give two whole days of rest for my body and for my legs and muscles. Two whole days where I could not do any workouts, regardless of HIIT or strength training. However, hopefully tomorrow I will be feeling good enough to go back to hit the gym — and the treadmill (though planning to take it easy there for a few days at the least).
<em>Update</em>: even Thursday was a no-go. The opportunity presented itself, but I chickened out and went for strength training instead; in my defense, it was late in the day. So looks like three whole days of rest. Friday morning will be a green light and a re-exploratory foray into the tread for me.</p>

<p>All said, was it worth it? Honestly, it was because like I said it was a personal goal, and in large part I was only really competing against myself. In a smaller part, I would not be entirely truthful if I did not say that it was fun to compete with other members at Orangetheory Fitness as well.</p>

<p>There were other similar times, some great runners out there. I enjoy checking out the leaderboards at various studios. One dude (in a land far away) got a 4:28 mile. Holy <em>cow</em>! Imagine how wrecked his legs must be now. Hope it’s not too bad though. I saw another dude at my gym studio get a sub-5 minute mile. I am still at #1 position on the one mile leaderboard, at least in my gym and local area. So certainly, that helps too. My legs might be beat for a day or more, but I certainly 100% think it was worth it, just to set a new personal best, and to prove to myself and to my body and mind that it’s possible to get a sub- 5 minute mile – also on a smaller level, to prove this to others and to community as a whole as well. I certainly agree and feel that it’s worth it for that alone.</p>]]></content><author><name>Ritvik Nag</name><email>me@ritviknag.com</email></author><category term="blog" /><category term="run" /><category term="running" /><category term="treadmill" /><category term="one mile" /><category term="orangetheory" /><category term="mile run" /><category term="fitness" /><summary type="html"><![CDATA[Two sub-5:00 miles, one treadmill, and legs that barely survived — my most intense fitness challenge yet.]]></summary></entry><entry><title type="html">New Year, New Blog Theme</title><link href="https://ritviknag.com/blog/new-year-new-blog-theme/" rel="alternate" type="text/html" title="New Year, New Blog Theme" /><published>2024-01-21T23:40:00-05:00</published><updated>2024-01-21T23:40:00-05:00</updated><id>https://ritviknag.com/blog/new-year-new-blog-theme</id><content type="html" xml:base="https://ritviknag.com/blog/new-year-new-blog-theme/"><![CDATA[<p>New year, new blog theme — and a snowstorm to stir things up. What began as a spontaneous idea turned into an all-night website overhaul, full of bugs, stubbornness, small wins, and too much tea. This isn’t a tutorial. It’s more of a ramble. But if you’ve ever faced a blank screen and felt stuck in your head, maybe you’ll find a kindred spirit here.</p>

<p>Keep reading if you’re curious how a minor blog refresh turned into a full-on winter escape plan — and what happens when you stop waiting for perfection and just… begin.</p>

<hr />

<p>So — new year, new me.<br />
And hey, new blog theme too.</p>

<p>I finally ditched <code class="language-plaintext highlighter-rouge">minima</code>, the classic theme that everyone and their Jekyll-using cousin starts with. It’s solid. But I wanted something more… expressive. A site that felt like me. Or at least, a version of me.</p>

<p>Now I’m using <code class="language-plaintext highlighter-rouge">minimal-mistakes</code>. I’ve known about it for a while — kept meaning to try it, then kept not doing it. Classic. It wasn’t until a snowed-in Friday, a colleague calling it a “POW day” (prisoner of weather, not war), that I cracked and gave in. One part boredom, one part stubborn spark. I figured, why not?</p>

<p>It started with updating a config file. Then cloning the starter repo. Then spiraling into a full migration until 5:30AM. Somewhere between the third cup of tea and fixing my navigation bar, I realized I was having fun. Or something like it. Not quite joy — more like gritty satisfaction.</p>

<p>I won’t lie — there were bugs. Lots of them. Timestamps, tags, formatting. My posts felt like fragile paper houses and I was the wind. But piece by piece, things clicked into place. The new homepage looks like how I’d always imagined it: clean, personal, a little mysterious.</p>

<p>Now there’s a table of contents. Reading time estimates. A comment system. Even share buttons — including custom ones for WhatsApp and Email (which I had to hack in myself). I spent way too long tweaking those icons. But now they sparkle. They <em>work</em>. There’s pride in that.</p>

<p>Is it perfect? No. It’s not supposed to be. It’s meant to breathe. To give me space to write — even messily — without overthinking the frame it lives in.</p>

<p>This wasn’t a redesign. It was a reset. A little back massage for the blog, done entirely for me. Because sometimes, the most satisfying kind of progress is quiet and unseen — but you feel it all the same.</p>

<p>Thanks for reading. I’ve got a fitness benchmark tomorrow. Let’s hope I survive it.</p>]]></content><author><name>Ritvik Nag</name><email>me@ritviknag.com</email></author><category term="blog" /><category term="new year" /><category term="2024" /><category term="new blog" /><category term="winter" /><summary type="html"><![CDATA[One snowed-in night, I gave my blog a full makeover. What started as boredom became a reset — and maybe, a quiet little revolution.]]></summary></entry><entry><title type="html">It’s Finally Here!</title><link href="https://ritviknag.com/blog/its-finally-here/" rel="alternate" type="text/html" title="It’s Finally Here!" /><published>2022-09-28T16:24:03-04:00</published><updated>2022-09-28T16:24:03-04:00</updated><id>https://ritviknag.com/blog/its-finally-here</id><content type="html" xml:base="https://ritviknag.com/blog/its-finally-here/"><![CDATA[<p>Hooray 🎉 — it’s finally live!</p>

<p>After far too many false starts and “I’ll get to it next week” moments, I’ve published my first personal site. It’s a humble beginning — more digital garden than polished showcase — but one I’m happy to tend to, slowly and intentionally.</p>

<p>This corner of the web exists for a mix of reasons: to host thoughts and tips I don’t want lost to time, to point toward things I’ve built or maintained, and maybe to capture a bit of who I am along the way — without giving away the whole story.</p>

<p>There’s a blog, of course, and perhaps a project or two worth exploring. One day it may take the shape of a more traditional portfolio. Or not. I’m still figuring that out, and I don’t mind the ambiguity.</p>

<p>So if you’ve somehow landed here — whether by curiosity, accident, or the whims of a search engine — welcome. Take a look around. Or don’t. This place will still be here, quietly growing, whenever you decide to return.</p>

<p>And as they’re <a href="https://www.youtube.com/watch?v=rjQtzV9IZ0Q">fond of saying</a>:</p>

<blockquote>
  <p>“That’ll do, pig. That’ll do.”</p>
</blockquote>]]></content><author><name>Ritvik Nag</name><email>me@ritviknag.com</email></author><category term="blog" /><category term="first" /><category term="website" /><summary type="html"><![CDATA[Hooray 🎉 — it’s finally live!]]></summary></entry></feed>